Home
Acer
Laptop
Aspire 4352
Acer Aspire 4352 User Manual
4
of 1
of 1 rating
224 pages
Give review
Manual
Specs
To Next Page
To Next Page
To Previous Page
To Previous Page
Loading...
Machine Maintenance
3-27
Removing the Power Button Board
0
1.
Perform th
e “
Removing the Palmrest Module/Upper
Case
” procedure described on
pag
e
3-21
.
2.
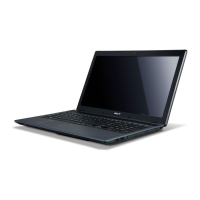
Remove the adhesive t
ape securing the power b
utton board.
Figure 3-35.
Power Button Adhesive
T
ape
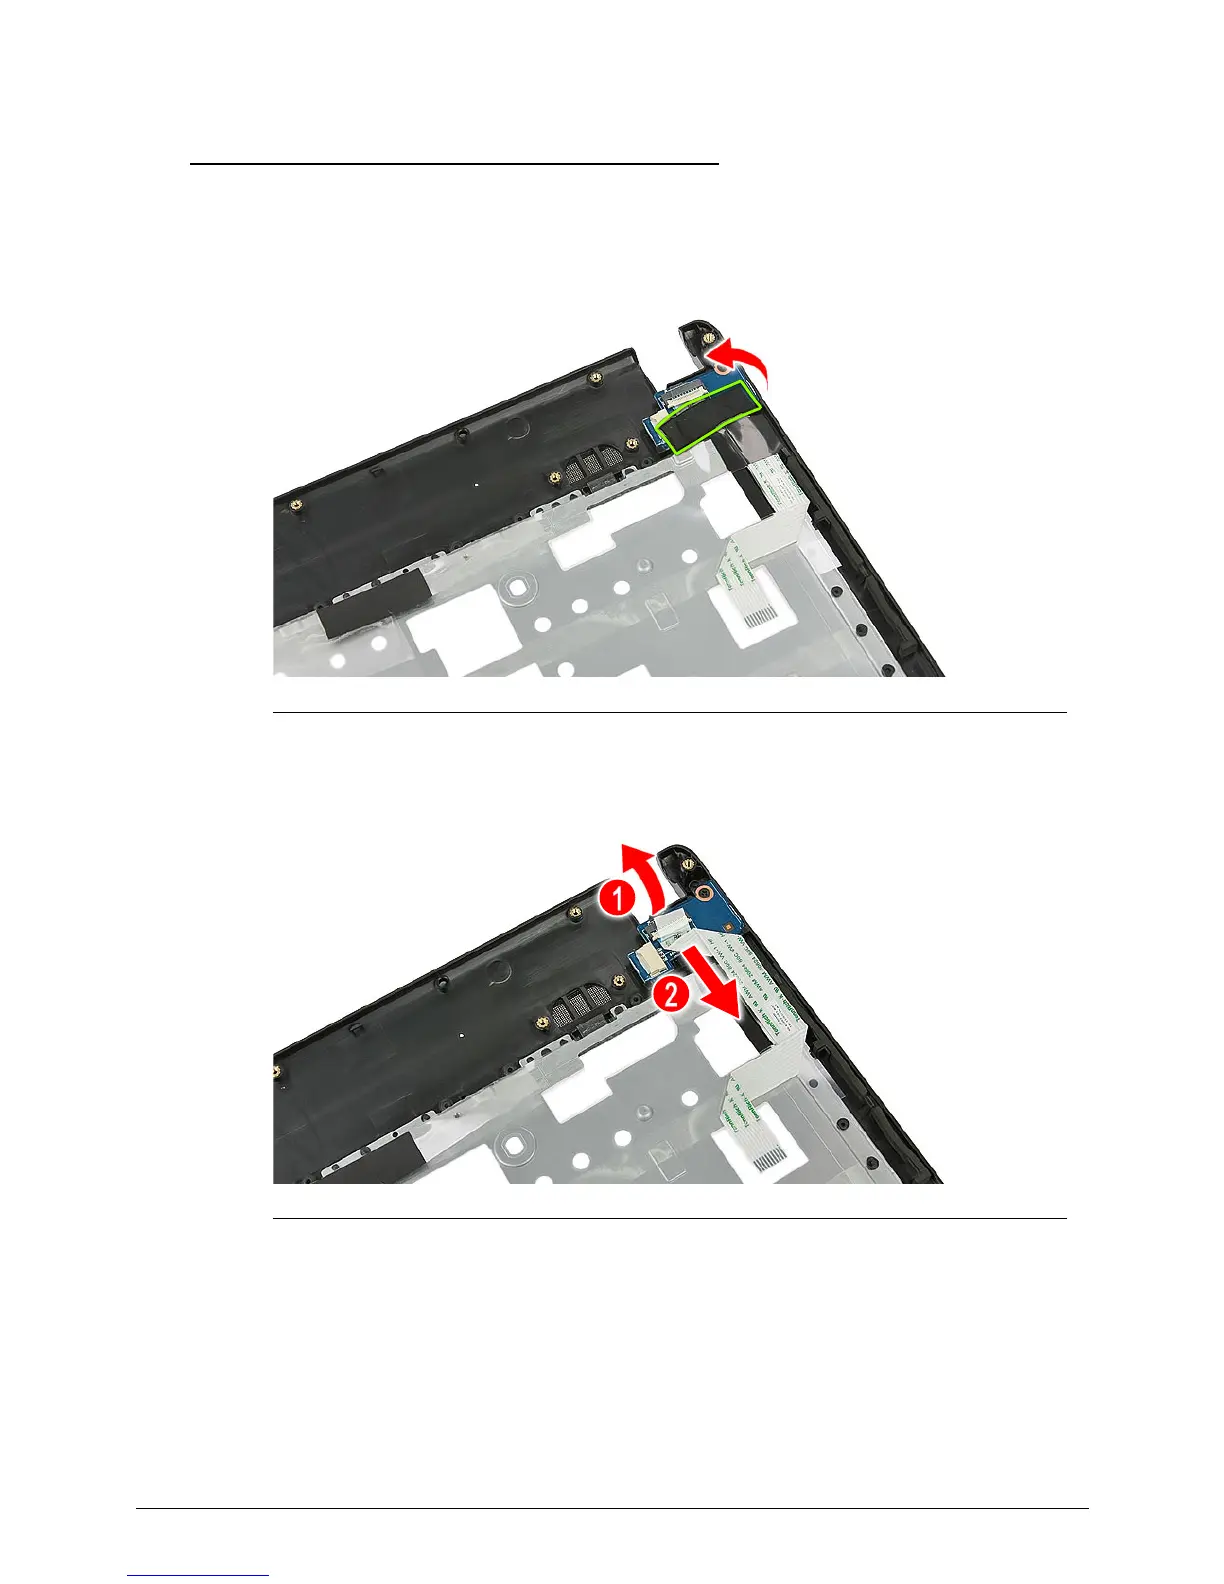
3.
Open the connector la
tch for the power butto
n
board (1) an
d then disconnect the
cable (2).
Figure 3-36.
Power Button Cable
94
96
Table of Contents
Aspire 4752/4752G/4752Z/4752Zg/4352/4352G Chapter 1 Hardware Specifications
5
Revision History
2
General Information
4
Table of Contents
5
Table of Contents
13
CHAPTER 1 Hardware Specifications
15
Features
15
Display
15
Graphics
15
Operating System
15
Platform
15
System Memory
15
Audio Subsystem
16
Storage Subsystem
16
Hard Disk Drive
16
Communication
17
Keyboard and Pointing Device
17
Power Adapter and Battery
17
Privacy Control
17
I/O Ports
18
Software and Tools
18
Dimensions and Weight
20
Environment
20
Optional Items
20
Warranty
20
Notebook Tour
21
Open Front View
21
Close Front View
23
Left View
24
Right View
25
Base View
26
Touchpad Basics
27
Keyboard
28
Windows Keys
29
D2D Recovery
32
System Block Diagram
32
Specification Tables
33
Processor Specifications
35
Card Reader
41
LCD Panel
42
Supported Display Resolutions
42
Audio Codec
43
Audio Interface
43
Webcam
43
Lan
44
Wireless LAN
44
Bluetooth
44
USB Interface
45
HDMI Port
45
Expansion Card
45
System LED Indicators
45
Battery Pack
46
AC Adapter
46
System Power Management
47
System DMA Specification
47
Chapter 2 System Utilities
52
BIOS Setup Utility
53
Navigating the BIOS Utility
53
BIOS Menus
54
Removing a Password
58
Setting a Password
58
Changing a Password
59
BIOS Flash Utilities
62
DOS Flash Utility
63
Winflash Utility
63
Remove HDD/BIOS Password Utilities
64
Removing the HDD Password
64
Removing the BIOS Passwords
65
Clearing the BIOS Passwords
66
Using DMI Tools
67
LAN EEPROM Utility
67
Table of Contents
70
Machine Disassembly and Replacement
73
Recommended Equipment
73
Replacement Requirements
73
Pre-Disassembly Instructions
74
Disassembly Process
75
External Module Disassembly Process
76
External Modules Disassembly Flowchart
76
Removing the Battery Pack
77
Removing the ODD Module
78
Removing the Back Cover
80
Removing the HDD Module
81
Removing the WLAN Module
83
Removing the Memory Modules
85
Removing the Keyboard
86
Main Unit Disassembly Process
88
Main Unit Disassembly Flowchart
88
Removing the Palmrest Module/Upper Case
89
Removing the Touchpad Board
92
Removing the Left & Right Speakers
93
Removing the Power Button Board
95
Removing the USB Board
97
Removing the Bluetooth Module
98
Removing the RTC Battery
99
Removing the Mainboard
100
Removing the Thermal Module
102
Removing the CPU
104
Removing the LCD Module
105
LCD Module Disassembly Process
107
LCD Module Disassembly Flowchart
107
Removing the LCD Bezel
108
Removing the LCD Panel
110
Removing the Camera Board
112
Removing the Microphone
113
Removing the Antenna Cable
114
Removing the LCD Brackets
115
Removing the LCD FPC Cable
116
LCD Module Reassembly Process
117
Replacing the Antenna Cable
117
Replacing the Microphone
118
Replacing the Camera Board
119
Replacing the LCD FPC Cable
120
Replacing the LCD Brackets
121
Replacing the LCD Panel
122
Replacing the LCD Bezel
124
Main Unit Reassembly Process
126
Replacing the LCD Module
126
Replacing the CPU
128
Replacing the Thermal Module
129
Replacing the Mainboard
131
Replacing the RTC Battery
133
Replacing the Bluetooth Module
134
Replacing the USB Board
135
Replacing the Power Button Board
136
Replacing the Left & Right Speakers
138
Replacing the Touchpad Board
140
Replacing the Palmrest Module/Upper Case
141
External Module Reassembly Process
144
Replacing the Keyboard
144
Replacing the Memory Modules
146
Replacing the WLAN Module
147
Replacing the HDD Module
149
Replacing the Base Cover
151
Replacing the ODD Module
152
Replacing the Battery Pack
154
Chapter 4 Troubleshooting
156
Default Chapter
157
General Information
157
Power on Issues
158
No Display Issues
159
Abnormal Video
160
LCD Failure
161
Keyboard Failure
162
Touchpad Failure
163
Internal Speaker Failure
164
Microphone Failure
166
USB Failure
167
WLAN Failure
168
Bluetooth Failure
169
Card Reader Failure
170
Thermal Unit Failure
171
Other Functions Failure
172
Introduction
157
Intermittent Problems
173
Undetermined Problems
173
Error Codes
174
BIOS Beep Codes
175
POST Codes
180
Component Codes
180
Progress Codes
185
CHAPTER 5 Jumper & Connector Locations
188
Mainboard Layout
188
Clearing Password Check and BIOS Recovery
188
Clearing the BIOS Passwords
188
Jumper and Connector Locations
189
Mainboard Layout
189
Clearing the Bios Passwords
192
Performing a BIOS Recovery
192
Performing a Bios Recovery
193
Exploded Diagrams
196
FRU List
196
LCD Assembly
196
FRU List
197
Main Assembly
198
Lcd Assembly
200
Microsoft Windows 7 Environment Test
216
Online Support Information
223
CHAPTER 6 Fru List
201
CHAPTER 7 Test Compatible Components
215
4
Based on 1 rating
Ask a question
Give review
Questions and Answers:
Need help?
Do you have a question about the Acer Aspire 4352 and is the answer not in the manual?
Ask a question
Acer Aspire 4352 Specifications
General
Storage
320 GB / 500 GB HDD
Display
14-inch HD (1366 x 768)
Operating System
Windows 7 Home Premium
Battery
6-cell Li-ion
Dimensions
342 x 245 mm
Related product manuals
Acer Aspire 4350
150 pages
Acer Aspire 4315
154 pages
Acer Aspire 4349
223 pages
Acer Aspire 4330
11 pages
Acer ASPIRE 4333
168 pages
Acer Aspire 4320
113 pages
Acer Aspire 4339
315 pages
Acer Aspire 4310
112 pages
Acer Aspire V5-431
2484 pages
Acer Aspire E1-431
251 pages
Acer Aspire E1-430
103 pages
Acer Aspire V5-431P
3492 pages
 Loading...