1
2
3
4
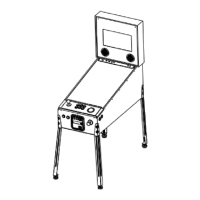
Arcade Control Panel
(included)
Phillips head screwdriver
(not included)
Warranty Info
The manufacturer warrants this product to be free and clear of
defects in the materials and workmanship, under normal
residential use and conditions, for a period of ninety (90) days
from the original invoice date. Shipping and handling fees are to
be paid for by the customer. To make a warranty claim, please
submit a service request here:
https://www.atgames.net/arcades/contact
Standard warranty coverage for the AtGames Arcade Control
Panel does not apply to and is considered invalid due to misuse,
improper maintenance, self-repair, tampering, or invasive
hardware modifications of any kind, and damages or dysfunction
caused by shipping or non-manufacturing related causes.
Note: Standard warranty services are valid with receipt from an
authorized retailer. Purchases through third-party sellers and
resellers do not fall under the standard warranty program. For
warranty support, please contact the third-party seller or reseller
where you purchased the product.
This equipment has been tested and found to comply with the
limits for a Class B digital device, pursuant to Part 15 of the FCC
Rules. These limits are designed to provide reasonable protection
against harmful interference in a residential installation. This
equipment generates, uses and can radiate radio frequency
energy and, if not installed and used in accordance with the
instructions, may cause harmful interference to radio
communications. However, there is no guarantee that interference
will not occur in a particular installation. If this equipment does
cause harmful interference to radio or television reception, which
can be determined by turning the equipment off and on, the user
is encouraged to try to correct the interference by one or more of
the following measures:
• Reorient or relocate the receiving antenna.
• Increase the separation between the equipment and receiver.
• Connect the equipment into an outlet on a circuit different from
that to which the receiver is connected.
• Consult the dealer or an experienced radio/TV technician
for help.
Changes or modifications not expressly approved by the party
responsible for compliance could void the user’s authority to
operate the equipment.
This device complies with Part 15 of the FCC Rules. Operation is
subject to the following two conditions:
(1) this device may not cause harmful interference, and
(2) this device must accept any interference received, including
interference that may cause undesired operation.
CAN ICES‐3 (B)/NMB‐3(B)
• Do not submerge the device in water or expose it to extreme
heat or to strong magnetic fields. Doing so may cause
permanent damage to your device.
• Always use a dry towel to clean the device.
• Transformers are suitable for indoor use only. Transformers and
power supplies for toys are not intended to be used as toys, and
the use of these products by children shall be under the full
supervision of parents.
USB port
Haptic feedback speaker cable
1
2
7
3
5
4
6
8
9
10
Joystick
X button
Y button
Z button
5
6
A button
B button
C button
Trackball
7
8
9
10
USB port
3 screws on the front
10 screws on the side panels
Haptic feedback
speaker cable
Haptic feedback speaker cable
D-pad cable port
Step 3. Place the Arcade Control Panel over the original control
top. Take the USB cable from the inner side of the pinball machine
and connect both that and the haptic feedback speaker cable to
the Arcade Control Panel.
Step 4. Repeat Step 1 in reverse to re-assemble the machine. Place
the left and right side panels back to their original positions by the
main display and secure them with the 10 screws. Once both left
and right side panels are reattached, replace the front panel and
fasten with the 3 screws.
Step 1. Use a Phillips head screwdriver to remove the 3 screws on the
front of the apron. Remove all 10 screws on the side panels to the left
and right of the main display. Put all screws and panels aside.
Step 2. Remove the screws and lift up the original control top.
Carefully detach the D-pad connecting cable and haptic feedback
speaker cable. Remove the screws holding the USB cable.
Safety Notice
FCC Statement
Assembly Steps
2
2
3
3
5
4
1
1
7
6
8
9
10
Tools/Parts Required
Arcade Control Panel Features
FRONT
BACK
Note: Be careful not to tug or pull on the
haptic cable while you are connecting.
1
2
3
4
© 2023 AtGames Interactive
www.atgames.net
PO Box 1691, El Segundo, CA 90245
All rights reserved.
*Content and images are for reference only and subject to change.
The trademarks and images are the properties of their respective owners. © 2023 AtGames
Made in China
www.atgames.us
Please find the most updated product info at www.atgames.us.
For customer service, warranty info, and technical support please find us here:
https://www.atgames.net/arcades/contact/