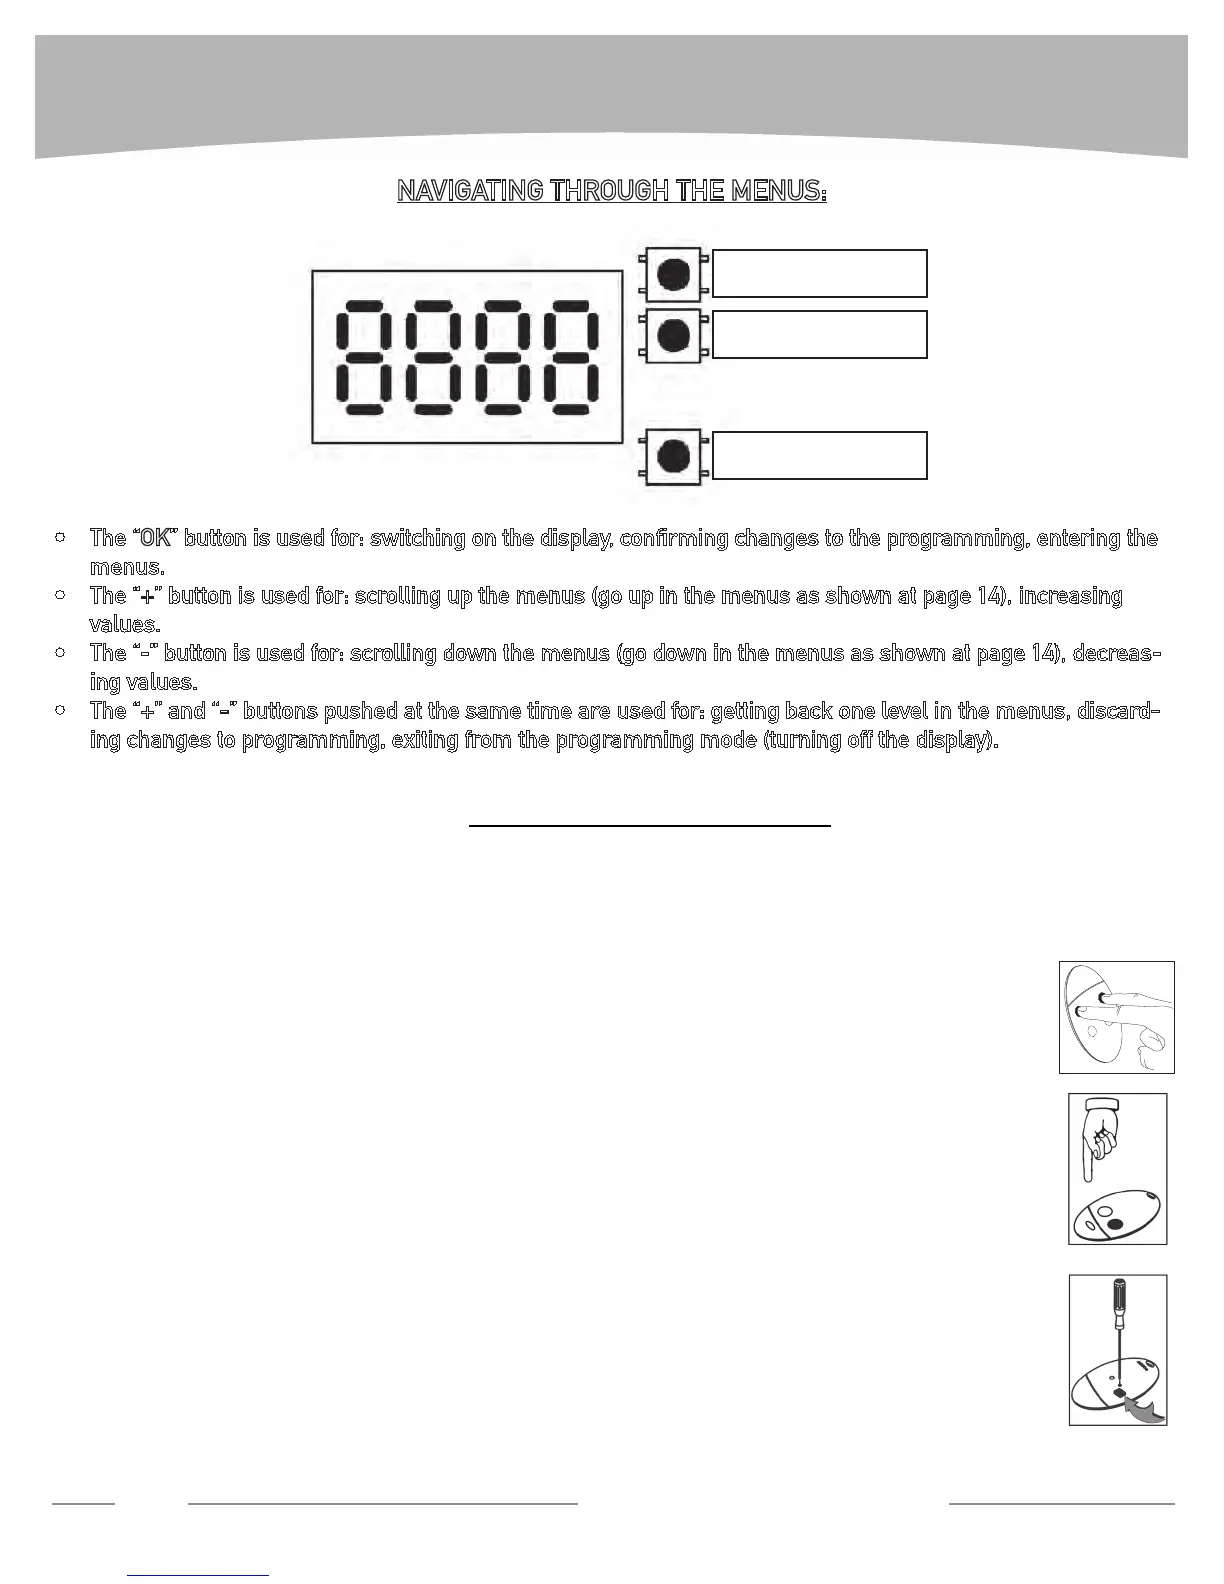
NAVIGATING THROUGH THE MENUS:
The “• OK” button is used for: switching on the display, conrming changes to the programming, entering the
menus.
The “• +” button is used for: scrolling up the menus (go up in the menus as shown at page 14), increasing
values.
The “• -” button is used for: scrolling down the menus (go down in the menus as shown at page 14), decreas-
ing values.
The “• +” and “-” buttons pushed at the same time are used for: getting back one level in the menus, discard-
ingchangestoprogramming,exitingfromtheprogrammingmode(turningoffthedisplay).
FINALIZINGTHEINSTALLATION:
• Turnthepowerofftothecontrolboard.
• Connectanyexternalcontroldeviceaccordingtowiringdiagramonpage16.
• Turnonpowertocontrolboard.CheckredpowerlightonDeimosBTcontrolboard.
ADDING TRASMITTERS TO THE RECEIVER
Turn on the display (by pressing twice the “1. OK” button).
Scroll down (“2. -“ button) to “Radio” menu and press “OK”.
The display will show “3. Add Start”. Press “OK”.
The display will show “4. Hidden button”. Press the hidden button of the transmit-
ter you want to store as shown in Fig. 13.
The display will show “5. Desired button”. Press the button you want to activate
the gate with as shown in Fig. 14.
The display will show “6. Add Start”, repeat the procedure from step # 3 to install
other transmitters.
Switch off the display by pressing “7. +” and “-” buttons at the same time twice.
CONTROL BOARD QUICK PROGRAMMING
12
Technical Support: 1-877-995-8155
+ BUTTON
- BUTTON
OK BUTTON
FIG. 13
FIG. 14
Technical Support: 877-995-8155 13
CONTROL BOARD QUICK PROGRAMMING
NAVIGATING THROUGH THE MENUS:
• The “OK” button is used for: switching on the display, conrming changes to the
programming, entering the menus.
• The “+” button is used for: scrolling up the menus (go up in the menus as shown on page
15), increasing values.
• The “-” button is used for: scrolling down the menus (go down in the menus as shown on
page 15), decreasing values.
• The “+” and “-” buttons pushed at the same time are used for: getting back one level in the
menus, discarding changes to programming, exiting from the programming mode (turning
off the display).
FINALIZING THE INSTALLATION:
• Turn off power to the control board.
• Connect any external control device according to wiring diagram on page 17.
• Turn on power to control board. Check red power light on Libra
control board.
ADDING TRANSMITTERS TO THE RECEIVER
1. Turn on the display (by pressing twice the “OK” button).
2. Scroll down(“-”button) to “RADIO” menu and press “OK”.
3. The display will show “ADD START”. Press “OK”
4. The display will show “HIDDEN BUTTON”. Press the two front buttons
of the transmitter at the same time as shown on Fig. A.
Note: Older models will have the hidden button on the back side of the
transmitter as shown on Fig. C.
5. The display will show “DESIRED BUTTON”. Press the button you want
to activate the gate with as shown on Fig. B.
6. The display will show “ADD START” . Repeat the programming
procedure from step #3 to install other transmitters.
7. Switch off the display by pressing “+” and “-” buttons at the
same time twice.
Fig. A
Fig. B
Fig. C
NAVIGATING THROUGH THE MENUS:
• The “OK” button is used for: switching on the display, conrming changes to the programming, entering the
menus.
• The “+” button is used for: scrolling up the menus (go up in the menus as shown on page 15), increasing values.
• The “-” button is used for: scrolling down the menus (go down in the menus as shown on page 15), decreasing
values.
• The “+” and “-” buttons pushed at the same time are used for: getting back one level in the menus, discarding
changes to programming, exiting from the programming mode (turning off the display).
FINALIZING THE INSTALLATION:
• Turn off power to the control board.
• Connect any external control device according to wiring diagram on page 16.
• Turn on power to control board. Check red power light on Libra control board.
ADDING TRANSMITTERS TO THE RECEIVER
1. Turn on the display (by pressing twice the “OK” button).
2. Scroll down(“-”button) to “RADIO” menu and press “OK”.
3. The display will show “ADD START”. Press “OK”
4. The display will show “HIDDEN BUTTON”. Press the two front buttons
of the transmitter at the same time as shown on Fig. A.
Note: Older models will have the hidden button on the back side of the
transmitter as shown on Fig. C.
5. The display will show “DESIRED BUTTON”. Press the button you want
to activate the gate with as shown on Fig. B.
6. The display will show “ADD START” . Repeat the programming
procedure from step #3 to install other transmitters.
7. Switch off the display by pressing “+” and “-” buttons at the
same time twice.
Fig. A
Fig. B
Fig. C
 Loading...