HELPLINE NO 08448012949
13
ORIGINAL INSTRUCTIONS
8. SETTING THE CUTTING DEPTH
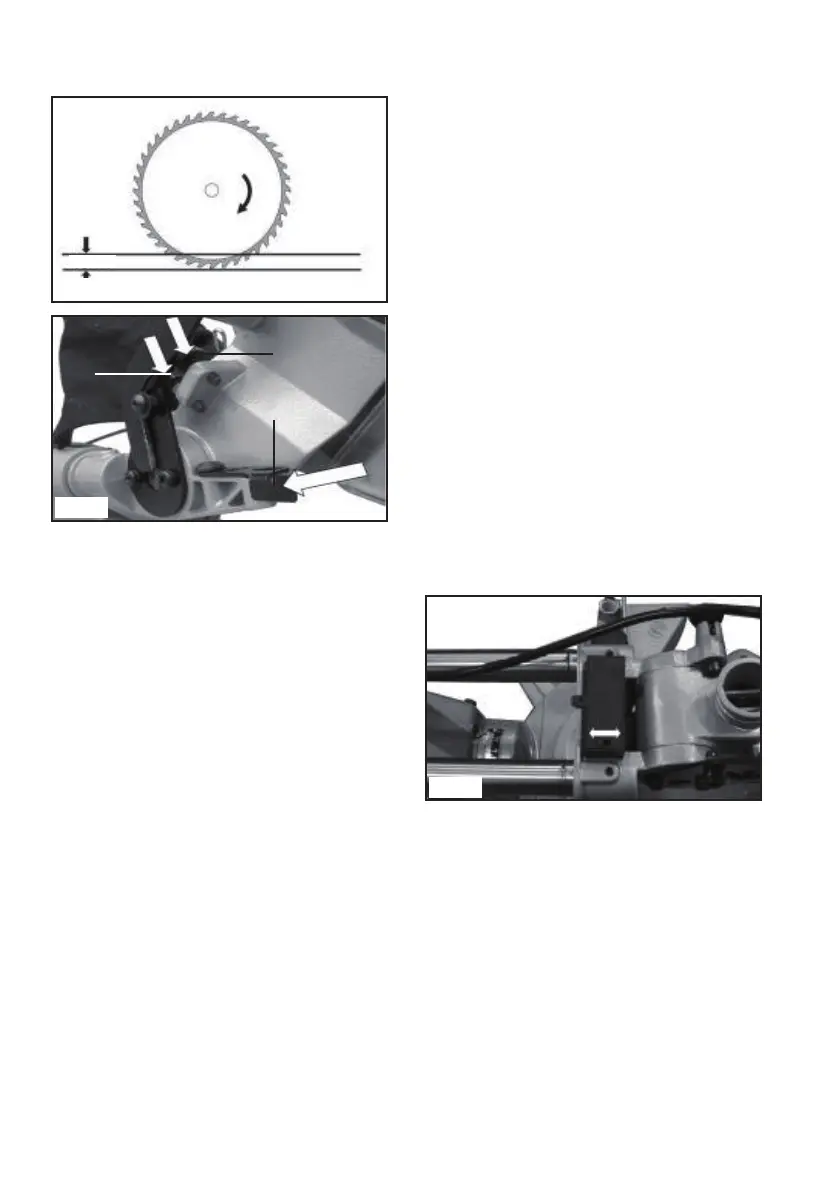
(See K1, K2)
15mm
Fig. K1
e2
f
e1
Fig. K2
The maximum cutting depth of the blade
must be set to make sure that it does not
come into contact with the bed of the saw.
1. Lower the cutting arm as far as it will go
and hold it down on the stop.
2. Lock the bevel lock lever in the 0°
position.
3. Securely tighten the bevel lock lever and
the slide rod securing knob.
4. Rotate the blade by hand to make sure
that it moves freely.
5. The correct blade depth should allow for
the blade to be 15mm below the upper level
of the kerf plate at the fence position. (See
K1)
6. If the blade is not in this position, it should
be adjusted as follows.
1) Undo the locking nut (e1) and turn the
blade depth adjusting screw until the blade
is 15mm below the upper level of the rotary
table slot (See K1).
2) Screw the adjusting screw in, if the blade
needs to be raised.
3) Screw the screw out, if the blade needs
to be lowered.
When the blade has been set to the lowest
cutting depth, securely tighten the lock nut.
There is also a secondary depth stop, it can
also be used for partial through cutting.
To do the trench cutting, proceed as follows:
1) Pull out the depth stop lever (f).
2) Loosen the trench depth adjusting locking
nut (e2).
3) Adjust the partial cut depth partial cut
depth stop until the required depth setting is
achieved.
(i.e lower cutting arm until adjusting bolt
touches the top of the depth stop lever.)
4) Screw the adjusting bolt in, if the blade
needs to be raised.
5) Screw the bolt out, if the blade needs to
be lowered.
6) Tighten the trench depth adjusting locking
nut.
7) Return the depth stop lever to its original
position when not in use.
9. OPERATION INSTRUCTION OF LASER
GUIDE (See L1, L2)
Fig. L1
The laser guide (20) equipped with this
machine is for the purpose of precision
cutting. Make sure the batteries are tted in
the laser guide before carrying out precision
cutting. To t the batteries, remove the
battery storage cover, insert 2 x 1.5V AAA
batteries, then replace cover.
Note: Ensure correct battery polarity.
To use the laser guide, simply slide the laser
on/off switch at the “I” position, the laser
guide then projects a visible red line on the
workpiece surface, make your cut along the
 Loading...