DIESEL AUTOHEAT
Steps:-
1. Locate the cable from the existing controller to the heater. Normally within 300mm of the existing controller there will be a
cable join or a connector.
2. Remove this connection. You should now have the cable from the heater with 3 wires (normally Red, Black & Blue) (if round
connector is tted to loom you can simply plug in to it) or use adaptor to rectangle connector
3. Once new controller has been tted, connect the cable loom from it to the existing 3 wires. Red to red, black to black and
white to blue. (These colours may differ) Call us on 01555 728515 for assistance if required.
4. Reconnect large connector block and replace inline fuse to heater.
5. New WiFi controller should now power up. Now follow the correct connection type below.
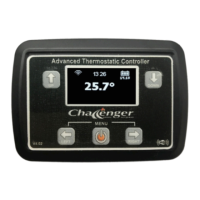
The Challenger WiFi controller is a fully capable communications device. It can operate as an independent WiFi server
( It creates it’s own local WiFi network) or as an access point to your chosen internet connected WiFi router.
(3) ONCE CONNECTED TO EITHER METHOD PROCEED WITH SETUP.
From the menu at the top left of your device screen, select System Settings. Now press the enable button. You will need to
input the password 4682. Now again from the menu, select Fuel Mixture Settings. These need to be changed to the standard
defaults for the size of your heater. Please ensure you set correctly, options are displayed in user manual!
Now set the Heat demand mode - Comfort is advised with a 2° window for normal use with the exception of Cyclic Mode.
** FAILURE TO ADD CORRECT FUEL SETTINGS CAN CAUSE DAMAGE TO YOUR HEATER. **
From the menu, now select Date /Time. Once displayed, press Update Time Button to set your new controller to the correct time
from your connected device.
Temperature sensor:
Your new Ignite controller can have multiple temperature sensors, the default on board temperature sensor
will need to be offset to give a more accurate in vehicle temperature reading. We recommend that the new
Ignite controller is placed in the vehicle for approx 15 minutes to allow it to acclimatise. From an independent
temperature gauge, take a reading and then offset the onboard temperature sensor to match your
independent gauge. Under normal circumstances the offset should be around -7.5 (minus) to allow for heat
within the actual Ignite casing. This only needs to be completed once on rst installation.
From the menu, now select Home. The main screen will now be displayed. To start your heater, press the
centre of the temperature dial.
Allow heater to start, monitoring both the controller and your device and follow user manual.
(1) DIRECT WIFI CONNECTION (NO Internet) TO Mobile device (phone / tablet)
1. On your mobile device connect to the Challenger wi network. Password is located on rear of the controller and on the
instruction manual and above. (SETTINGS, WIFI CONNECTIONS ON YOUR MOBILE DEVICE)
2. Once connected to the WiFi network, open your browser and go to 192.168.4.1 Save this page to your desktop. NOW
JUMP TO 3 ONCE CONNECTED IF YOU ARE NOT CONNECTING TO AN EXISTING WIFI ROUTER.
Add your displayed STA IP address here:
09012022-V4.0.2-UK-RC1
Controller SSID and
password
Prior to commencing installation, please ensure that you:-
1. Take a note of your existing controllers fuel settings, Pump Min, Pump Max, Fan Min and Fan Max
2. Remove the inline fuse for the heater and unplug the large connector block at the heater. DO NOT POWER YOUR
HEATER again until STEP 4 in these instructions. Please follow correct setup instructions depending on your
installation WiFi connection type.
(2) CONNECT TO EXISTING INTERNET CONNECTED WIFI NEWORK OR PERSONAL HOTSPOT FROM YOUR
DEVICE
1. Complete 1 above (Direct Wi connection)
2. On the controller press the right arrow 4 times, press up arrow to move to System Settings, press right arrow 4 times.
Now press the up arrow to change the mode to CFG AP only, once changed, press the middle button and save.
Controller will now reboot. Connect to Challenger network entering WiFi password on case.
WiFi cong screen should now appear., Press congure wi button, Select your WiFi network
and add your password. Now save. Controller will reboot again
3. From the controller again press the right arrow to navigate back to the Wi Settings, note the
STA IP address in the box as shown.
4. On your mobile device input the noted STA IP address address in your browser, you will then be
presented with the Challenger WiFi main screen. Book mark this address or save to your desktop for easy repeat access.
PMin PMax Fan Min Fan Max
User Manual

 Loading...