Americas Headquarters
Cisco Systems, Inc.
170 West Tasman Drive
San Jose, CA 95134-1706
USA
http://www.cisco.com
Tel: 408 526-4000
800 553-NETS (6387)
Fax: 408 527-0883
Cisco, Cisco Systems, the Cisco logo, and the Cisco Systems logo are registered trademarks or
trademarks of Cisco Systems, Inc. and/or its affiliates in the United States and certain other
countries. All other trademarks mentioned in this document or Website are the property of their
respective owners. The use of the word partner does not imply a partnership relationship between
Cisco and any other company. (0705R)
© 2009 Cisco Systems, Inc. All rights reserved.
Printed in the USA on recycled paper containing 10% postconsumer waste.
78-18969-01
Before You Begin
To prepare the router for installation do the following:
• Obtain the setup information for your specific type of Internet connection
from your Internet Service Provider (ISP).
• Power off all of your network hardware, including the router, PCs, and cable
modem or DSL modem.
Installation
Perform the steps in this section to install the hardware.
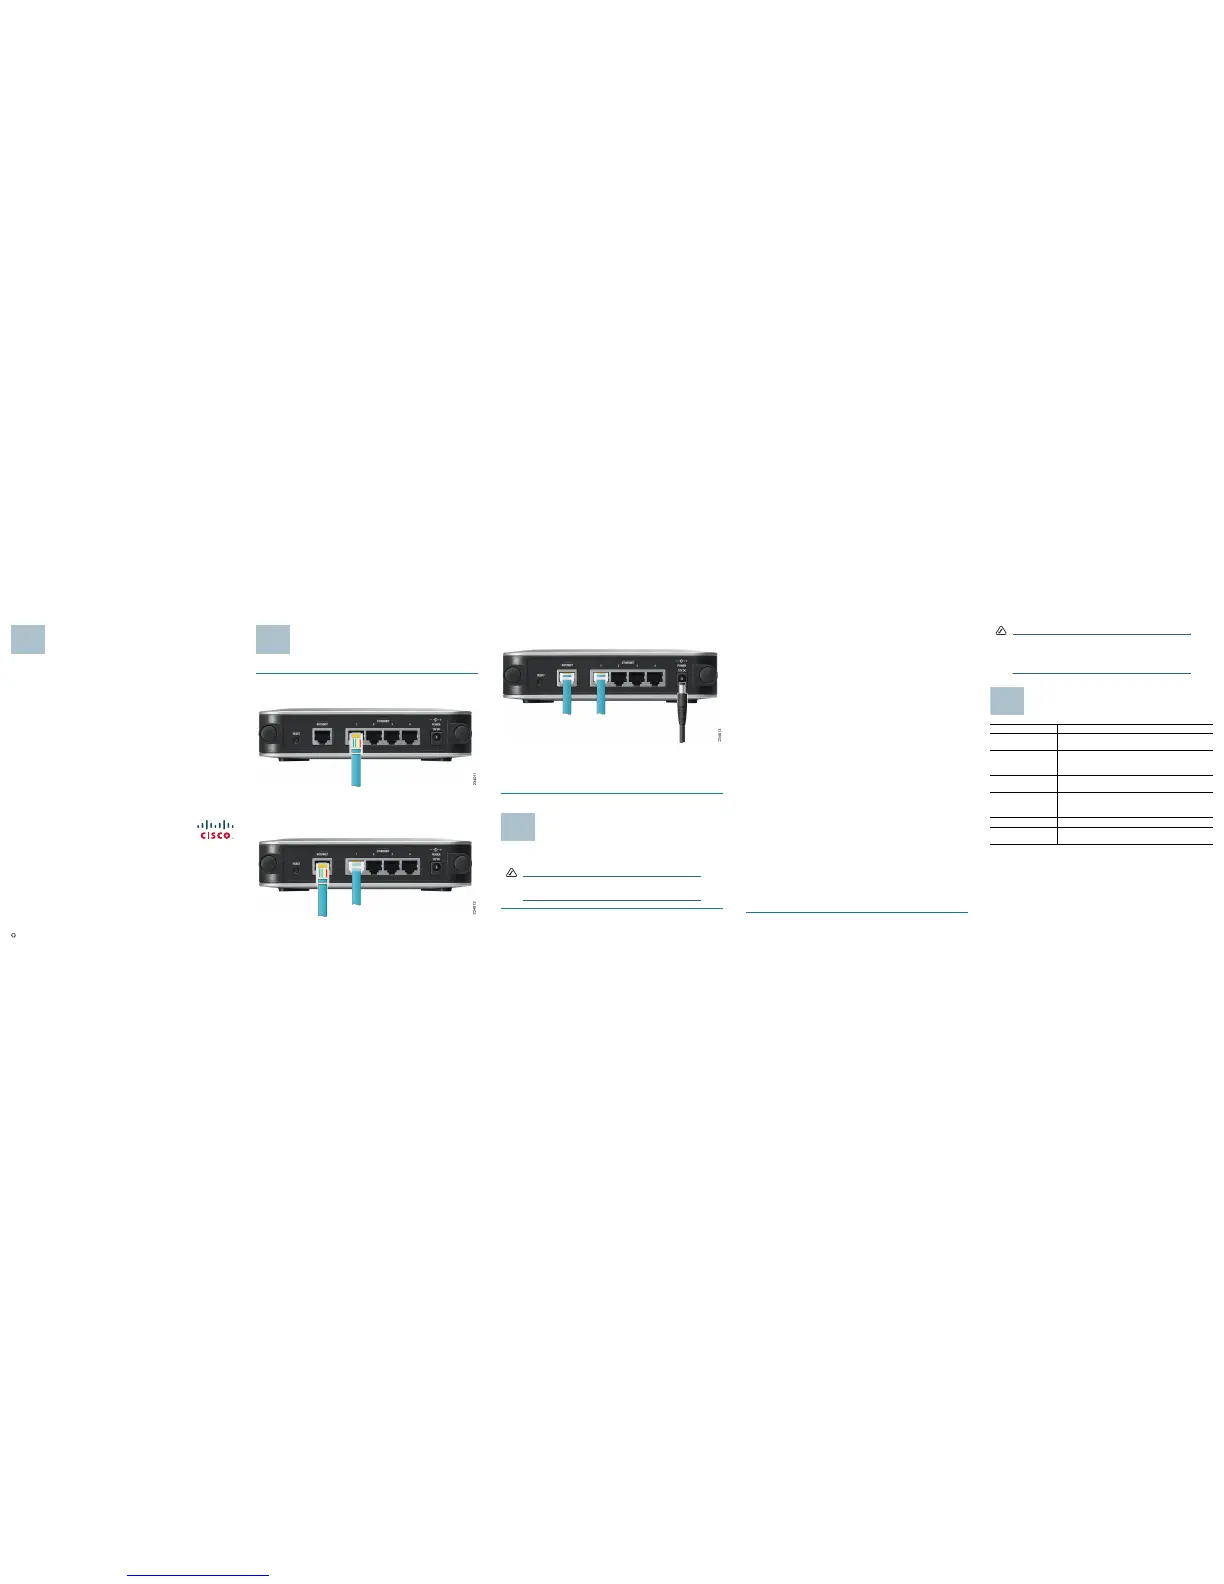
STEP 1 Connect one end of an Ethernet network cable to one of the LAN
ports (labeled 1-4) on the back of the router. Connect the other end
to an Ethernet port on a PC.
S
TEP 2 Repeat step 1 to connect up to four PCs, switches, or other network
devices to the router.
S
TEP 3 Connect an Ethernet network cable from your cable modem or DSL
modem to the Internet port on the back panel of the router.
S
TEP 4 Power on the cable or DSL modem.
STEP 5 Connect the power adapter to the router’s Power port and plug the
other end into an electrical outlet.
S
TEP 6 The Power and Internet LEDs on the front panel will light up green as
soon as the power adapter is connected.
S
TEP 7 Power on the PCs.
The router hardware installation is now complete.
Configure the Router
To configure the RVS4000, plug a PC into the router and launch the web-based
configuration utility as follows.
NOTE Before setting up the router, make sure your PCs are
conf igured to obt ain an IP (o r TCP/IP) add re ss automatically
from the router.
STEP 1 Launch a web browser, such as Internet Explorer or Mozilla Firefox.
S
TEP 2 In the Address field enter http://192.168.1.1 and press Enter.
S
TEP 3 In the User Name and Password fields, enter admin.
The default user name and password is admin.
STEP 4 Click OK.
For added security, you should later set a new password using the
Administration > Management window of the web-based utility.
S
TEP 5 The web-based utility will appear with the Setup menu and Summary
selected. Click WA N under the Setup menu.
S
TEP 6 If requested by your ISP (usually cable ISPs), complete the Host Name
and Domain Name fields, and the MTU and MTU Size fields.
Otherwise, leave the defaults.
S
TEP 7 In the WAN screen, choose an Internet Connection Type from the
drop-down menu. Depending on which Internet connection type you
select, addtional setup may be required.
The Internet Connection Types are:
Automatic Configuration - DHCP: If you are connecting through DHCP
or a dynamic IP address from your ISP, keep this default setting.
Static IP: If your ISP assigns you a static IP address, select Static IP
from the drop-down menu. Complete the Internet IP Address, Subnet
Mask, Default Gateway, and DNS fields. Enter at least one DNS
address.
PPPoE: If you are connecting through PPPoE, select PPPoE from the
drop-down menu. Complete the User Name and Password fields.
PPTP: PPTP is a service used in Europe only. If you are using a PPTP
connection, check with your ISP for the necessary setup information.
Heartbeat Signal: Heartbeat Signal is used primarily in Australia.
Check with your ISP for the necessary setup information.
L2TP: L2TP is used mostly in Europe. Check with your ISP for the
necessary setup information.
S
TEP 8 When you are finished entering your Internet connection settings, click
Save.
S
TEP 9 Restart or power on your PC to obtain the new router setting.
S
TEP 10 Test the setup by opening your web browser from any computer and
entering http://www.cisco.com/smb.
Congratulations! The installation of the router is complete.
NOTE For more information about advanced settings and security
options, refer to the
Cisco
RVS4000 4-Port Gigabit Security
Router with VPN Administration Guide on your CD-ROM. You
can also access this guide and other related documentation
on Cisco.com, as indicated in the next section.
Where to Go from Here
Resource Location
Te c h n i c a l
Documentation
http://www.cisco.com/en/US/products/ps9923/
tsd_products_support_series_home.html
Customer Support www.cisco.com/en/US/support/
tsd_cisco_small_business_support_center_contacts.
html
Open Source License
Notices
www.cisco.com/go/osln
Regulatory
Compliance and
Safety Information
www.cisco.com/en/US/products/ps9923/
tsd_products_support_series_home.html
Warranty Information www.cisco.com/go/warranty
Cisco Partner Central
site for Small Business
www.cisco.com/web/partners/sell/smb

 Loading...