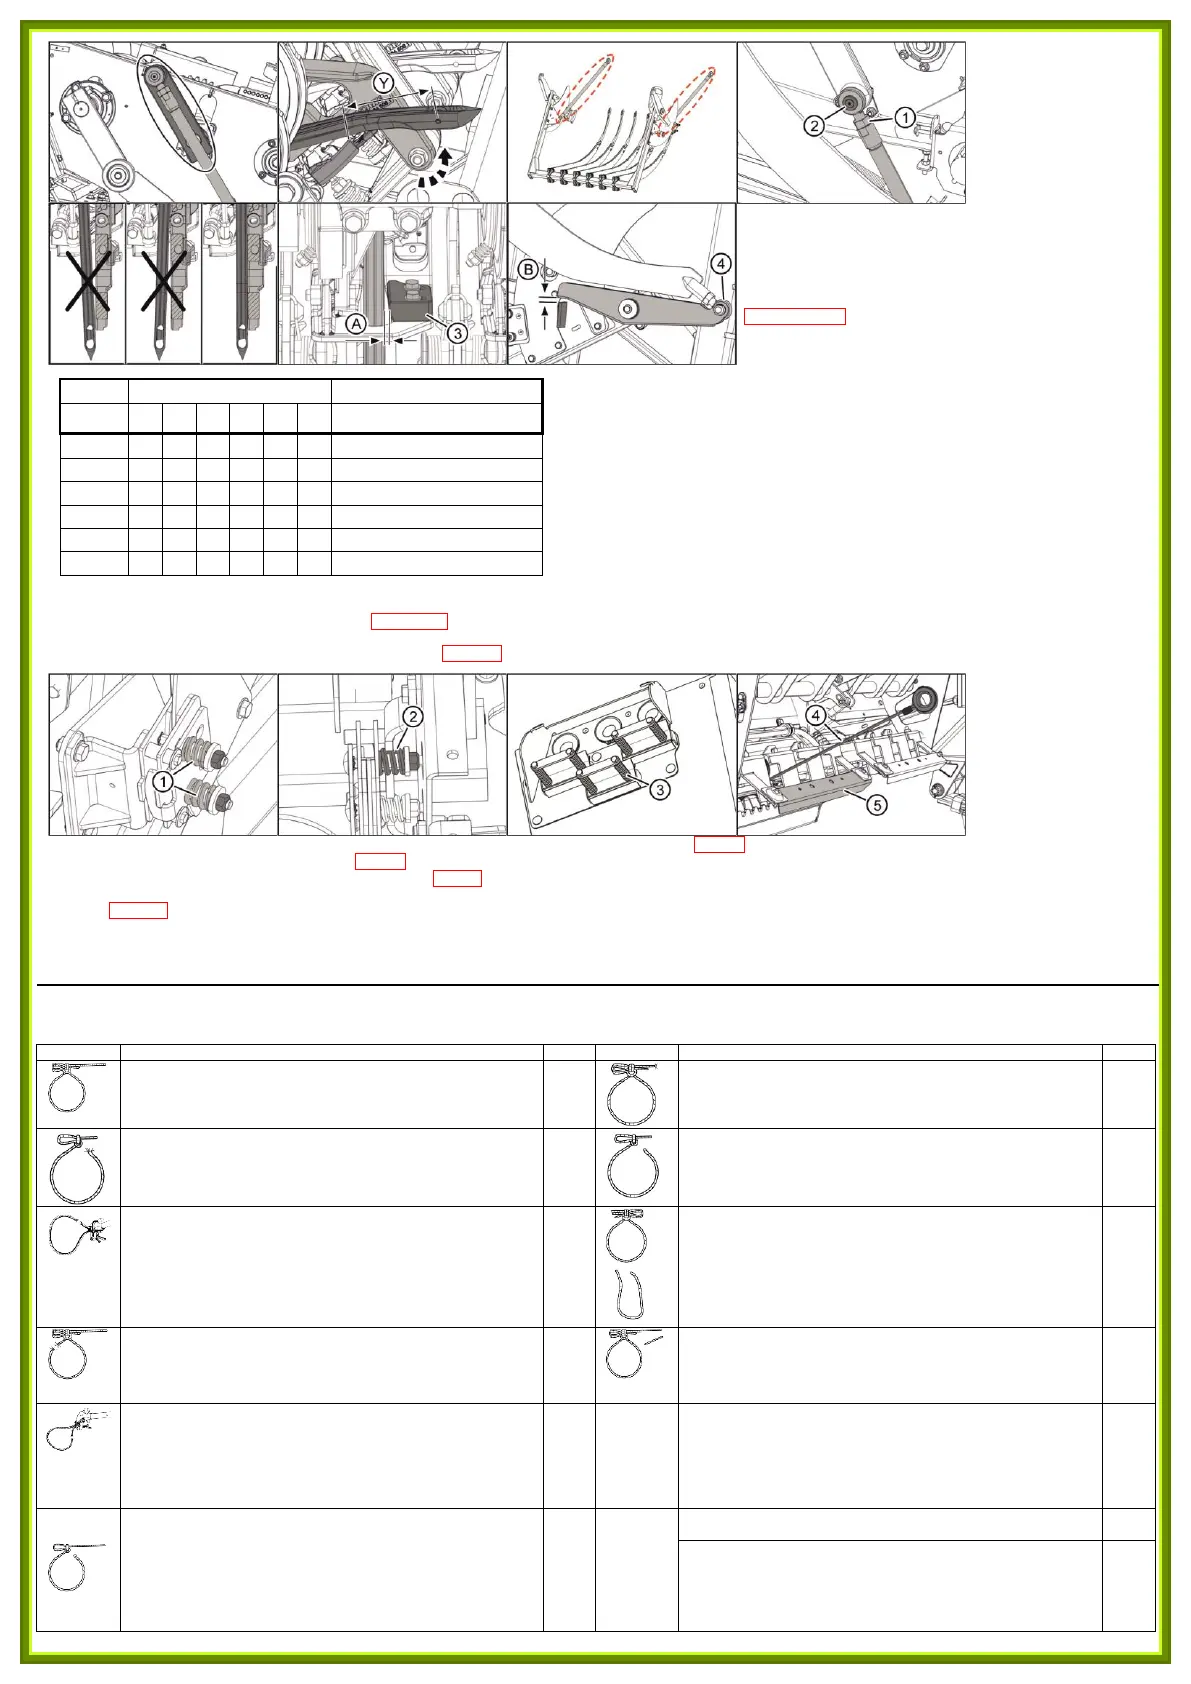
Step 7: 7-1 Turn the flywheel in the direction of the arrow. Align the
round tie rods and the cranks to position the needles at top dead
center.
Pull the knotter backward to capture the clearance.
7-2 Measure the length (Y) between the wheel and the rear of each
twine pincer flange.
95 < Y < 100 mm
7-3 If necessary, adjust the length of the round tie rods while acting
on the end ball joints and their lock nut according to the chart
below:
LEFT------------------------>RIGHT
Needle 2 too short & 5 too long
Once the round tie rods are adjusted, they do not need to have the same length.
Case 1: No adjustment.
Case 2: Extend the right tie rod & shorten the left tie rod.
Case 3: Extend the left tie rod & shorten the right tie rod.
Case 4: Shorten the length of both tie rods.
Case 5: Extend the length of both tie rods.
Case 6: Checking the knotter positions and the integrity of the needles. If necessary, replace the
components.
- Lock the 4 lock nuts (1).
- Tighten the 2 bolts (2) to 34 Nm.
- Finish the tying cycle.
7-4 Remove the needles from the baling chamber and launch tying again.
Check the height of the needles (X), and readjust them, if necessary.
Check the length of the needles (Y), and readjust them, if necessary.
Step 10: 10-1 Adjust the springs (1) for the brakes for the needle equalizer beams on each side of the machine: 27
+1
mm.
10-2 Adjust the springs (2) of the needle shaft brake: 27
+1
mm.
10-3 Adjust the springs (3) of the twine brakes on the twine boxes: 55
-1
mm.
10-4 Check the twine tension: Install the twine on the machine and launch tying. Measure the distance between the twine tension springs (4) and their bracket (5).
It must be 50
±20
mm, and if necessary, adjust the brake settings on the twine boxes.
If no adjustment can be made, contact the service department.
When arriving on the field, do another quick check of all the points above:
Step 8: Leave the needles at top dead center.
Make sure each needle is in contact and parallel to each knotter body.
Check the needle guides (3) to get the clearance in (A): A=0.3
±0.2
mm.
Step 9: Adjust the clearance in (B) between the lever and the stop by acting on the ball joint (4) and its lock nut.
The distance (B) must be strictly identical on both sides of the baler: B=8
+1
mm. Finish the tying cycle.
Tying problems and solutions
Knot errors are often due to: poor-quality twine, incorrect twine guidance, twine tension errors, bad needle positioning or bad knotter adjustment. To limit errors due to twine quality, use twine
recommended by CLAAS.
The knot is not tight enough, but the two ends of the twine are cut
correctly:
- Retighten or replace the knotter nose spring.
- Check the shape of the knotter nose tongue.
The knot is tight, but one of the ends of the twine is broken and
fibrous. A piece of twine is under the knotter:
- Check the twine pincer flange setting.
- Check the status of the pincer flange wheel.
The knot is broken at the short end of the twine, the rest of the
twine is kept below the twine pincer flange:
- Check the status of the pincer flange wheel.
- Check the setting of the twine pincer flange roller.
- Use thicker twine.
The knot is cut at the short end of the twine:
- Check the status of the pincer flange wheel.
- Check the setting of the twine pincer flange roller.
- Adjust the baling pressure.
- Use twine of a regular thickness.
The twine is wound around the knotter nose and is broken:
- Clean, tense or replace the twine tensioner.
- Adjust the needle height.
- Adjust the needle balancer brake.
- Adjust the needle shaft brake.
There is no knot or the twine is pinched and is no longer held in
the needle or retainer. It is cut cleanly, but is dangling in the
baling chamber, or it has snagged in the knot of the previous
bale:
- Check the twine routing (align the rear eye of the needle).
- Adjust the twine tensioner.
- Engage the brakes of the needle equalizer beams and the needle
shaft.
The twine is broken after tying:
- Check the status of the guidance horn.
- Check the adjustment and status of the twine guide finger.
- Check the status of the knotter flange.
- Use thicker twine.
The twine is being held in the retainer, but the end of the twine is
damaged lengthwise.
- Use twine of a regular thickness.
- Check the status of the pincer flange wheel.
- Check the setting of the twine pincer flange roller.
The twine is broken before the knotter nose and is stuck in the
knotter nose:
- Loosen the knotter nose spring.
- Check the status of the knotter nose and its tongue.
- Check the status of the knotter flange.
- Use thicker twine.
- Check the status of the guidance horn.
The twine is no longer held by the retainer:
- Check the setting of the twine pincer flange roller.
- Use twine of a regular thickness.
- Reduce the baling pressure.
- Check the shape of the swath (it must be wide and regular); if the
swath is small, tack to ensure optimal filling of the channel.
The knot has a long twine end and is cut:
- Check the clearance between the pinion and the knotter disk.
- Check the axial clearance of the small pinion.
- Tense the knotter nose spring.
- Reduce the baling pressure.
- Check the status of the pincer flange wheel.
- Check the twine pincer flange setting.
The twine jumps behind the twine guide finger:
- Reduce the baling pressure.
A piece of twine is held in the retainer; a piece of twine is in the
knotter:
- Check the status of the pincer flange wheel.
Adjust the spring of the twine pincer flange to its upper
tolerance (28 mm)
- Use the recommended twine.
 Loading...