English
GREAT BRITAIN • customer service
tel: 0845 300 9799 e-mail: customerservice@clasohlson.co.uk internet: www.clasohlson.com/uk
Ver. 20140210
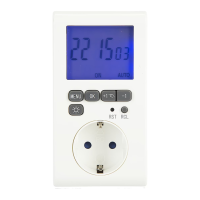
Digital Timer
Art.no 36-4867 Model EMT769A-ET2
Please read theentire instruction manual before use and save it for
future reference. Wereserve theright for any errors in text or images
and for making any necessary technical changes to this document.
Ifyou should have any questions concerning technical problems please
contact our Customer Services.
Product description
• Clock
• 2 on/off programmes
• Built-in backup battery
• Backlit display
• Childproof safety shutters
Buttons and functions
Operation
Note: Thetimer has abackup battery. Youcan programme theon/off
switching times even when thetimer is not plugged into awall socket.
Programmed times will be saved in theevent of apowercut.
Setting theclock
1. Press [MENU] until clock mode is entered.
2. Hold in [OK] until thehoursflash.
3. Set thehours using [ ] or [-1].
4. Press [OK] to change to theminutes.
5. Set theminutes using [ ] or [-1].
6. Press [MENU] when thetime has beenset.
Programming theon/offtimes
• There are 2 on/off programmes.
• You can set thetimer to switch on and off twice aday.
• Programme 1 controls 1 on-switching and 1 off-switching operation.
• Programme 2 controls 1 on-switching and 1 off-switching operation.
Setting theon and off times for programme 1
1. Press [MENU] until thetime is displayed and “PROG” and
“1 ON” flash.
2. Press [OK] until thehoursflash.
3. Set thehours using [ ] or [-1].
4. Press [OK] to change to theminutes.
5. Set theminutes using [ ] or [-1].
6. Press [OK] until theset time is displayed and “1 ON” flashes.
7. Press [ ] or [-1] until thetime is displayed and “PROG” and
“1OFF” flash.
8. Press [OK] until thehoursflash.
9. Set thehours using [ ] or [-1].
10. Press [OK] to change to theminutes.
11. Set theminutes using [ ] or [-1].
12. Press [MENU] to return to clockmode.
Setting theon and off times for programme 2
1. Press [MENU] until thetime is displayed and “PROG” and
“1 ON” flash.
2. Press [ ] or [-1] until thetime is displayed and “PROG” and
“2ON” flash.
3. Press [OK] until thehoursflash.
4. Set thehours using [ ] or [-1].
5. Press [OK] to change to theminutes.
6. Set theminutes using [ ] or [-1].
7. Press [OK] until theset time is displayed and “PROG” and
“2 ON” flash.
8. Press [ ] or [-1] until thetime is displayed and “PROG” and
“2 OFF” flash.
9. Press [OK] until thehoursflash.
10. Set thehours using [
] or [-1].
11. Press [OK] to change to theminutes.
12. Set theminutes using [ ] or [-1].
13. Press [MENU] to return to clockmode.
Setting ON, OFF, ON AUTO or OFF AUTOmode
1. Press [MENU] to enter clockmode.
2. Press [ ] to change modes in thefollowing sequence:
- “ON” The timer is on continuously, regardless of any
programmed on/offtimes.
- “ON AUTO” The timer is on until theset off times. Thetimer is
switched on again at theset ontimes.
- “OFF” The timer is off continuously, regardless of any
programmed on/offtimes.
- “OFF AUTO” The timer is off until theset on times. Thetimer is
switched off again at theset offtimes.
Care and maintenance
• Always unplug thetimer before cleaning it.
• Clean theproduct using alightly moistened cloth. Onlyuse mild
cleaning agents, never solvents or corrosive chemicals.
Disposal
This product should be disposed of in accordance with local regulations.
Ifyou are unsure how to proceed, contact your local authority.
Specifications
Rated voltage 230 V, 50 Hz, 16A
Size 135×70×36mm
1. [MENU] Switches between time display mode (clock) and
programme settings mode.
2. [OK] Changes settings mode (hour, minute, and programme).
3. [
] Increases thesetting in time settings mode. Pressand hold in
to increase setting quicker.
4. [-1] Decreases thesetting in time settings mode. Pressand hold in
to decrease setting quicker.
5. [
] Turnsthescreen light on/off. Note:Only works when thetimer
is plugged into awall socket.
6. [RST] Press carefully to reset all settings.
7. [RCL] Puts theclock forward one hour for Summer Time, etc.
1 2 3 4
5 6 7