English
GREAT BRITAIN • customer service
tel: 0845 300 9799 e-mail: customerservice@clasohlson.co.uk internet: www.clasohlson.com/uk
Ver. 20140325
Radio Controlled
AlarmClock
Art.no 36-5085 Model RS8732CT2
Please read theentire instruction manual before use and save it for
future reference. Wereserve theright for any errors in text or images
and for making any necessary technical changes to this document.
Ifyou should have any questions concerning technical problems please
contact our Customer Services.
Product description
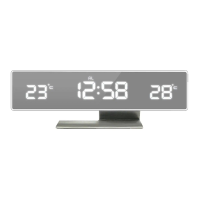
• Radio controlled alarm clock with date and indoor temperature display
• Backlight
• Snooze
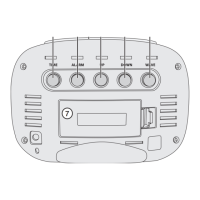
Buttons and functions
Operation
Alarm clock placement
For thebest reception, consider thefollowing:
• Place theclock at adistance from possible signal disturbing
devices like TVs, computers, etc.
• The clock may be less accurate when used in enclosed spaces
such as cellars or buildings with thickwalls.
• Do not activate thetime signal scanning function if you are in transit
such as on atrain or in acar.
Setting theclock
1. Open thebattery compartment and insert 2×AAA/LR03 batteries
(sold separately).
2. Hold in the[ TIME ] button for 2 seconds to enter thetime setting
mode. Press[ UP ] or [ DOWN ] to change thesetting.
3. Press [ TIME ] to confirm and go to thenext setting.
Make your settings in this sequence:
• 12/24 hour display
• Offset (hours + or – in relation to CET (Central European Time))
• Hours
• Minutes
• Year
• Month
• Date (the correct date sets automatically)
• Language
4. Press [ TIME ] to finish.
If [ TIME ] is not pressed after you have finished making your settings,
thealarm clock will automatically save thesettings and revert to normal
time display mode after 30 seconds.
Setting thealarm
1. Hold in [ ALARM ] for 2 seconds to enter thealarm settings mode -
thehours display willflash.
2. Use [ UP ] or [ DOWN ] to change thesetting.
3. Press [ ALARM ] again - theminutes display willflash.
4. Use [ UP ] or [ DOWN ] to change thesetting.
5. Press [ ALARM ] again to finish.
• If [ ALARM ] is not pressed after you have finished making your
settings, thealarm clock will automatically save thesettings
and exit thealarm settings mode after 30 seconds.
• The alarm can be switched on and off by pressing [ ALARM ].
Thealarm symbol will be shown on thedisplay.
• When thealarm is activated, it sounds for 2 minutes.
If[ SNOOZE ] is pressed, thealarm shuts off and comes back
on again after 5minutes. Pressany button to turn thealarmoff.
• If [ WAVE ] is pressed after thealarm settings have been made,
thesettings are saved and theclock starts to scan for atime signal.
Time signal
The scan for atime signal can be initiated in one of three ways:
• The clock enters time scanning mode as soon as thebatteries
areinserted.
• The time scanning mode can be entered by pressing [ WAVE ].
• The clock automatically scans for atime signal every day at:
01:00, 02:00, 03:00, 04:00, and 05:00. Iftheclock is unable to
receive atime signal at any of these times it will try scanning again
thefollowing day.
Key to time signal symbols
Flashing display: scanning in progress, no signal
Flashing display: scanning in progress, weak or sporadic signal
Steady display: signal received
If aDST (British Summer Time/ Daylight Saving Time) signal is received,
asymbol for this will appear on thedisplay.
Care and maintenance
Clean theproduct using alightly moistened cloth. Onlyuse mild
cleaning agents, never solvents or corrosive chemicals.
Troubleshooting guide
No time signal. Move theclock to another location,
thesignal might be blocked.
Weak/unclear display. Change thebatteries.
Disposal
This product should be disposed of in accordance with local regulations.
Ifyou are unsure how to proceed, contact your local authority.
Specifications
Snooze Repeated after 5 minutes
Temperature range 0–50 ºC, ºC or ºF, updated every 30 seconds
Clock format 12- or 24-hour
Calendar range Year2000 to2099
Language English, Danish, French, German, Italian,
Dutch and Spanish
Size 130×90×60mm
1. [ TIME ] Timesetting
2. [ ALARM ] Alarmsetting, alarm on/off
3. [ SNOOZE ] Snooze, backlight
4. [ UP ] Increase displayed number - hold button in to increase
morequickly
5. [ DOWN ] Decrease displayed number - hold button in to decrease
more quickly. Selectbetween ºC/ºF.
6. [ WAVE ] Start/stop time signal scanning
7. Battery cover
1 2 3 4 5 6
7