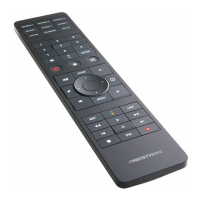
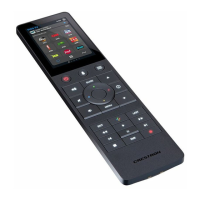
DO GUIDE
HR-310
Handheld Remote
Joining an inNET EX Network
1. Press the ACQUIRE button on the inNET EX gateway to enter Acquire mode, or enter
Acquire mode from Crestron Toolbox™ software. For more information, refer to the
CEN-GWEXER Installation Guide (Doc. 7723), the DIN-AP3MEX Installation Guide (Doc.
7492), or the MC3 DO Guide (Doc. 7774) at www.crestron.com/manuals.
NOTE: In an environment where there are multiple gateways installed, only one gateway
should be placed in Acquire mode at any time.
2. Quickly press the (Home) button on the HR-310 three times, and then press and hold
the button (press, press, press, press + hold) until the backlight on the remote blinks
once. (This process can take up to 10 seconds.)
3. Release the button to start the acquire process. The backlight blinks slowly to show that
the remote is actively scanning the inNET EX network.
4. Conrm the status of the acquire process:
• If the HR-310 is acquired by the inNET EX network, the backlight turns on for ve
seconds.
• If the HR-310 is not acquired by the inNET EX network, the backlight rapidly blinks.
Press the button to cancel the acquire process. Ensure the gateway is in Acquire
mode and that the HR-310 is in range before attempting the acquire process again.
5. After the acquire process is complete, remove the gateway from Acquire mode as
described by the gateway’s documentation.
NOTE: Firmware updates can only be performed by connecting the HR-310 to Crestron Toolbox
via USB. Remove the battery cover on the rear of the HR-310 to locate the micro USB port, and then
connect the remote to the computer using a micro USB to USB A cable (not included). For more
information on performing rmware updates in Crestron Toolbox, refer to the embedded Crestron
Toolbox help le.
Leaving an inNET EX Network
To leave an inNET EX network, put the HR-310 into Acquire mode as described in “Joining an
inNET EX Network” when no gateway has been placed in Acquire mode.
DO Install the Battery Pack
The Crestron
®
HR-310 ships with three AAA alkaline batteries that must be installed prior to
operating the remote. Use the following procedure to install the battery pack.
1. Locate the battery cover on the rear of the HR-310. Gently push on the battery cover while
sliding it down and away from the remote until the tabs connecting the cover to the remote
disengage.
2. Install the included AAA batteries as shown in the illustration following step 3. Observe the
correct polarity when inserting the batteries into the compartment.
3. Reattach the battery cover by aligning the tabs on the top and bottom of the cover with
their respective slots on the bottom of the HR-310, and then gently push the cover upward
until the tabs snap into place.
DO Acquire the Remote
The HR-310 must be acquired by an inNET EX
®
wireless gateway or by a control system with a
built-in inNET EX gateway (both not included) before it can be used with a Crestron control
system. Supported devices with inNET EX gateways currently include the Crestron CEN-GWEXER,
DIN-AP3MEX, and MC3. Use the procedures outlined in this section to join or leave an inNET EX
network and to verify communications between the device and the control system.
DO Check the Box
QTY PRODUCT PART NUM.
1 Batteries, AAA Alkaline, x3 2022558
Battery cover
positive (+) terminals
(rear view)