13
ENGLISH
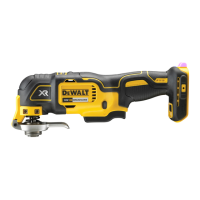
Proper hand position requires the tool to be held as shown in
FigureN.
Instructions for Use (Fig. A)
1. Install the batterypack.
2. To turn the tool ON, hold it as shown in FigureN and press
the variable speed trigger
1
.
NOTE: The further the trigger switch is depressed the faster
the tool will operate. If in doubt about the proper speed
for your operation, test the performance at low speed and
gradually increase until a comfortable speed isfound.
3. To turn the tool OFF, release the variable speed trigger
1
.
Lock on/off Button (Fig.O)
The tool can be locked off by fully depressing the lock on/off
button
4
shown in FigureO.
For more comfort in extended use applications, the lock
on/off button
4
can lock the trigger trigger
1
in the
depressedposition.
NOTE: The tool will automatically shut off after operating for
five minutes with the lock-on button engaged. To restart the
tool, the user will have to release the trigger and repress lock-
onbutton.
Speed Selector (Fig. A)
DCS356
Your tool is equipped with a speed selector
10
which allows
you to select one of the three speeds that limits the full speed.
Select the speed based on the application and control the speed
of the tool using the variable speed trigger switch
1
.
LED Worklight (Fig.P)
The LED worklight
2
will activate when the trigger is depressed.
It will automatically shut off following a short period of time
once the trigger isreleased.
Proper Hand Position (Fig. N)
WARNING: To reduce the risk of serious personal injury,
ALWAYS use proper hand position asshown.
WARNING: To reduce the risk of serious personal
injury, ALWAYS hold securely in anticipation of a
suddenreaction.
WARNING: Ensure switch is fully OFF before installing
thebattery.
Non-
accessories can be attached using the
universaladaptor.
1. Place the washer
20
on thetool.
2. Place accessory
12
on towasher.
3. Tighten and secure adaptor nut
18
using hex wrench
16
.
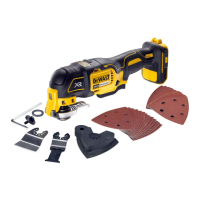
Attaching the Cut Guide (Fig.H–M)
The depth/cut guide allows you to precisely cut material at a
specified depth and more accurately track a marked cutline.
1. Attach the cut guide block
6
by inserting the accessory
tabs
13
on the guide into the accessory side mount slots
5
on the main body of thetool.
NOTE: The depth/cut guide can be attached to either side
of thetool.
2. Secure the block to the main body with the supplied
screw
15
and washer
21
. Tighten with the supplied hex
wrench
16
.
Depth Guide (Fig. I, J)
This feature allows you to precisely cut material at a
specifieddepth.
1. Insert the guide arm
7
as shown in FigureI into the front
slot on the guide block
6
.
2. Adjust the length of the guide by pulling out or pushing
inward to achieve the desired cut depth as shown in
FigureJ.
3. Secure the guide in place by turning the depth/cut
adjustment knob
14
clockwise. To release the guide turn
the depth/cut adjustment knobcounterclockwise.
Cut Guide (Fig. K–M)
This feature allows you to more accurately track a marked
cutline.
1. Insert the guide arm
7
as shown in FigureK into the slots
on the left and right sides of the guide block
6
.
2. Adjust the length of the guide by pulling out or pushing
inward to achieve the desired length as shown in FigureL.
3. Secure the guide in place by turning the depth/cut
adjustment knob
14
clockwise. To release the guide turn
the depth/cut adjustment knobcounterclockwise.
NOTE: The guide arm can also be placed in the guard assembly
vertically in order to set the height off a cut. Refer to FigureM.
Attaching the Dust Extraction Adaptor
(Fig.Q)
The Dust Extraction Adaptor allows you to connect the tool to
an external dust extractor, either using the AirLock™ system
(DWV9000-XJ), or a standard 35mm dust extractorfitment.
1. Attach the dust extraction adaptor
17
by inserting the
tabs
13
in to the accessory side mount slots
5
.
NOTE: The dust extraction adaptor can be attached to either
side of thetool.
2. Insert screw
15
and washer
21
into the dust extraction
adaptor
17
and tighten with the supplied hex wrench
16
.
OPERATION
Instructions for Use
WARNING: Always observe the safety instructions and
applicableregulations.
WARNING: To reduce the risk of serious personal
injury, turn tool off and disconnect battery pack
before making any adjustments or removing/
installing attachments or accessories. An accidental
start-up can causeinjury.
 Loading...