30
Do not clamp the restraining cord between
the enclosure cover and base.
Tighten the middle screw on the side with the
hinge first.
The following applies for enclosures with or
without optional cover hinge:
In order to ensure the required minimum
protection category, the cover screws shall be
positioned correctly and then tightened firmly.
At first, only tighten all the cover screws lightly.
Then tighten the cover screws securely in a
diagonal pattern to prevent any tension on the
cover.
X
ATEX - IEC
See Technical Data for test torques.
Over tightening of the cover screws can
damage the thread inserts in the enclosure
base an can impair the degree of protection.
6.7 Putting into operation
Before putting the apparatus into operation,
the tests specified in the individual national
regulations shall be performed.
In addition, before being put into operation, the
correct functioning of the apparatus and of the
built-in components (measuring instruments,
signal lamps, pushbuttons, etc.) shall be
checked in accordance with these operating
instructions and other applicable regulations.
a The incorrect installation and operation of
components can result in the invalidation of
the guarantee.
7 Maintenance / Servicing
a Prior to opening the enclosure, it is
necessary to ensure that the voltage supply
has been isolated or to take suitable
protective measures.
Before opening the enclosure, ensure that
no potentially explosive atmosphere is
present.
The valid national regulations for the
servicing / maintenance of electrical
apparatus for use in potentially explosive
atmospheres shall be observed
(IEC/EN 60079-17).
The necessary intervals between servicing shall
be stipulated by the operator.
Special attention should be given to ensuring
the:
– Integrity and tightness of the enclosure.
– Integrity of the flameproof joints on the
enclosure body and enclosure cover.
– Integrity of the seals, cable feeds and cable
entries.
– Cable entries shall be corrosion-free.
Clean the flameproof joints. Do not use any
sharp tools to do this. The flameproof joints
shall be smooth and not have any scratches.
Finally, apply a light coat of grease to the
flameproof joints again.
Preferred lubricant:
Renocal FN 745/94,
Renolit Unitemp 2.
Damages to any parts of the flameproof
encapsulation or flameproof joints shall be
remedied immediately using original parts or
the damaged parts shall be repaired by the
manufacturer. Otherwise the explosion
protection is no longer guaranteed.
If, in the course of servicing, it is ascertained,
that repairs are necessary, section 8 of these
operating instructions shall be observed.
8 Repair / Overhaul /
Modifications
Only original CCH parts shall be used for
carrying out repairs that concern the explosion
protection.
Repairs that affect the explosion protection
may only be carried out by Cooper Crouse-
Hinds / EATON or a qualified electrician in
compliance with the applicable national
laws (IEC/EN 60079-19).
In the event of damage to the flameproof
encapsulation or flameproof joints,
replacement of these components is
mandatory. In case of doubt, the respective
apparatus shall be returned to CCH for
repair.
Reconstruction or modifications to
apparatus are only possible within the
scope of the approvals and shall be
certified afterwards (EN 60079-19).
9 Disposal / Recycling
The respective valid national regulations for
waste disposal shall be observed when
disposing of apparatus.
The product range is subject to changes and
additions.
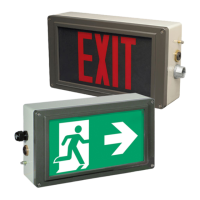
6.6 Closing apparatus / Cover lock
Any foreign matter shall be removed from
the apparatus.
Grease the joint surfaces before screwing the
enclosure cover onto the flameproof enclosure.
Preferred lubricant:
Renocal FN 745/94,
Renolit Unitemp 2.
The flat joints must not be painted or modifi-
cated!
Before closing the Ex-d enclosure with built-in
load disconnect switch, set the switch to the
„ON“ position.
When fitting the apparatus cover, care shall
be taken to ensure that the switch shaft of
the switch insert engages correctly in the
carrier hole of the switch handle.
Enclocure with optinal cover hinge:
Do not damage flameproof joints on the
enclosure cover and enclosure by making
scratches!
– Align the enclosure cover on the base.
Enclosure with optional cover hinge (Fig.5)
– Close the enclosure cover.
– Push the hinge catch back.
Take care not to crush fingers when pressing
the cover onto the enclosure base
– Press the side of the enclosure cover with
the hinge onto the base against the spring
pressure.
Fig.5 Closing
enclosure with optional hing
GB
Explosion-protected, light alloy Ex-d (e) control stations and
distributions, Series: GHG 64
 Loading...