
Do you have a question about the ECS G41T-M6 and is the answer not in the manual?
| Form Factor | Micro ATX |
|---|---|
| Socket | LGA 775 |
| Memory Type | DDR3 |
| Memory Slots | 2 |
| Maximum Memory Supported | 8GB |
| PCIe x16 Slots | 1 |
| PCIe x1 Slots | 1 |
| PCI Slots | 2 |
| SATA Ports | 4 |
| IDE Ports | 1 |
| USB Ports (Rear) | 4 |
| Video Outputs | VGA |
| Chipset | Intel G41 |
| LAN | 10/100 Mbps Ethernet |
| USB Ports | 8 |
| USB Ports (Front) | 4 x USB 2.0 |
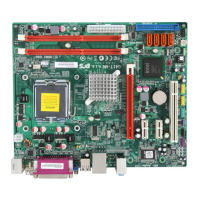
Introduces the motherboard, its features, and components.
Details the key features of the motherboard, including CPU, Chipset, and Memory.
Identifies and lists the various components on the motherboard.
Lists essential safety measures to follow before and during motherboard installation.
Guidance on selecting a compatible computer case and preparing it for motherboard installation.
Explains the physical process of mounting the motherboard inside a computer case.
Details how to check and set motherboard jumpers for correct configuration.
Covers the installation of essential hardware components like the processor and memory.
Step-by-step guide for safely installing the CPU onto the motherboard socket.
Instructions for installing DDR3 SDRAM modules into the motherboard slots.
Describes the different types of expansion slots available on the motherboard.
Explains how to connect various optional devices like SATA and front panel headers.
Guides users on connecting power cables and case headers to the motherboard.
Details the connections for front panel switches, LEDs, and ports.
Explains rear I/O ports and their functions.
Overview of the BIOS Setup Utility and its configuration capabilities.
Instructions on how to access the BIOS Setup Utility during system startup.
Explains how to restore BIOS settings to factory defaults.
Details basic system information and configuration within the BIOS.
Covers advanced system settings and configurations for performance tuning.
Configuration options related to the motherboard's chipset and memory.
Settings for onboard peripheral devices like IDE, SATA, Audio, and LAN.
Configuration of system power saving modes and wake-up features.
Settings for devices on the PCI bus and Plug and Play capabilities.
Monitors system voltages, temperatures, and fan speeds for hardware health.
Adjusts CPU clock speed and system bus frequency for performance.
Option to load optimized default settings for system stability.
Instructions for setting or changing a supervisor password for BIOS access.
Instructions for setting or changing a user password for system access.
How to save changes made in BIOS and exit the utility.
How to discard changes and exit the BIOS utility.
Steps for downloading and installing updated BIOS firmware.
Overview of the included software and drivers on the support disc.
Guide to the automatic installation process for drivers and utilities.
Instructions on initiating the software installation process.
Steps for manually installing drivers if auto-install fails or is unavailable.
Information on available utility software and licensing terms.
Introduces eJIFFY as a fast boot program for web browsing and chat.
Steps for installing eJIFFY software and activating it in BIOS.
How to access the eJIFFY operating environment after boot-up.
Explains the main icons and their functions within the eJIFFY interface.
Frequently asked questions about using eJIFFY features like downloading and language settings.
Troubleshooting steps for initial assembly and post-prolonged use startup issues.
Guidance for resolving startup issues that occur after extended system use.
Basic advice for maintaining the motherboard to prolong its lifespan.
A visual guide to diagnose and resolve common PC startup problems.