TECHNICAL DATA SHEET
PUB. NO. 31-40015
DVM - DIGITAL VOLT METER
HVC - HIGH VOLTAGE CAPACITOR
HVD - HIGH VOLTAGE DIODE
HVT - HIGH VOLTAGE TRANSFORMER
LVT - LOW VOLTAGE TRANSFORMER
TCO
PCB - PRINTED CIRCUIT BOARD
- THERMAL CUT OUT
(TEMPERATURE SENSOR)
MWO TROUBLESHOOTING FLOW CHART
RETEST & REASSEMBLE -
END
IS DISPLAY
LIT?
VERIFY OUTLET
VOLTAGE PRESENT
NO
INSTALL SERVICE
BREAKER ACROSS
FUSE HOLDER
UNPLUG & DISASSEMBLE
CHECK FUSE/CIRCUIT BREAKER - RESET
BREAKER/REPLACE FUSE IF NEEDED
IS INTERNAL
MWO 15A/20A
FUSE OK?
YES
NO
NO
YES
YES
YES
NO
NO
NO
PLUG IN UNIT
IS DISPLAY
LIT?
SERVICE BREAKER
TRIPPED BEFORE
PROGRAMMING
FOR COOK?
HAVE
VOLTAGE AT
LVT ON PCB?
ANY SHORTED
OR PINCHED
WIRING?
REPAIR
YES
YES
YES
NO
CHECK
TCO(s)
REPLACE
TCO(s)
CHECK/
REPAIR
TCO
WIRING
CLOSED
1. SET CLOCK (IF NEEDED)
2. PLACE CUP OF WATER AND
NEON LIGHT TESTER IN UNIT
3. PROGRAM UNIT TO COOK
WATER HEATS /
NEON TESTER
LIGHTS?
YES
NO
INSTALL CLAMP ON
AMMETER TO MWO's
INTERNAL FUSE
LEAD
< 2A
ABOUT
5A
> 8A
MAGNETRON
BLOWER AND
CAVITY LIGHT
ON?
NO
REPLACE
PRIMARY DOOR
SWITCH
CAVITY
LIGHT
ONLY ON
PRIMARY
SWITCH OK
YES
CHECK VOLTAGE ACROSS POWER
RELAY ON PCB (DOOR CLOSED,
NO COOKING PROGRAMMED) -
SHOULD GET ABOUT 120V
REPLACE PCB REPLACE HVT
MAGNETRON &
HV COMPTS
ARE GOOD
INTERMITTENT
PROBLEM - CALL TAG
TEAM FOR
RESOLUTION
120V?
ABOUT 120V
ABOUT 0V
YES
WIRING
TO HVT
OK?
YES
REPAIR
NONO
SERVICE
BREAKER
TRIPS?
NO
MONITOR
DOOR
SWITCH
OK?
REPAIR /
REPLACE
NO
YES
IMMED
HVT IS GROUNDED
CHECK RESISTANCE
OF HVC - 2K OHM
SCALE ON DVM
AFTER A
FEW SEC
RESISTANCE
< 2K OHMS?
REPLACE
HVC
YES
NO
HVC IS
MISWIRED
REPAIR
CMO ONLY - IF AN OTR, GO TO
"OTR START" BLOCK
INSTALL CLAMP ON AMMETER
TO A MAGNETRON LEAD
< 1A
> 8A
OTR START
1. UNPLUG UNIT
2. DISCHARGE HVC
3. SET DVM ON 2K OHM SCALE
4. MEASURE HVD SIDE OF HVC
TO GROUND
INFINITE
(OPEN)
SOME
RESISTANCE
CHECK RESISTANCE
OF SECONDARY SIDE
OF HVT (SINGLE LEAD
TO HVC)
70 - 150
OHMS
OTHER
HVT IS OK
REPLACE
MAGNETRON
REPLACE HVD
& HVC AND
RETEST
OK?
YES
NO
START - VERIFY MWO POWER
CORD PLUGGED INTO OUTLET
UNIT ABLE TO
PROGRAM?
YES
PRESS START
NO
PERFORM
KEY PANEL
TEST
KEY
PANEL
OK?
REPLACE
KEY PANEL
NO
YES
PROGRAM UNIT FOR
COOKING AND START -
CHECK VOLTAGE AT RELAY
AGAIN
A
C
A
B
B
B
A
B
B
C
C
C
A
A
D
D
A
A
OPEN
CIRCLE NODES:
FOLLOW THE
ARROWS - EXAMPLE:
A A
THEN
GO TO
"*" REFER TO FRONT
PAGE FOR MORE INFO
RETEST & REASSEMBLE -
END
REPLACE PCB
REPLACE HVT
A
B
C
1. SET CLOCK (IF NEEDED)
2. PLACE CUP OF WATER AND
NEON LIGHT TESTER IN UNIT
3. PROGRAM UNIT TO COOK
D
THIS IS A
LEGEND -
FIND
THESE
ON MAIN
CHART
SENSOR TEST (QUICK TEST)
1. With 2 fingers touch and hold the following
pads at the same time:
and
2. Observe diagnostic number in display
(numbers approximate)
15-185 (Normal-verify with "detection test")
213 or Higher (sensor failed to open, sensor
unplugged, wiring or smart board)
Less than 6 (shorted sensor, or smart board).
NOTE:
Only heater terminals (H : Black
and Red leads) can be checked
with ohmmeter (30 ).
CAUTION :
DO NOT ATTEMPT TO CHECK
SENSOR TERMINALS(White
and Orange leads).
87
CAN DAMAGE SENSOR.
ERROR MESSAGE
Display Signal
• F1 Open thermal sensor(convection)
• F2
Shorted thermal sensor(convection)
• F3
Keypanel shorted for > 60seconds
• F4 Open humidity sensor
• F5
* Error sound will beep for 3 cycles (2 second on,
1 second off) loudey in upper condition.
Shorted humidity sensor
Condition
SENSOR COOKING
(PLMV168, GLMV168)
The Sensor Cooking function uses a special gas
sensor which detects both humidty (steam) and
hydrocarbons (food odors) during the cooking
process, The sensor is a plug-in device located in
the vent area at the top left hand corner of the
cavity behind the grille.
SENSOR COOKING TEST
(PLMV168, GLMV168)
1. Place 1/3 cup tap water in oven.
2. Touch
VEGETABLE
, the oven starts immediately.
3. Control Beeps and shuts off.
4. Touch
CLEAR/OFF
A) Test OK - Normal
B) Test Fails - Check Sensor
C) Test Fails - See Sensor Test Below
Bracket Barrier
Printed in Malaysia
DE99-00140B
SMART BOARD
The SMART BOARD contains the power relay,
LVT, vent blower triac, surface light relays, and
other components to perform the proper
switching circuits. Several disconnect plugs are
also located on the SMART BOARD:
CON 01 - Ribbon Connector
CON 02 - Vent Blower Connector
CON 03 - Primary L.V.T & Main Relay
CON 04 - Door Sensing & Probe Connector
CON 05 - Gas Sensor Connector
(PLMV168, GLMV168)
Many diagnostic circuit tests can be made at the
disconnect plugs. (Refer to diagnosis flow chart
and simplified schematic in mini-manuals.)
CONTROL PERFORMANCE TEST
Set Clock-Touch clock pad, enter time of day,
AM/PM touch start pad.
Alternately touch each function pad and enter
time or temperature selection for the function.
Also change power levels.
Touch Clear-Off after each function test to
clear that function.
Repeat procedure for each function to
exercise each pad.
Control and display should respond to each entry.
Display should revert to Time-Of-Day after each
Clear-Off. Refer results to Diagnostic Flow Chart.
KEY PANEL TEST
If necessary the key panel pads can be verified
by a continuity test. For ease of handling the key
panel should be removed and placed on a flat
surface.
Check continity between connections at end of
ribbon (Use high scale).
10~16
1~9
10
9
16
RIBBON
PAD CONN. PAD CONN.
ADD 30SEC 4-11 REHEAT 8-11
BEVERAGE 9-11
BEVERAGE 6-11
CLOCK 7-13
POWER LEVEL 3-14 TIMER 4-13
DEFROST START 3-11
BEEPER VOLUME 9-12
4-15
HELP 4-12
AUTO NITE LIGHT 6-12 POTATO 6-10
AM/PM 9-13 1 9-16
SURFACE LIGHT
7-12 2 8-16
VENT FAN 8-12 3 7-16
TURNTABLE 5-12 4 6-16
REMINDER 5-13 5 5-16
TIME COOK 5-15 6 4-16
DELAY START 6-13 7 9-15
CLEAR 3-12 8 8-15
POPCORN 7-11
REHEAT 9-11
POPCORN 5-11
TEMPCOOK/ROAST 3-15
GROUND MEATS 3-10
VEGETABLE 9-10
9 7-15
0 6-15
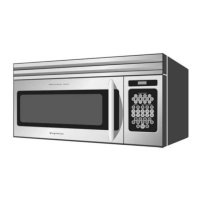
PLMV168KC4, GLMV168KB4,
GLMV168KQ4, GLMV168KS4,
FMV145
MODEL NO. :
MODULARITY-OTR-FRIGIDAIRE
PLMV168KC4, GLMV168KB4,
GLMV168KQ4, GLMV168KS4,
FMV145
MODEL NO. :
MODULARITY-OTR-FRIGIDAIRE
(PLMV168, GLMV168)
- FMV145 -