2 of 12 AII 19610 (9810) © 1998 American Honda Motor Co., Inc - All Rights Reserved.
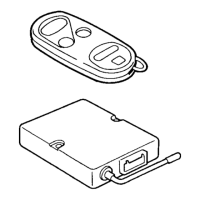
LED
CONTROL UNIT
DISARM
SWITCH
ALARM HARNESS
LEFT
FUSE BOX
MODE SWITCH
AUTO LOCK
AUTO
MANUAL
MIN MAX
GLASS
BREAKAGE
SENSOR
Connector clip
2 Cushion tapes
TOOLS AND SUPPLIES REQUIRED
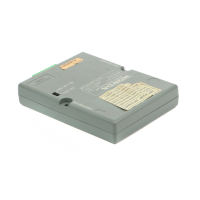
Adjusting the Control Unit
• Use a small flat-tip screwdriver to change the mode
switch and the horn/siren switch and to adjust
sensitivity.
SENSITIVITY
ADJUSTMENT
KNOB
MODE SWITCH:
Small flat-tip screwdriver
#2 Phillips screwdriver
Eye protection (face shield, safety goggles, etc.)
Drill
5.5 mm and 12 mm Drill bits
Tape measure
File
Felt-tip pen
Pliers
17 mm Open-end wrench
10 mm and 17 mm Sockets
Electrical tape
Ratchet
Illustration of the Alarm Installed on the Vehicle
• Set the mode switch according to the customer’s
choice.
• Refer to the Owner’s Manual for the explanation of
each mode.
GLASS BREAKAGE SENSOR:
Do not attach anything like scotch tape over the holes;
this is a microphone pickup.
SENSITIVITY ADJUSTMENT KNOB:
• Adjust the sensitivity only if the customer requests it;
the sensitivity adjustment of the glass break sensor
is factory-set.
• Be careful when you adjust the sensitivity; if you raise
the sensitivity too much, the system can give a false
alarm, and if the sensitivity is too low, the security
system may not work even if glass is broken.

 Loading...