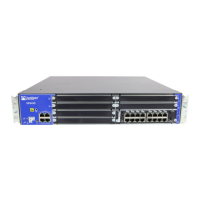
SRX4600 Services Gateway Quick Start
See the complete SRX4600 Services Gateway Platform documentation at
https://www.juniper.net/techpubs/a077.html .
To mount, connect power to, and perform initial configuration on the Juniper Networks
®
SRX4600 Services Gateway, you need:
z Electrostatic discharge (ESD) grounding strap (not provided)
z Four-post rack-mounting kit (provided)
z Twelve screws to secure the mounting rails and mounting blades to the chassis
(provided)
z Eight screws to secure the chassis to the rack (not provided)
z Screwdriver appropriate for your rack-mounting screws (not provided)
z Two AC power cords with plugs appropriate for your geographical location (provided)
z RJ-45 cable and RJ-45 to DB-9 serial port adapter (provided)
z Management host, such as a PC or laptop, with a serial port (not provided)
z A grounding cable (minimum 14 AWG (2 mm²), minimum 90°C wire), a grounding lug
(Panduit LCD10-10A-L or equivalent) (not provided).
Part 1: Mount the Services Gateway
You can mount an SRX4600 Services Gateway in a 19-inch four-post rack configuration.
An AC device weighs approximately 38 lb (17.23 kg) and a DC device weighs
approximately 40 lb (18.14 kg). Two persons are required for mounting the device.
1. Attach the ESD grounding strap to your bare wrist and to a site ESD point.
NOTE: If you are mounting multiple units in the rack, mount the heaviest unit at the
bottom and mount the others from bottom to top in order of decreasing weight.
2. Place the rack in its permanent location, allowing adequate clearance for airflow and
maintenance, and secure it to the building structure.
3. Attach the front-mounting brackets to the side mounting rails by using the Phillips
4-40 flat-head mounting screws.
4. Align the holes in the side mounting rails with the holes on the side of the chassis and
attach the side mounting rails to the chassis by using the mounting screws.
5. Have one person grasp both sides of the device, lift it, and position it in the rack so
that the front bracket is aligned with the rack holes and the second person secure the
front of the device to the rack by using four mounting screws.
6. Have the second person use the mounting screws (and cage nuts and washers if
your rack requires them) to screw the mounting bracket to the rack.
7. Continue to support the device and slide the rear mounting blades into the channel of
the side mounting rails and securing the blades to the rack. Use the four mounting
screws (cage nuts and washers if the rack requires) to attach each blade to the rack.
8. Attach a grounding cable to earth ground and then to the chassis grounding points.
Part 2: Connect the Grounding Cable
1. Attach an ESD grounding strap to your bare wrist, and connect the strap to the ESD
point on the chassis.
2. Connect one end of the grounding cable to a proper earth ground, such as the rack in
which the services gateway is mounted.
3. Place the grounding lug attached to the grounding cable over the protective earthing
terminal on the protective earthing terminal bracket.
4. Secure the grounding lug to the protective earthing terminal with the washers and
screws.
5. Dress the grounding cable and ensure that it does not touch or block access to other
device components and that it does not drape where people could trip over it.