JVC Company of America
A Division of JVC Americas Corp.
1700 Valley Road, Wayne, NJ 07470
www.jvc.com
Customer Service
TOLL FREE: 1-800-252-5722
For our online tutorials please visit:
http://camcorder.jvc.com/tutorials.jsp
Register your EVERIO online at:
REGISTER.JVC.COM
and receive a special offer.
LYT1975-001A
0708ASR-MW-OT
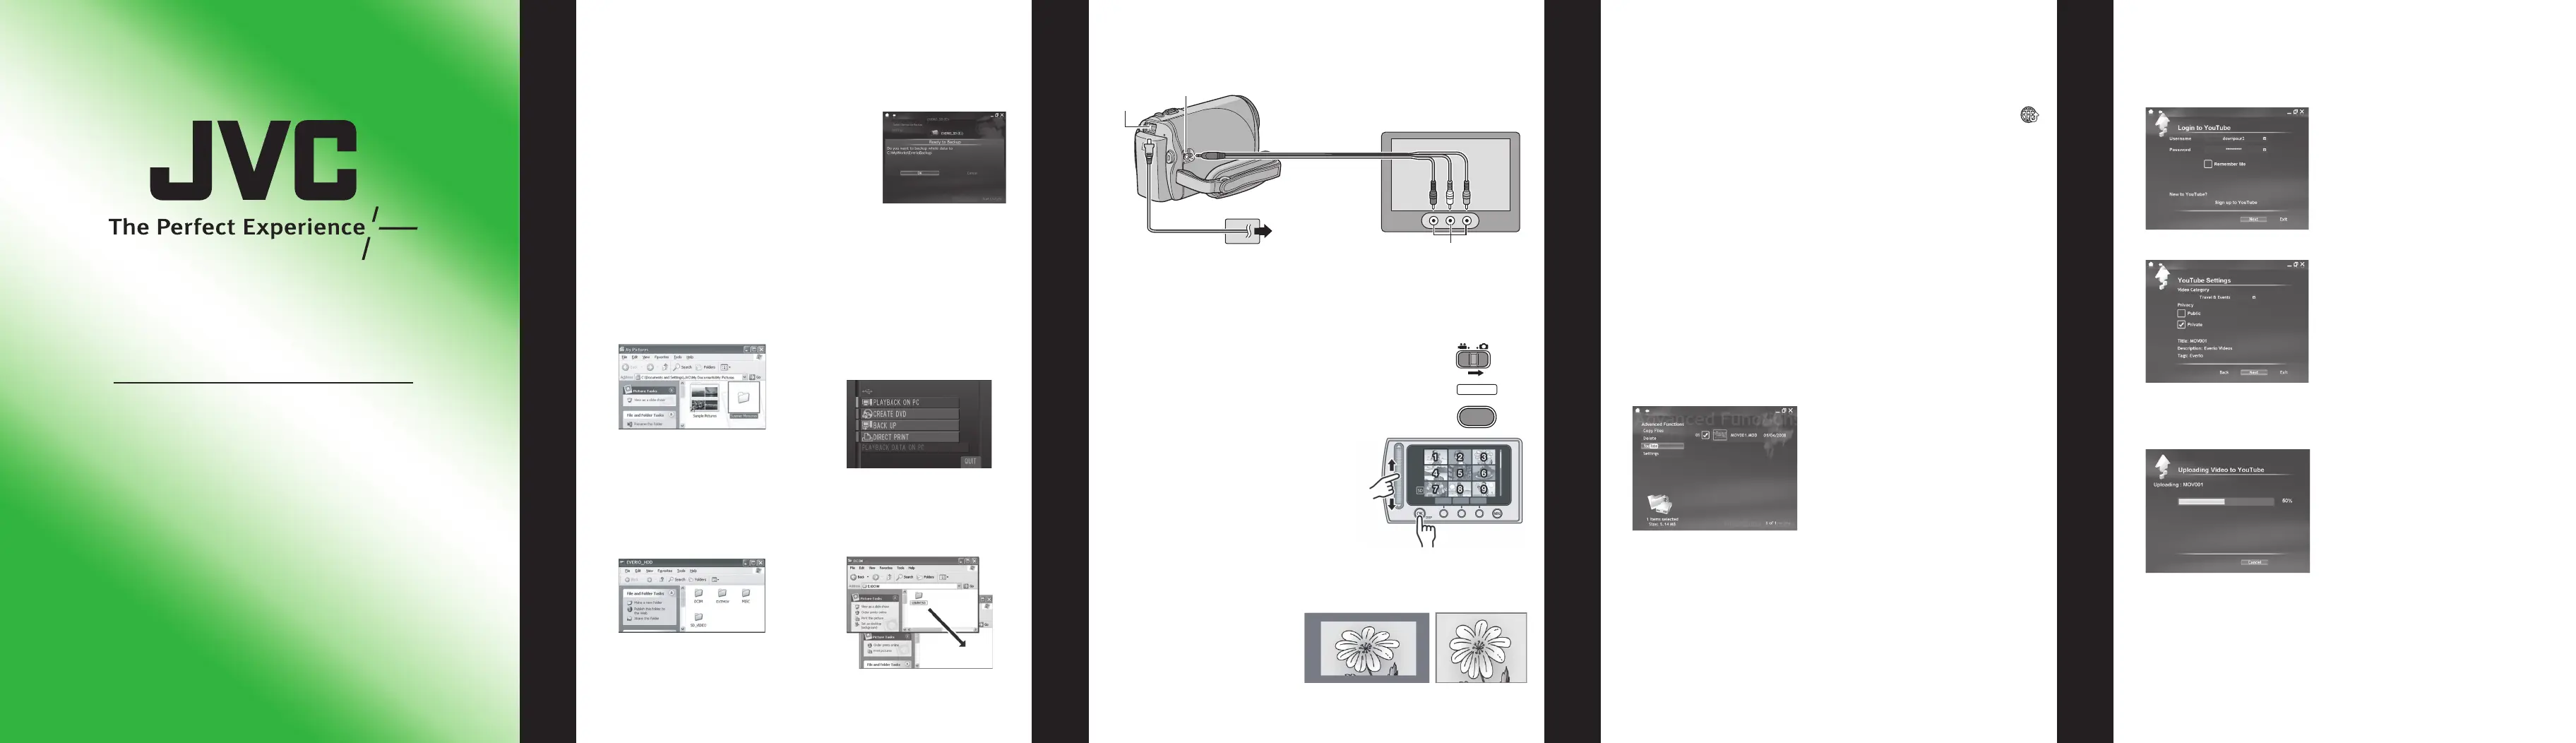
1) Connect camcorder to PC using the USB cable.
2) Open the LCD monitor to turn on the camcorder.
File Backup
1) After connecting USB to and AC adapter to camcorder and
PC open LCD to turn camcorder on.
2) On the camcorder: use the Laser sensor to select Back Up
then press OK.
PowerCinema will start.
3) On the PC: click EVERIO_SD then
click OK.
When the progress bar disappears,
the process is complete.
File Backup (PC) using software
File Backup (PC and Mac) without using software
3) Create a folder to backup up
fi les into.
4) On the camcorder: use
the Laser sensor to select
Playback on PC then press
OK.
5) On the PC (Windows
®
):
select [Open folder to view
fi les using Windows Explorer]
and click [OK].
6) Select the folder that you
want to backup. Drag and
drop it in to the folder you
created in (step 3).
SD_Video: This folder contains all your video fi les.
DCIM: This folder contains all your still images.
On the PC (Mac): double click
EVERIO_SD
Playing Your Memories on a TV
Preparation:
• Turn off both camcorder and TV.
1) Plug in the supplied A/V cable to the camcorder. Then push
the single plug side into the A/V input. You must fi rst open
the cover for the A/V input.
2) Turn on the camcorder and the TV.
3) Slide the mode switch to select Video or Still
Image Mode
4) Press the SELECT PLAY/ REC button to put
the camcorder in playback mode.
5) Slide your fi nger up and down on
the Laser Sensor to select the
desired thumbnail for video or still
image playback. Then press OK.
• If the aspect ratio of the image
is not correct as shown on the
right. Change the settings in
[SELECT TV TYPE] from the
menu.
• To display the camcorder’s
on-screen display on TV Set
[DISPLAY ON TV] to [ON]
from the menu.
16:9 TV
4:3 TV
To AC Outlet
AC Adapter
AV Jack
DC Jack
AV Cable
AV Input Jack
PLAY/REC
SELECT
Uploading Video Clips to YouTube™
• How to record a File (video clip)
1) Slide the mode switch to select video mode.
2) Press the SELECT PLAY/REC button to set on recording
mode.
3) Press the UPLOAD button twice to “UPLOAD REC ON”.
indicator appears.
4)
Press the START/STOP button to start recording a video clip.
Recording stops automatically after 10 minutes.
• How to upload a File (video clip) to YouTube™
1) Install software from the supplied CD-ROM. (see “How to
Install”)
2) After connecting USB and AC Adapter to camcorder and PC,
open the LCD to turn camcorder on.
3) On the camcorder: press the UPLOAD button.
PowerCinema starts automatically.
4)
On the PC: click on the check box of desired fi le.
The “
s
”mark appears on the left of the selected fi le.
To select other fi les, repeat this step.
5) Click [YouTube™].
Uploading Video Clips to YouTube™ (cont.)
6) Login your username and password.
Click [Next].
To create a YouTube™ account, click [Sign up to
YouTube™].
7) Select video category and broadcast option. Click [Next].
8)
Click on the check box and then click [Upload].
Uploading starts.
Click [Cancel] to cancel procedure.
9) Click [Finish].
Trademark
YouTube and the YouTube logo are trademarks and/or
registered trademarks of YouTube LLC.
M8S3_EasyStartup_EN_B6_4.indd 2M8S3_EasyStartup_EN_B6_4.indd 2 7/16/2008 12:52:57 PM7/16/2008 12:52:57 PM
 Loading...