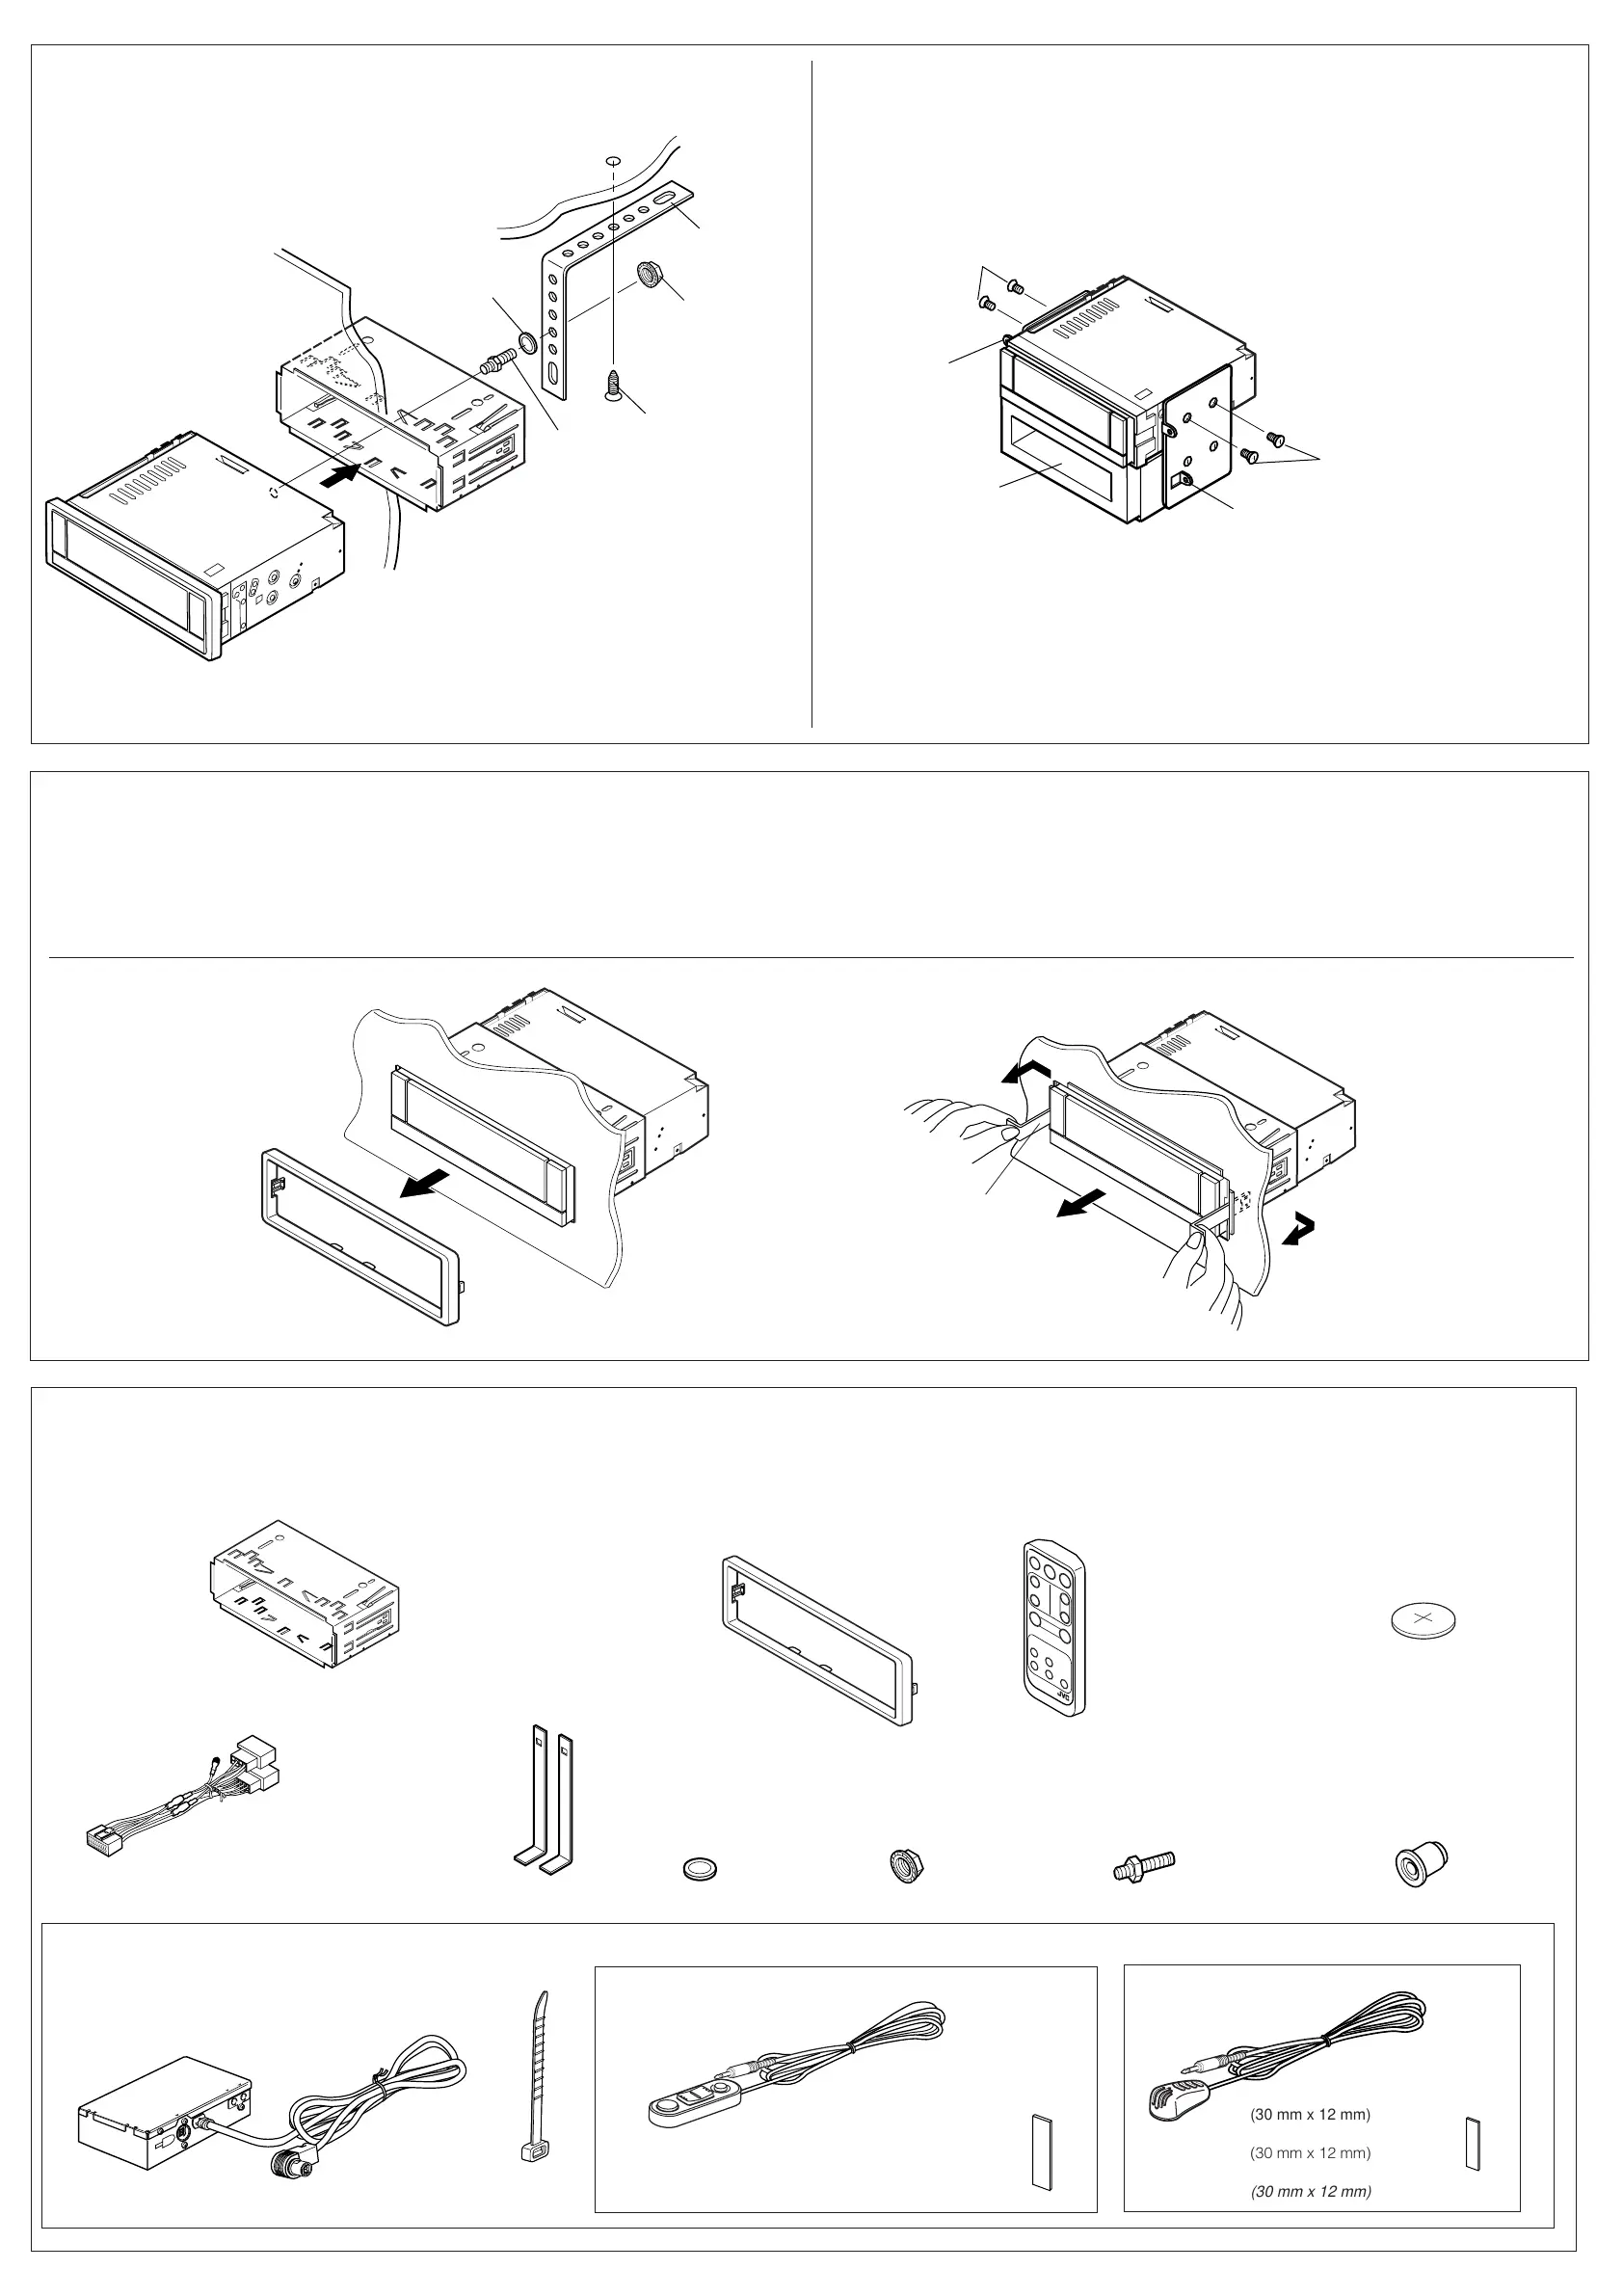
• When using the optional stay
• Beim Verwenden der Anker-Option
• Lors de l'utilisation du hauban en option
• When installing the unit without using the sleeve
• Beim Einbau des Geräts ohne Halterung
• Lors de l'installation de l’appareil sans utiliser de manchon
In a Toyota for example, first remove the car radio and install the unit in its place.
Zum Beispiel in einem Toyota zuerst das Autoradio ausbauen und dann das Gerät an seinem Platz einbauen.
Par exemple dans une Toyota, retirer d’abord l’autoradio et installer l’appareil à la place.
* Not included with this unit.
* Nicht Teil dieses Geräts.
*
Non fourni avec cet appareil.
Flat type screws (M5 x 6 mm)*
Senkkopfschrauben (M5 x 6 mm)*
Vis à tête plate (M5 x 6 mm)*
Bracket*
Konsole*
Support*
Flat type screws (M5 x 6 mm)*
Senkkopfschrauben (M5 x 6 mm)*
Vis à tête plate (M5 x 6 mm)*
Pocket
Taschen
Poche
Bracket*
Konsole*
Support*
Note: When installing the unit on the mounting bracket, make sure to use the 6 mm-long screws. If
longer screws are used, they could damage the unit.
Hinweis: Beim Anbringen des Gerät an der Konsole sicherstellen, daß 6 mm lange Schrauben
verwendet werden. Werden längere Schrauben verwendet, können sie das Gerät beschädigen.
Remarque:
Lors de l’nstallation de l’appareil sur le support de montage, s’assurer d’utiliser des vis
d’une longueur de 6 mm. Si des vis plus longues sont utilisées, elles peuvent endommager l’appareil.
Removing the unit
• Before removing the unit, release the rear section.
1
Remove the trim plate.
2
Insert the 2 handles into the slots, as shown. Then, while gently
pulling the handles away from each other, slide out the unit.
(Be sure to keep the handles after installing it.)
Ausbau des Geräts
• Vor dem Ausbau des Geräts den hinteren Teil freigeben.
1
Den Frontrahmen abnehmen.
2
Die 2 Griffe in die Schlitze wie gezeigt stecken. Dann die Griffe
behutsam auseinander ziehen und das Gerät herausziehen.
(Die Griffe nach dem Einbau auf jeden Fall aufbewahren.)
1
Handle
Griff
Poignée
2
Teileliste für den Einbau und Anschluß
Die folgenden Teile werden zusammen mit diesem Gerät geliefert.
Nach ihrer Überprüfung, die Teile richtig einsetzen.
Liste des pièces pour l’installation et
raccordement
Les pièces suivantes sont fournies avec cet appareil.
Après vérification, veuillez les placer correctement.
Power cord
Spannungsversorgungskabel
Cordon d’alimentation
Battery
Batterie
Pile
CR2025
Remote controller
Fernbedienung
Télécommande
Trim plate
Frontrahmen
Plaque d’assemblage
Sleeve
Halterung
Manchon
Parts list for installation and connection
The following parts are provided with this unit.
After checking them, please set them correctly.
Handles
Griffe
Poignées
Mounting bolt (M5 x 20 mm)
Befestigungsschrauben (M5 x 20 mm)
Boulon de montage (M5 x 20 mm)
Rubber cushion
Gummipuffer
Amortisseur en caoutchouc
Lock nut (M5)
Sicherungsmutter (M5)
Ecrou d’arrêt (M5)
Washer (ø5)
Unterlegscheibe(ø5)
Rondelle (ø5)
Voice control unit
Sprachsteuerungseinheit
Module de commande vocale
L
CHANGER
INPUT
MIC INPUT
CONTROLLER
INPUT
Trim plate
Frontrahmen
Plaque d’assemblage
Retrait de l’appareil
•
Avant de retirer l’appareil, libérer la section arrière.
1
Retirer la plaque d’assemblage.
2
Introduire les deux poignées dans les fentes, comme montré.
Puis, tout en tirant doucement les poignées écartées, faire
glisser l’appareil pour le sortir.
(S’assurer de conserver les
poignées après l’installation de l’appareil.)
Washer
Unterlegscheibe
Rondelle
Fire wall
Feuerwand
Cloison
Lock nut
Sicherungsmutter
Ecrou d’arrêt
Mounting bolt
Befestigungsschraube
Boulon de montage
Sleeve
Halterung
Manchon
Dashboard
Armaturenbrett
Tableau de bord
Stay (option)
Anker (Option)
Hauban (en option)
Screw (option)
Schraube (Option)
Vis (en option)
Voice control unit/Sprachsteuerungseinheit /Module de commande vocale
Microphone
Mikrofon
Microphone
Voice remote
Sprache Fern
Commande vocale
Tie band
Befestigungsband
Bandes de fixation
Double-faced adhesive tape
(50 mm x 13 mm)
Doppelseitiges Klebeband
(50 mm x 13 mm)
Ruban adhésif à double face
(50 mm x 13 mm)
Double-faced adhesive tape
(30 mm x 12 mm)
Doppelseitiges Klebeband
(30 mm x 12 mm)
Ruban adhésif à double face
(30 mm x 12 mm)
 Loading...