3
ENGLISH INDONESIA
A
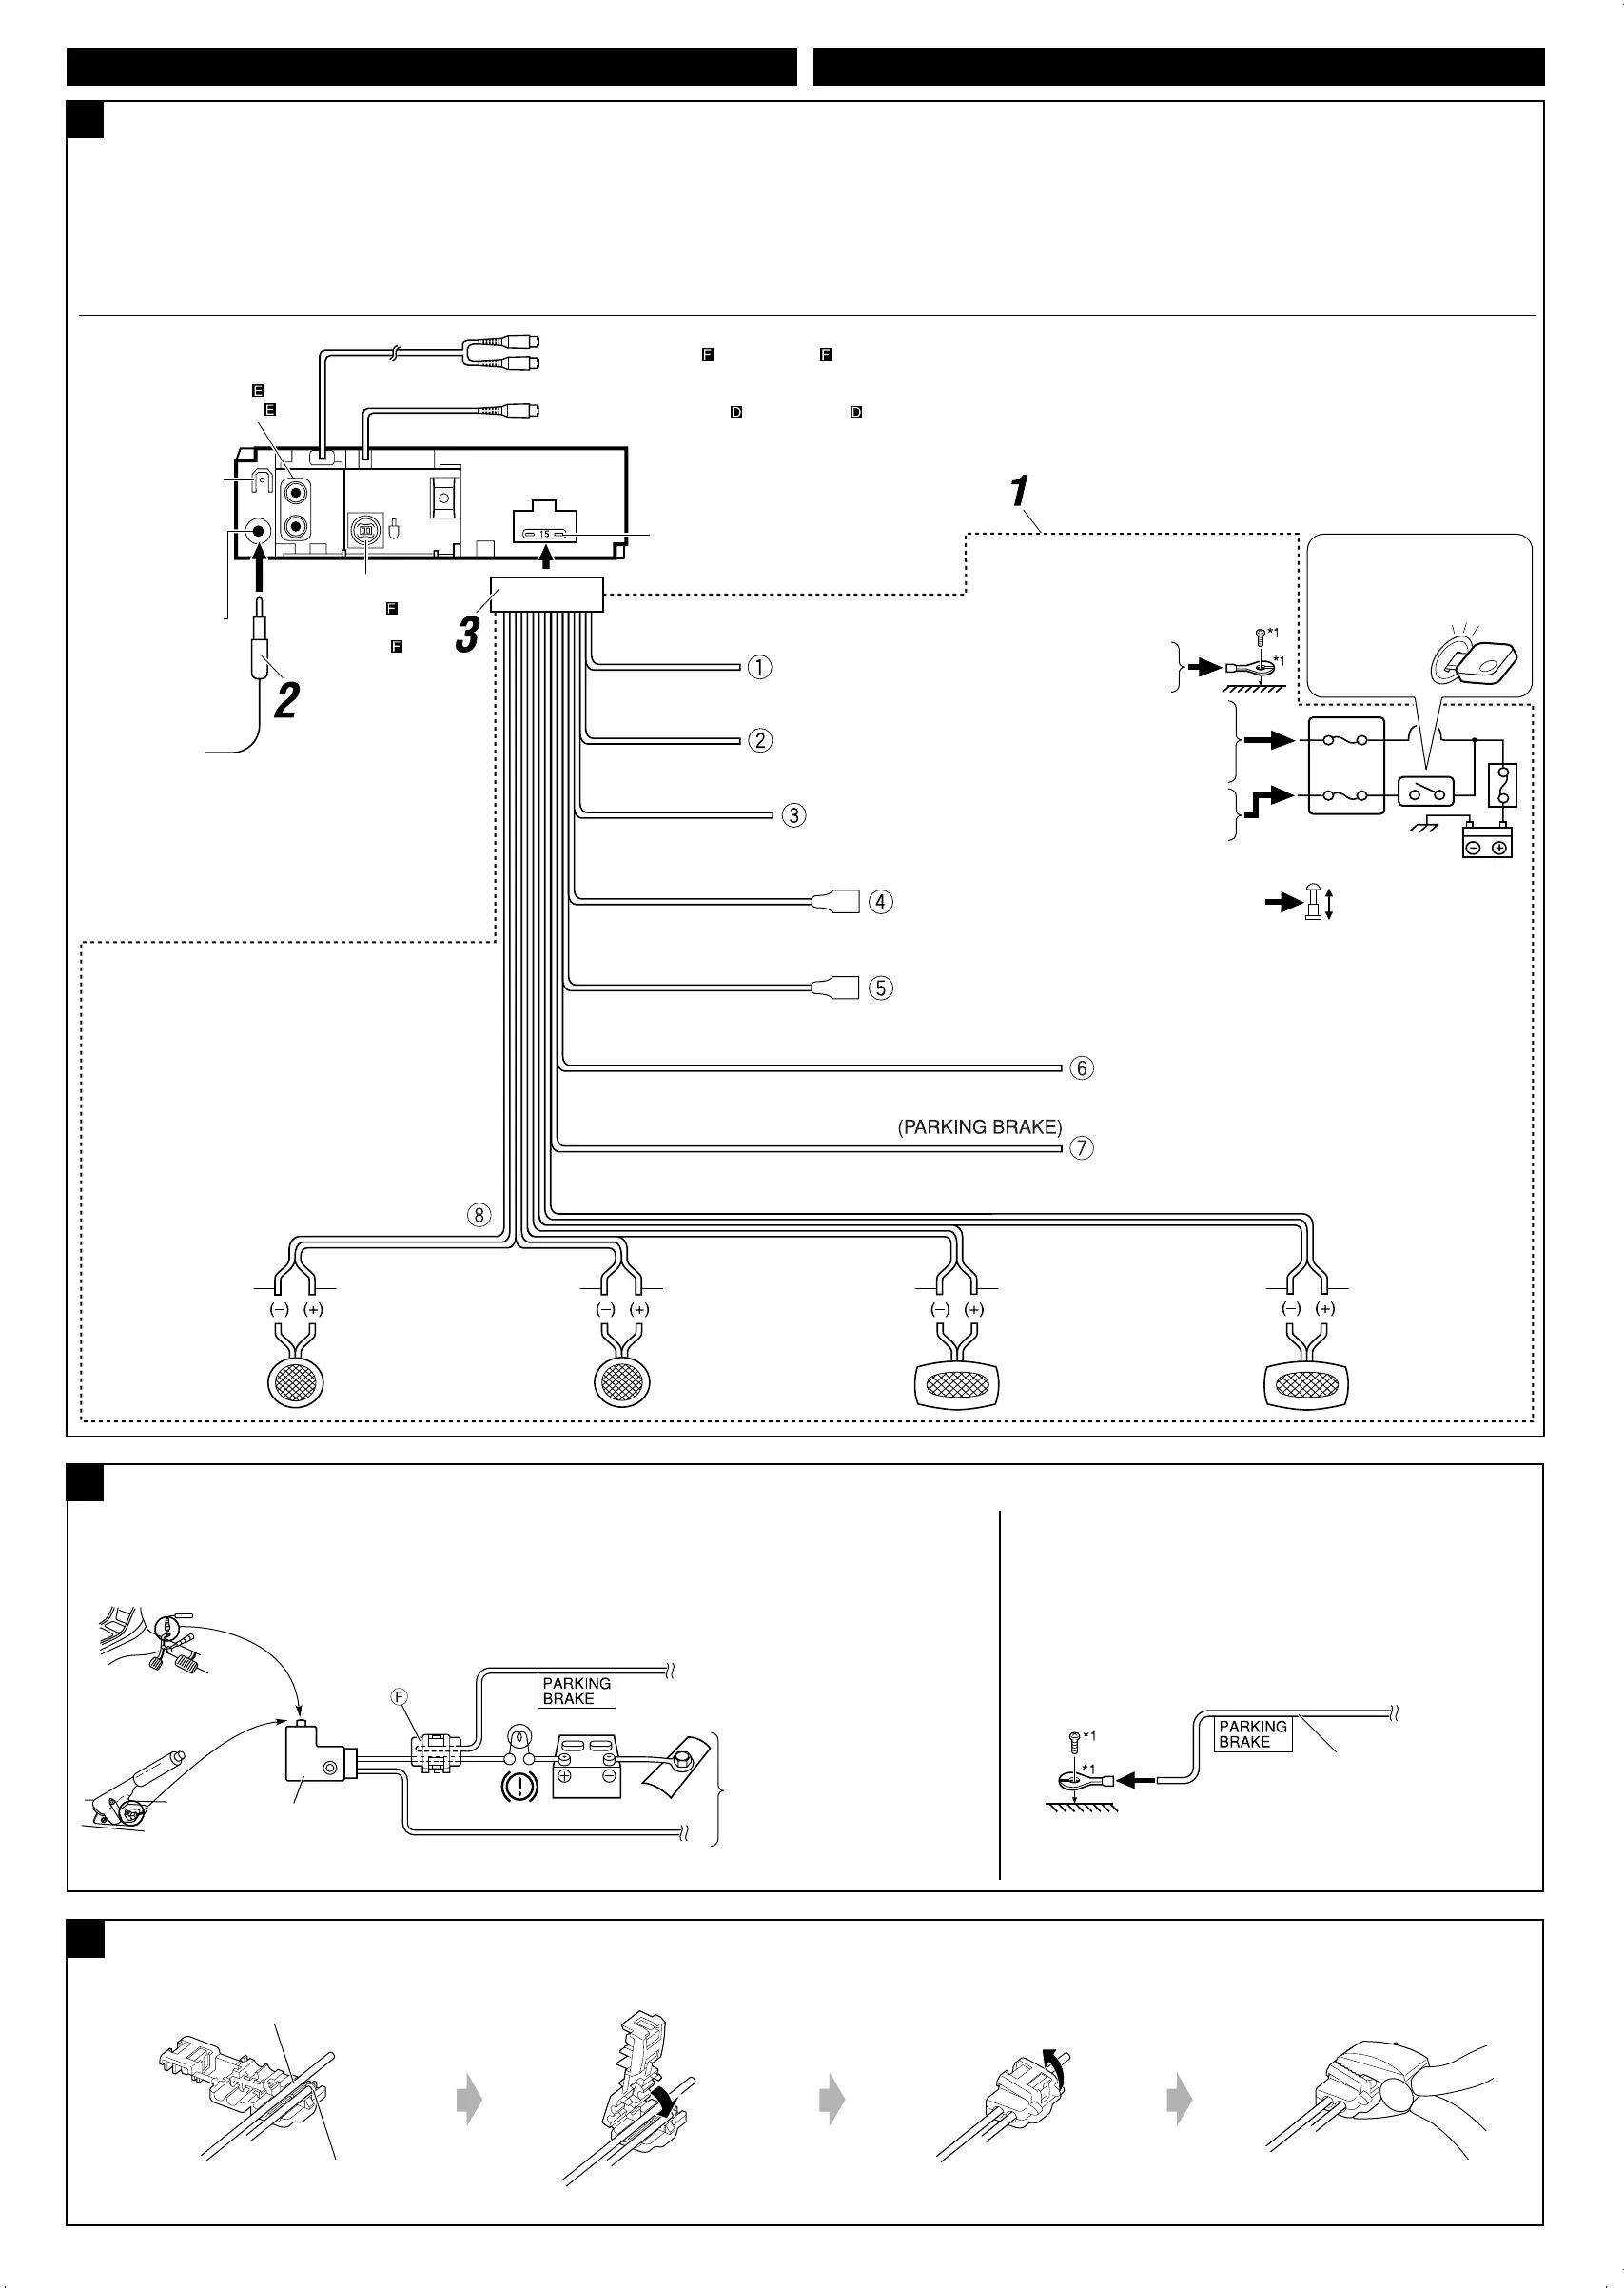
Typical Connections / Ciri khas sambungan-sambungan
Before connecting: Check the wiring in the vehicle carefully. Incorrect connection may cause
serious damage to this unit.
The leads of the power cord and those of the connector from the car body may be different in
color.
1 Connect the colored leads of the power cord in the order specified in the illustration below.
2 Connect the antenna cord.
3 Finally connect the wiring harness to the unit.
*
1
Not included for this unit.
*
1
Tidak termasuk untuk alat penerima
ini.
Ignition switch
Saklar kontak
CD changer jack
(see diagram )
Konektor CD changer
(lihat diagram )
Rear ground
terminal
Terminal tanah
belakang
15 A fuse
Sekring 15 A
Black
Hitam
To metallic body or chassis of the car
Ke besi bodi atau casis dari mobil tersebut
Yellow *
2
Kuning *
2
To a live terminal in the fuse block connecting to the car battery
(bypassing the ignition switch) (constant 12 V)
Ke sebuah tempat terminal dalam blok sekring disambungkan
ke baterai mobil (abaikan saklar kontak) (konstant 12 V)
Red
Merah
To an accessory terminal in the fuse block
Ke sebuah terminal aksesoris dalam blok sekring
Blue
Biru
To the automatic antenna if any (250 mA max.)
Ke antena otomatis jika ada (maksimum 250 mA)
Blue with white stripe
Biru dengan strip putih
To the remote lead of other equipment (200 mA max.)
Ke ujung jauh dari peralatan lain (maksimum 200 mA)
To cellular phone system
Untuk sistem telepon selular
Brown
Coklat
White with black stripe
Putih dengan strip
hitam
White
Putih
Gray with black stripe
Abu-abu dengan strip
hitam
Left speaker (front)
Speker kiri (depan)
Gray
Abu-abu
Green with black stripe
Hijau dengan strip
hitam
Right speaker (front)
Speker kanan (depan)
Green
Hijau
Purple with black stripe
Ungu dengan strip
hitam
Left speaker (rear)
Speker kiri (belakang)
Purple
Ungu
Right speaker (rear)
Speker kanan (belakang)
Fuse block
Blok sekring
Light green
Hijau muda
Line out (see diagram
)
Keluaran (lihat diagram )
VIDEO OUT (see diagram
/ lihat diagram )
LINE IN (see diagram
/ lihat diagram )
To parking brake, metallic body or chassis of the car
Ke rem parkir, logam body atau casis mobil
B
Connecting the parking brake wire / Menyambung kabel rem parkir
When installing the monitor in a location where it can be seen by the driver
Ketika memasang monitor pada tempat yang dapat dilihat oleh pengemudi
Connect the parking brake wire to the parking brake system built in the car.
Sambungkan kabel rem parkir ke sistem rem parkir yang terpasang tetap dalam mobil.
Connecting the crimp connector / Menyambung konektor kerut
C
Wire connecting the battery and the parking brake switch.
Kabel yang menyambungkan baterai dan saklar rem parkir.
Attach the parking brake wire to this point.
Pasal kabel rem parkir ke poin ini.
Contact the metallic part of the crimp to the wires inside.
Hubungkan bagian logam dari konektor kerut ke kabel-kabel di dalam.
Pinch the crimp firmly.
Jepit konektor dengan kuat.
Parking brake
Rem parkir
Parking brake wire (light green)
Kabel rem parkir (hijau muda)
To metallic body or chassis of the car
Ke logam body atau casis mobil
Parking brake switch
(inside the car)
Saklar rem parkir
(di dalam mobil)
When installing the monitor in a location where it cannot be
seen by the driver
Ketika memasang monitor pada tempat yang tidak dapat
dilihat oleh pengemudi
Connect the parking brake wire to metallic body or chassis of the
car.
Sambungkan kabel rem parkir ke logam body atau casis mobil.
Parking brake wire (light green)
Kabel rem parkir (hijau muda)
Sebelum penyambungan: Cek perkabelan dalam mobil dengan hati-hati. Penyambungan
yang tidak benar mungkin menyebabkan kerusakan serius pada alat penerima.
Ujung dari kabel power dan beberapa konektor dari bodi mobil mungkin berbeda dalam warna.
1 Sambungkan ujung berwarna dari kabel power dalam urutan spesifikasi pada ilustrasi di
bawah.
2 Sambungkan kabel antena.
3 Akhirnya sambungkan dudukan kabel ke alat penerima.
Antenna terminal
Terminal antena
*
2
Before checking the operation of this unit prior
to installation, this lead must be connected,
otherwise power cannot be turned on.
*
2
Sebelum pengecekan pengoperasian dari alat
penerima ini sebelum pemasangan, ujung ini
harus sudah dihubungkan, selain itu power
tidak dapat dihidupkan.
 Loading...