Do you have a question about the Kenmore 970C5037 and is the answer not in the manual?
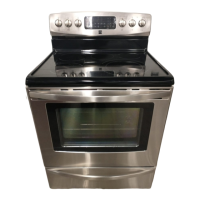
| Brand | Kenmore |
|---|---|
| Model Number | 970C5037 |
| Product Type | Range |
| Number of Ovens | 1 |
| Number of Burners | 5 |
| Self-Cleaning Oven | Yes |
| Color | Stainless Steel |
Child or adult can tip range and be killed. Verify anti-tip device has been installed.
Children should not be left alone or unattended. Never allow sitting/standing on appliance.
Flammable materials should not be stored in oven, drawer, or near oven vent.
Stepping, leaning, or sitting on door/drawers can cause injury or damage.
Never cover oven bottom or rack with foil; traps heat, causing fire hazard.
Wear proper apparel; loose-fitting garments can contact hot surfaces.
Do not heat unopened food containers; pressure buildup may cause burst.
Watch closely when heating fat/grease; it may catch fire if too hot.
Do not use water or flour on grease fires; use dry chemical or foam.
Use dry potholders; moist ones cause steam burns. Avoid touching hot areas.
California requires warning of substances known to cause cancer or birth defects.
Follow instructions for unpacking, installation, and servicing; use qualified technician.
Do not operate during power failure. Turn off range; reset clock and function when power resumes.
Cold can damage electronic control; warm appliance above 32°F (0°C) for 3 hours before first use.
Keep an appropriate foam-type fire extinguisher visible and accessible near the appliance.
Never use appliance for warming or heating the room.
Use care opening oven door; stand aside for hot air/steam escape.
Do not block oven vent ducts; hot air circulation is necessary for results.
Always place oven racks in desired location while cool.
Do not use broiler pan without insert; exposed fat could ignite.
Do not use aluminum foil to line oven bottoms/drip bowls improperly.
Do not cook food on the oven bottom; use proper bakeware and racks.
Know which knob controls each surface heating unit.
Select utensils with flat bottoms large enough to cover heating element.
Turn utensil handles inward to reduce burn, ignition, or spillage risk.
Never leave surface elements unattended at high heat; boilovers may ignite.
Check cookware manufacturer's recommendations for sudden temperature changes.
Turn fan on when flaming foods under a ventilating hood.
Improper cookware may break due to sudden temperature changes.
Do not use decorative burner covers; they can melt or cause burns.
Do not use foil to line drip bowls/reflector pans; risk of shock or fire.
Ensure reflector pans/drip bowls are in place; absence can damage wiring.
Do not immerse or soak removable surface heating elements.
Clean range regularly to keep free of grease that could catch fire.
Clean ventilating hoods frequently; grease accumulation can cause damage.
Specific instructions for cleaning self-cleaning ovens, including precautions.
Do not touch hot surface heating units, areas near them, or oven interior surfaces.
Appliance must be properly grounded for safety; use correct voltage, polarized, grounded outlet.
Use proper cookware for best cooking results; check flatness and size.
Understand how different cookware materials transfer heat for cooking efficiency.
Surface elements glow red as they heat; turn off just before cooking is complete.
Use extreme caution for home canning; follow USDA recommendations.
Indicator lights show when surface elements are on; check to ensure all are off.
Adjust surface element settings based on cookware, food amount, and type.
Oven vent location is crucial for air circulation and good baking results.
Arrange racks when cool; remove/replace by pulling forward and lifting.
Allow 2-4 inches around cookware for proper air circulation and even heat.
Features have minimum and maximum time/temperature settings; error tones sound for invalid entries.
Set the clock before operating the oven; time cannot be changed during cooking.
Lock oven for safety or inactivity; indicator light shows status.
Toggle between silent or audible operation for control feedback.
Change temperature display between Fahrenheit (°F) and Celsius (°C).
Use Add 1 Minute to add time to the kitchen timer.
Override 12-hour auto shutoff for continuous baking or select energy saving.
Set timer from 1 minute to 11 hours 59 minutes; it functions independently.
Use Bake for normal temperature baking; preheat indicator shows when temperature is reached.
Preheat oven, use proper rack positions, and consider bakeware for best baking results.
Set Cook Time to automatically start and stop baking at desired duration.
Program a delayed start time for baking or cleaning functions.
Convec Bake circulates heat for faster, even cooking; reduces cook time and energy.
Use Broil for direct flame heat exposure for optimum browning of meats.
Keep cooked foods warm at 170°F (77°C) for up to 3 hours after cooking.
Turn oven light on/off with door closed; light operates automatically when door is opened.
Check for 15 amp circuit breaker reset and optional night light feature.
Adjust oven temperature +/- 35°F (19°C) for precise baking calibration.
Self Clean uses high temperatures to eliminate soils; select 2, 3, or 4-hour cycle.
Start Self Clean immediately after removing racks and cleaning spills.
Program Self Clean to start at a future time for convenience.
Steam Clean uses water and heat for light cleaning; do not exceed temperature limits.
Clean knobs with soapy water; remove by pulling off shaft for thorough cleaning.
Clean painted parts with hot, soapy water and a cloth or sponge.
Clean decorative trim gently with soapy water, avoiding abrasives.
Clean aluminum/plastic/vinyl trim with soapy water; avoid harsh cleaners.
Clean control panel carefully with damp cloth; avoid excess water to prevent damage.
Scrub porcelain enamel with soapy scouring pad; use ammonia for tough spots.
Remove spills before Self Clean; clean frame and door liner with soap and water.
Remove racks before Self Clean; clean with mild abrasive cleaner.
Clean oven door with soap/water; use glass cleaner on outside glass only.
Do not use spray cleaners on cooktop; refer to surface element cleaning instructions.
Use specific stainless steel cleaners; rub with grain, polish with lint-free cloth.
Ensure controls are off and range is cool before cleaning; provide ventilation for ammonia.
Do not use foil in oven bottom/racks; can damage cooktop or melt.
Unplug surface elements to remove them and clean drip pans.
Wash drip bowls in hot, soapy water or dishwasher; avoid abrasive cleaners.
Lift cooktop carefully to access underside for cleaning; ensure it's secure before use.
Unplug range, release wire holder, replace bulb, and reassemble glass shield.
Carefully remove oven door by disengaging hinge locks and lifting arms.
Do not close door with racks out; avoid hitting glass with objects to prevent breakage.
Preheat oven for best results; adjust rack position and pan size for even baking.
Ensure proper rack, pan size, preheating, and oven leveling for good baking.
Check for level floor and adjust leveling legs if appliance or rack is uneven.
Ensure cabinets provide clearance; contact builder if cabinets are too tight.
Check power cord, house lights, or call electric company for power outages.
Verify clock is set and controls are properly set for the desired function.
Adjust surface control setting if element is too hot or not hot enough.
Use flat, balanced cookware; warped pans or incorrect size affect heating.
Ensure oven light is secure in socket; check bulb replacement instructions.
Check broil setting, meat placement, and clean oven surfaces to prevent excessive smoke.
Wipe up spills before broiling; follow broil instructions for flames or smoke.
Press STOP to clear error; try function again or reset power if error repeats.
Ensure control is set properly; restart Self Clean if interrupted by power failure.
Clean oven frame, door liner, and bottom center before Self Clean for best results.
Remove oven racks from cavity before Self Clean to prevent discoloration.
Remove acidic spills promptly; normal environment may cause corrosion.
Ensure cookware size matches element; avoid cookware that extends beyond surface.