•English
Function and OPeration
• ID should
be
reslstered
for
this
unit
when
connectins this
unit
to
the
receiver.
•
For
details
on
how
to
resister
ID,
refer
to
<Remote
controiiD
setup>
In
the
receiver
Instruction manual.
When
cannect1111
a receiver
other than
KMB·ZOOIJ
KMR·550lJ
KMR·55$U:
•
When this unit
is
connected
to
the
receiver,
"ID
SET
REGIST"
appears. Press
the
[ENTER)
button
after
above
messase
appeared.
"ID
SET
ID1 OK"
appears
when
the
settins is
completed.
• You can
control
only
the
front
or
rear side
with
this
unit when
the
dual
zone function
of
the
receiver
Is
active.
By
default,
the
front
side can.
be
controlled. To switch
to
the
rear
side,
refer
to
<Dual Zone control setup> in
the
receiver instruction manual. lKM1l:lOOIJ
sml
• You
must
walt
1
to
2
seconds
after
the
system powers
on
before
the
remote
can
be
operated.
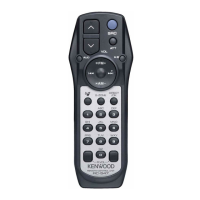
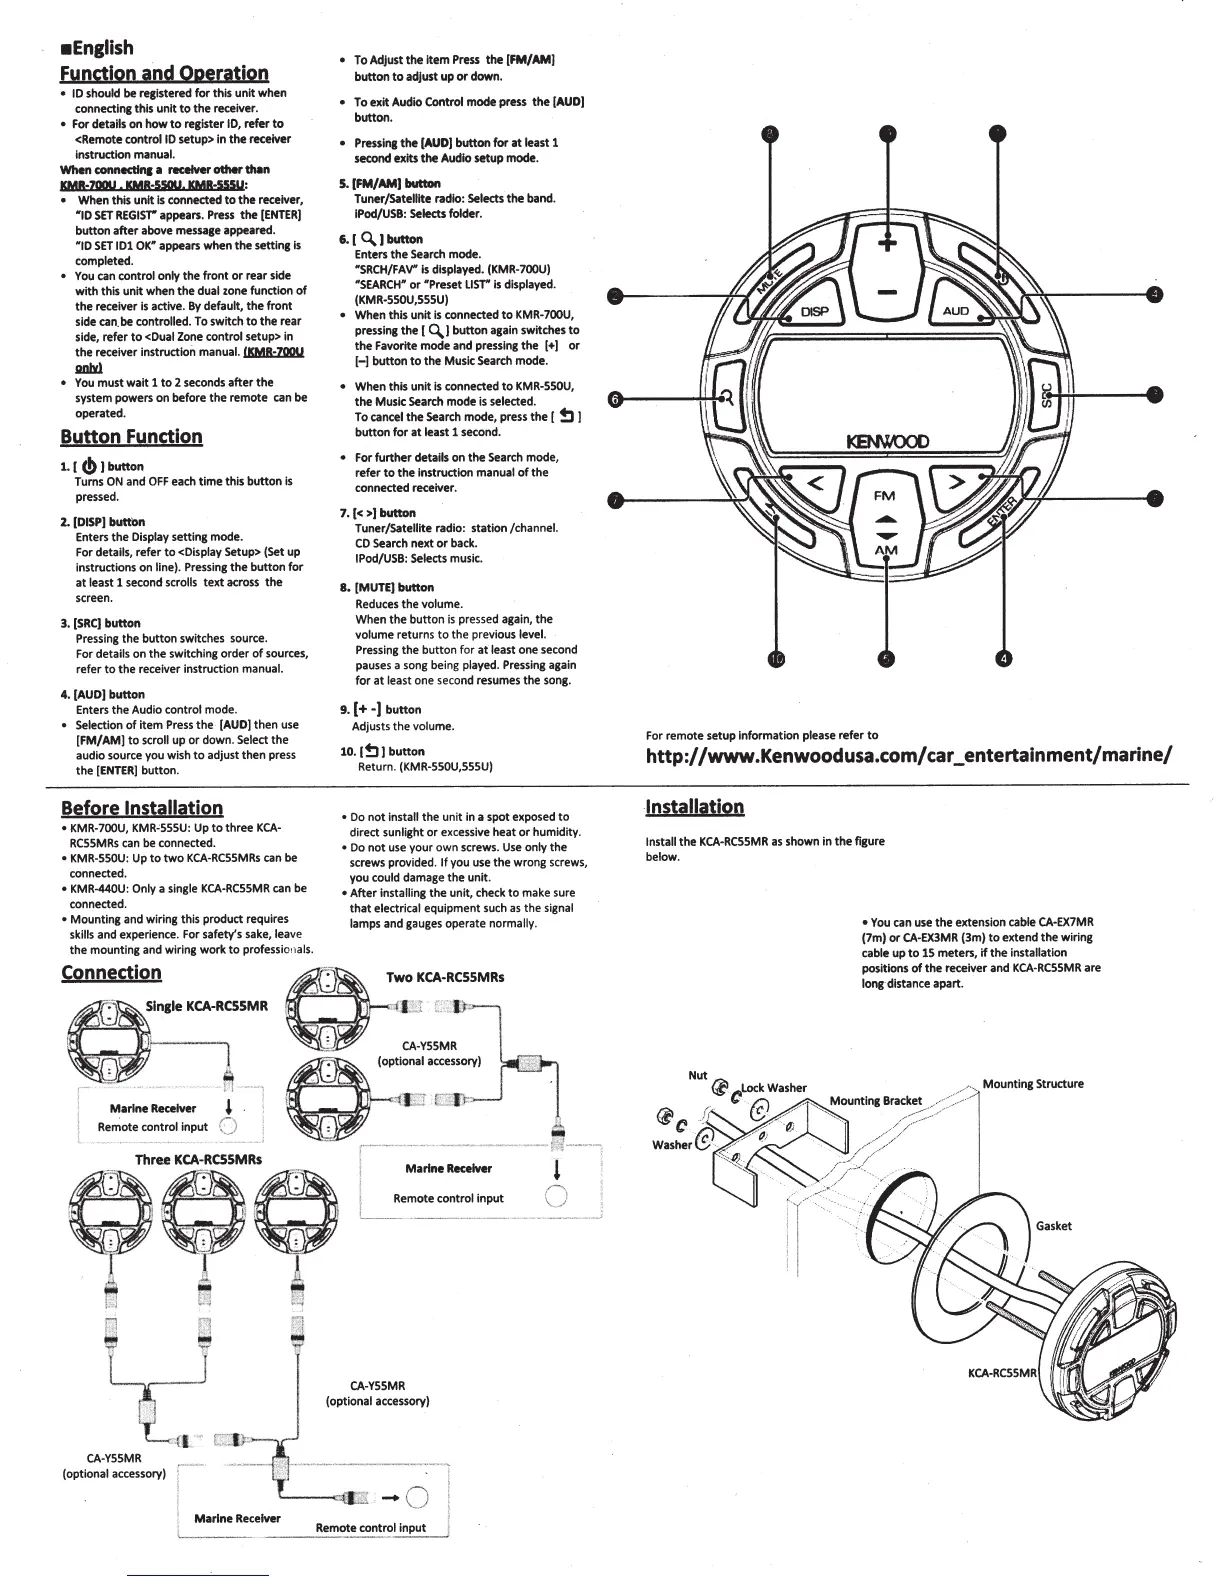
Button Function
1.
[
(!)
I
button
Turns
ON
and
OFF
each
time
this
button
Is
pressed.
2.
IDISP[ buttOn
Enters
the
Display
setting mode.
For
details, refer
to
<Display
Setup> (Set
up
instructions on
line).
Pressins
the
button
for
at
least
1 second
scrolls
text across
the
screen.
3.
ISRC)
button
Pressing
the
button switches source.
For
details
on
the
switch
ins
order
of
sources,
refer
to
the
receiver instruction
manual.
4.
lAUD)
button
Enters
the
Audio
control
mode.
• Selection
of
item
Press
the
·
[AUD)
then
use
[FM/AM)
to
scroll
up
or
down.
Select
the
audio source you wish
to
adjust
then
press
the
[ENTER]
button.
Before
Installation
• KMR-700U,
KMR
' 555U: Up
to
three
KCA-
RCSSMRs
can
be
connected.
•
KMR-SSOU:
Up
to
two
KCA-RCSSMRs
can be
connected.
• KMR-440U: Only
a
sinsle
KCA-RCSSMR
can
be
connected.
•
Mounting
and wiring this product requires
skills
and experience. For
safety's
sake,
leave
the
mounting and wiring
work
to
profession
als.
Connection
•
To Adjust
the
Item
Press
the
IFM/AMJ
button
to
adjust
up
or
down.
•
To
exit
Audio
Control
mode
press
the
[AUD)
button.
• Presslne
the
[AUDJ
button
for
at
least
1
second exits
the
Audio
setup mode.
5.
IFM/AMI
button
Tuner/Satellite
radio:
Selects
the
band.
IPod/USB: Selects folder.
6.
I
0.1
button
Enters
the
Search mode.
"SRCH/FAV"
is
displayed.
(KMR-700U)
"SEARCH"
or
"Preset
LIST"
is displayed.
(KMR-SSOU,SSSU)
•
When
this
unit
is connected
to
KMR-700U,
press
ins
the
[
Q.J
button
asain switches
to
the
Favorite
mode
and
presslns
the
[+)
or
H
button
to
the
Music Search
mode.
•
When
this
unit
Is
connected
to
KMR-SSOU,
the
Music
Search
mode
is selected.
To
cancel
the
Search mode, press
the
[
!:11
button
for
at
least 1 second.
•
For
further
details
on
the
Search mode,
refer
to
the
instruction
manual
of
the
connected
receiver.
1.
I<
>I
button
Tuner/Satellite radio: station
/channel.
CD
Search
next
or
back.
IPod/USB: Selects
music.
8.
[MUTE[
button
Reduces
the
volume.
When
the
button
is
pressed again,
the
volume
returns
to
the
previous
level.
Pressing
the
button
for
at
least
one
second
pauses a song being
played.
Pressing again
for
at
least
one second resumes
the
song.
9.
(+·)button
Adjusts
the
volume.
10. I
!:11
button
Return.
(KMR-SSOU,SSSU)
•
Do
not
install
the
unit
in a spot exposed
to
direct
sunlight
or
excessive heat
or
humidity.
•
Do
not
use your
own
screws.
Use
only
the
screws provided.
If
you use
the
wrong screws,
you
could
damage
the
unit.
•
After
installins
the
unit
, check
to
make sure
that
electrical
equipment such
as
the
signal
lamps
and gauges operate
normally.
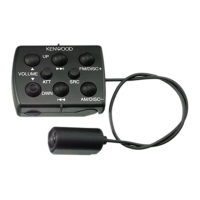
Two
KCA·RCSSMRs
e
.
Single
KCA-RCSSMR
a.-
l
'-
-
--~
·-
-~-
--
~
..
.
..
-,
!
Marine
Receiver '
~
A
(optional
~ccessory)
Remote control
input
0
r-·
-- -
............
.
~
~
'
-
·
........................
~:li
·-
..
.......
.
e
ThreeeKCA-.RCSSMRes
;
i
- - L
(-.)
1
1
~
Remote
control
input
~
,
I
--
-
..
·-
--
- -
--
-
'[l
' :
r 1
x
Marine
Receiver
~
~
~
CA
-
YSSMR
(optional
accessory)
CA-YSSMR
(optional accessory)
r·
--·
__
.......
_
..
_____
..
__
:-l
I
.
'----o::I)
L'i
'"'K:
-
()
I
I
Marine
Receiver
I
'---
----
.
Remote
control
input
'
_j
For remote setup information
please refer
to
http://www.Kenwoodusa.com/car_entertainment/marine/
Installation
Install
the
KCA-RCSSMR
as
shown
in
the
fisure
below.
• You
can use
the
extension cable
CA-EX7MR
(7m)
or
CA-EX3MR
(3m)
to
extend
the
wirins
cable
up
to
15
meters,
if
the
installati
on
positions
of
the
receiver and
KCA-RCSSMR
are
long
distance apart.

 Loading...