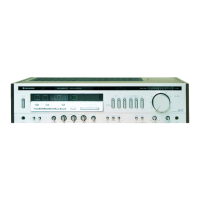
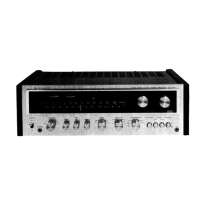
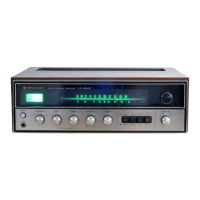
AM-FM
STEREO
RECEIVER
KR-770
INSTRUCTION
MANUAL
CONTENTS
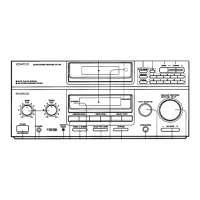
CONTROLS. INDICATORS
AND
CONNECTORS
SAFETY PRECAUTIONS ....
..
..
....... .........
..
.. .
SYSTEM CONNECTION
DIAGRAM
............
..
.......
..... .
SYSTEM
CONNECTIONS
. .
..
. . .. ..... .. ...
..
.
..
......... .
OPERATING INSTRUCTIONS
..
........ .........
.....
.
..
..
..
... . .
IN CASE OF DIFFICULTY .
..........
...
..
.. .
..
....
..
.......
.. ..
. .
SPECIFICATIONS .....
.....
..
.
.........
.. ................ .
MEMO
. .
........
. ... ..
..
. ..
FOR
YOUR
RECORDS
2
4
4
5
7
9
10
1 1
Record the serial number. found on the
back
of
the
unit. in the spaces designated on the
warranty
card. and in
the space provided
below
. Refer
to
the model and serial
numbers whenever you call
upon
your
Kenwood dealer
for
information
or
service on
this
product.
Model
KR-770
Serial
number
____
_____
_
UNPACKING
Unpack the
unit
carefully and make sure
that
all
accessories and cables are
put
aside so
they
will
not
be lost.
Examine the
unit
for
any possibility
of
shipping
damage.
If
your
unit
is
damaged
or fails
to
operate,
notify
your dealer
immediately
.
If
your
unit
was
shipped
to
you di-
rectly,
notify
the shipping
company
without
delay. Only the
consignee (the person or
company
receiving the
unit)
can file
a claim against the carrier
for
shipping
damage.
We
recommend
that
you retain the original
carton
and
packing materials
for
use should you transport
or
ship
the
unit in the
future
.
INSTALLATION
PRECAUTIONS
(a)
Avoid
locations
subject
to
direct
sunlight.
(b) Avoid high
or
low
temperature
extremes.
(c)
Keep the
unit
away
from
heat radiating sources.
(d)
Choose a
location
that
is relatively free
of
vibration
or
excessive dust.
(e)
Make sure
power
is
off
before making any system con-
nections.
WARNING:
TO PREVENT FIRE
OR
SHOCK HAZARD,
DO NOT EXPOSE THIS APPLIANCE TO
RAIN
OR
MOISTURE.
,·-
$KENVVOOD
_
..
----~~-POR;;NT~-~
U.S.A.
AND
CANADA
i
Units
shipped
to
the
U.S.A. and Canada are designed !
for
operation
on
120
volts
AC only. These units are
not
equipped
with
an AC Voltage Selector
switch
and
the discussion
of
such a
switch
that
follows
should be
disregarded.
ALL
OTHER
COUNTRIES
I
Units
shipped
to
countries
other
than
the U.S.A. and !
I Canada are equipped
with
an
AC
Voltage Selector 1
L:
1tch
on the rear panel Refer
to
the
following
pa- !
graph
for
the
proper
setting
of
this
switch
. • i
- -
...
- - . -
AC
VOLTAGE
SELECTION
This
unit
operates
on
120
.
220.
or
240
volts
AC
. The
AC Voltage Selector
Switch
on the rear panel is set
to
the
voltage
that
prevails in the area
to
which
the
unit
is shipped.
Before connecting the
power
cord
to
your AC outlet. make
sure
that
the
setting
position
of
this
switch
matches your
line
voltage
.
If
not.
it
must
be
set
to
your voltage in accor-
dance
with
the
following
direction
.
Note
:
--
-------
-
---
-----
- -
Our
warranty
does
not
cover damage caused by excessive line
voltage due
to
improper
setting
of
the AC Voltage Selector
Switch
.
'"""
''""il"
AC
120V
~
Position •
AC
220V
~
P
osit
ion
AC
240V
~
P
osition
Lever
I
io
• J@
1. Remove
screw
and
sto
pper plate.
2. Slide lever to your line voltage.
3. Lock lever
wit
h
stopper
plate
and
screw
.
AC VOLTAGE SELECTOR
SWITCH