Kodak - Diconix 150 Parallel/150 Serial OSE
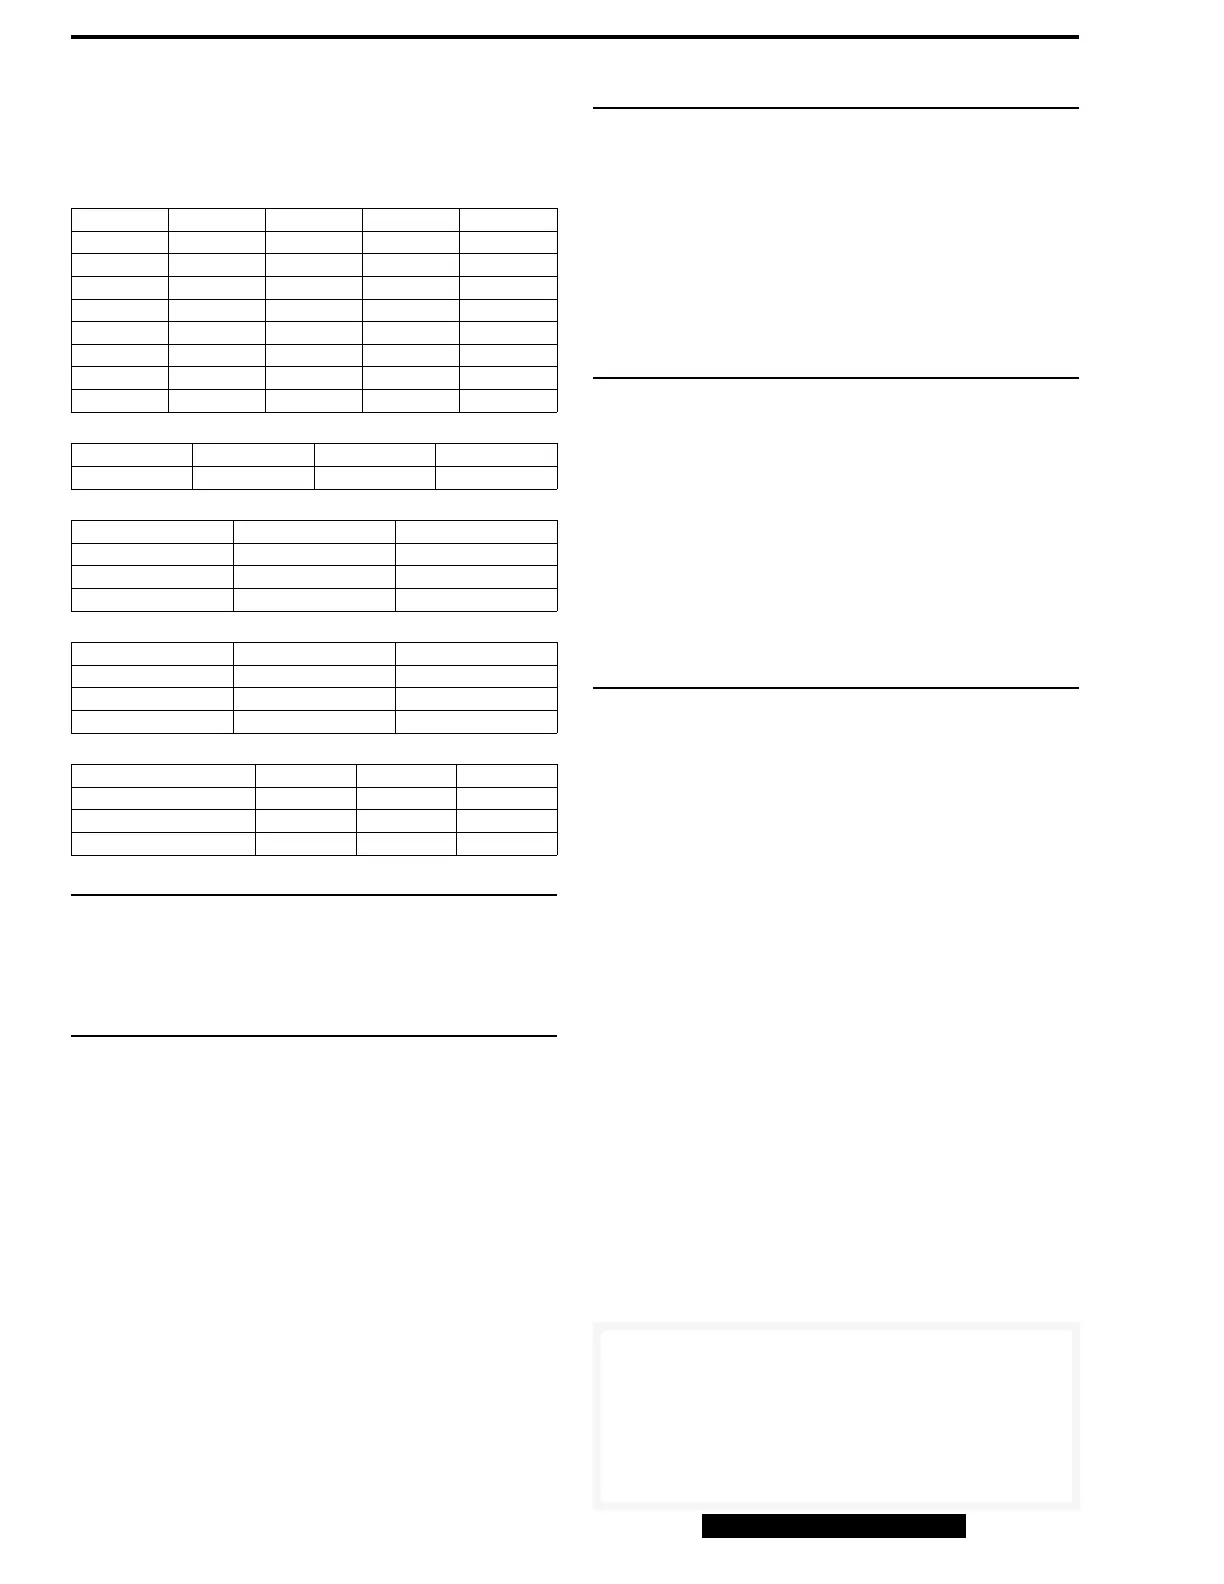
Serial Printer DIP Switch Settings
The Serial Printer DIP switches are located under the top cover on
the right side of the carriage opening.
Baud Rate Selection
Baud Rate Stop bit SW1 SW2 SW3
9600 * 1 OFF OFF OFF
4800 1 OFF OFF ON
2400 1 OFF ON OFF
1200 1 OFF ON ON
600 1 ON OFF OFF
300 1 ON OFF ON
300 2 ON ON OFF
110 2 ON ON ON
Data Bits
Switch Function OFF ON
SW4 Data bits 7 bits 8 bits
Parity
Parity SW5 SW6
No Parity * OFF OFF
Even Parity OFF ON
Odd Parity ON OFF
Data Protocol
Protocol SW7 SW8
RDY/BSY * OFF OFF
XON/XOFF OFF ON
ETX/ACK ON OFF
Handshake Disable
Handshake SW9 SW10 SW11
Carrier Detect (CD) ON OFF OFF
Clear to Send (CTS) OFF ON OFF
Data Set Ready (DSR) OFF OFF ON
*Indicates default settings
Error Codes
Power light flashing - Indicates batteries are low.
Paper Empty light flashing - Indicates paper empty or print head
carriage obstruction. Check paper. Clear any print head obstruction.
On Line light flashing - Indicates serial interface error.
Critical Adjustments
Head Installation
1. Turn printer power off. Disconnect the AC adapter if it is attached
to the printer.
2. Open the printer top cover. The print head will be parked at the left
side of the carriage travel.
3. Remove and replace the absorbent pad inserted in the print head
park absorber clip.
4. Drop the print head latch lever to allow removal of the old print
head.
5. Insert the new head and raise the latch to secure the print head in
place.
Battery Installation
1. Turn printer power off. Disconnect the AC adapter if it is attached
to the printer.
2. Open the printer top cover. Move the bail arm away from the
platen.
3. Rotate the platen until the battery compartment is aligned between
rear cover and paper guide.
4. Open the battery cover and replace old batteries with five "C" size,
nickel cadmium, rechargeable batteries. Refer to the diagram in the
battery compartment for polarity placement.
Common Problems and Fixes
Carriage moves, but printer does not print
1. Check print head installation.
2. Lock carriage latch.
3. Clean carriage connection.
4. Replace print head cartridge.
Poor print quality - Same as above.
Print head leaves blot of ink - Install new blotter pad.
Misc. erratic performance - Check AC adapter and AC adapter
connection.
Recharging batteries:
1. Power light flashes when batteries are low. Two pages may be
printed after the Power light begins to flash.
2. With power off, connect AC adapter. Turn on power while pressing
On Line, Line Feed and Form Feed keys. Continue to hold the
keys until the Paper Empty light and On Line light flash.
3. Complete recharging takes approximately ten hours. Printing may
interrupt the charging process by pressing the On Line key.
Re-enter the charge mode by repeating step 2.
4. When all lights are not blinking and the Power light is on, charging
process is complete.
Note: Recharging will not resume automatically if power is
interrupted during charging process.
Field Replaceable Units
There are no field replaceable units.
Note Be sure to print a menu/configuration list before
swapping the printer.
IBM/TSS Internal use only
© Copyright International Business Machines Corporation August 1995.
All rights reserved.
Printer IBM P/N IBM machine type
Diconix 150 Parallel 11F9442 1514-D01
Diconix 150 Serial 31F0242 1514-D02
Tech Support 800-877-7763
 Loading...