Our product cleaning instructions will help ensure that your gear has a long, exciting life. Washing by hand and hang air-drying
is the best way to care for your Kurgo products.
Hand Wash Instructions
1. Brush off loose dirt with a dry brush.
2. Spot clean with a damp sponge, cold water, and mild soap. Avoid harsh detergents.
3. If necessary, rinse larger area to eliminate excess soap residue.
4. Hang to air dry (do not machine dry).
Cleaning Instructions
The following represent alternate ways in which the Auto Zip Line can be set up. While not the recommended set up, you may find that for your
particular pet/vehicle these work better. Note that the product is intended to restrain your pet and keep it from distracting you while driving,
and does not guarantee protection from injury in every situation.
Products displaying this symbol are intended to prevent dogs from entering the front seat where they can
interfere with the driver and cause distracted driving accidents. They are intended to serve as either
physical barriers to the front seat or restraints that keep pets from roaming around in the car. If used
properly, they should keep dogs from entering the front seat, but they cannot guarantee containment nor
protect from injury in every situation.
REAR SEAT
CONTAINMENT
REDUCES
DRIVER
DISTRACTION
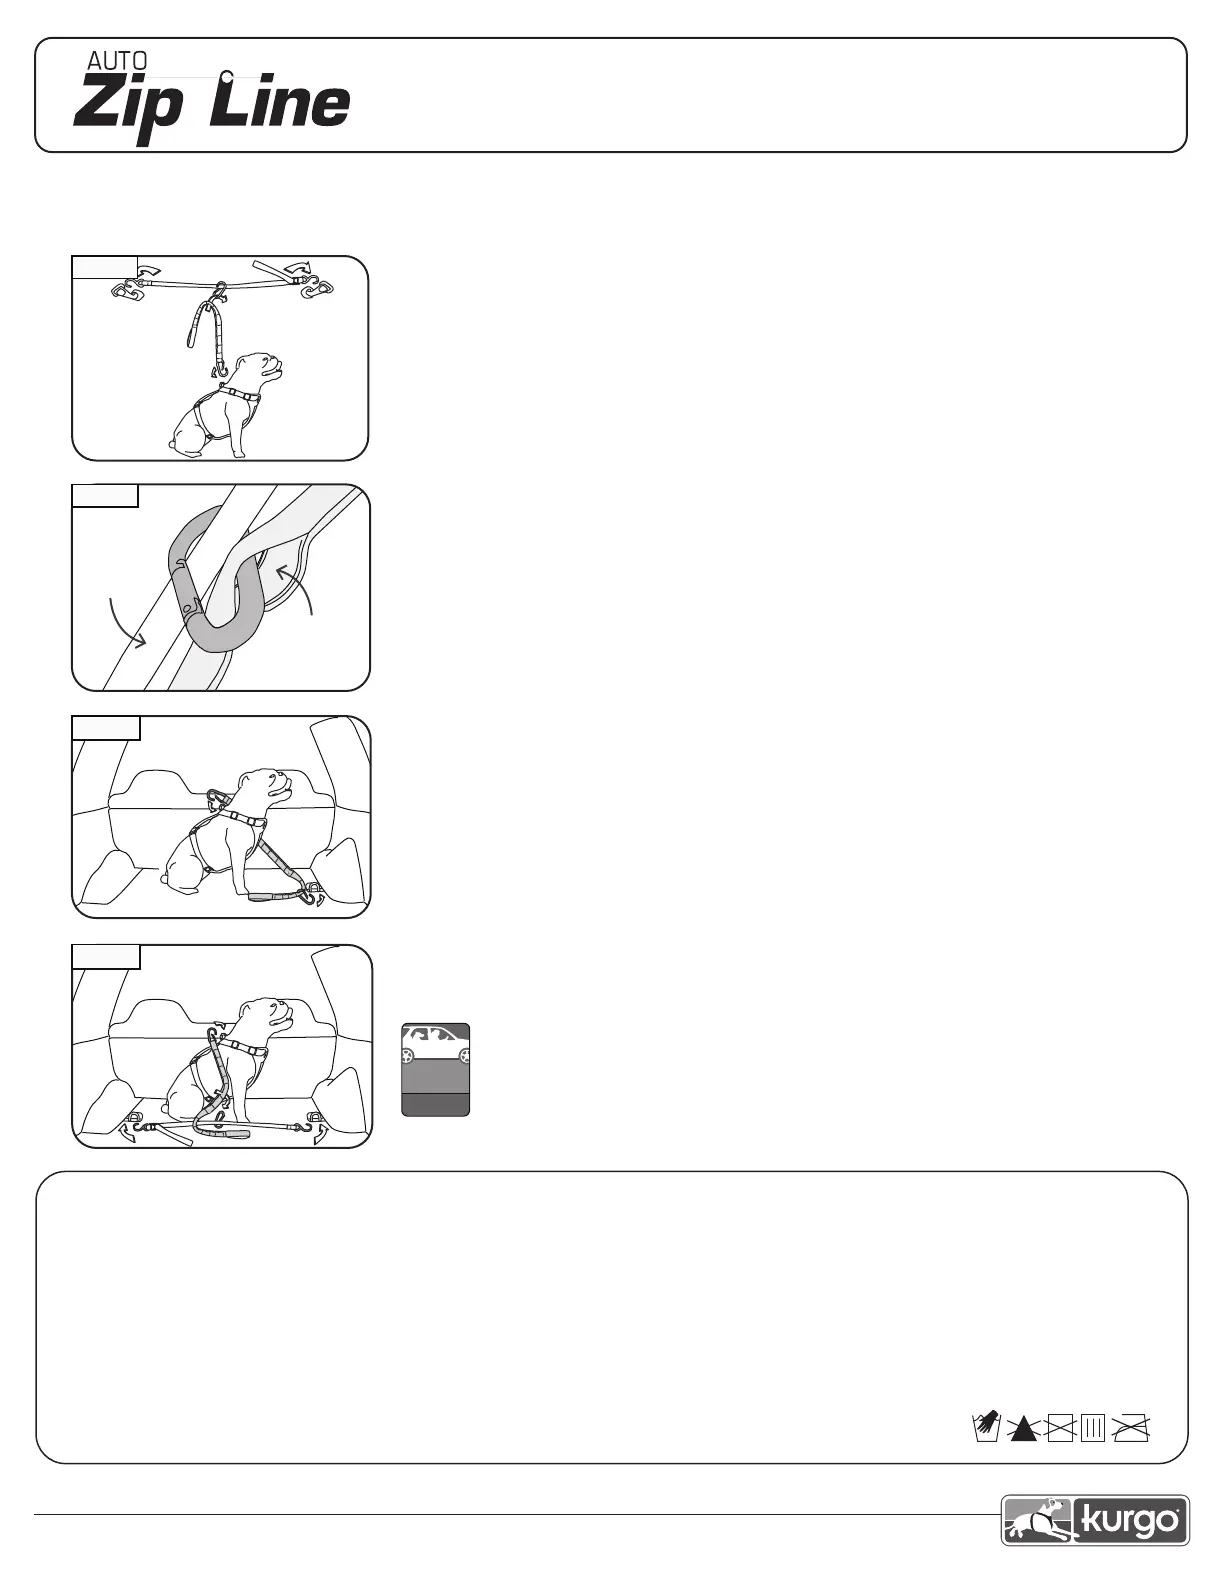
Passenger handle installation (Fig.1)
1. Place the two s-hooks (A) onto the rear passenger handles.
2. Tighten the zip line by pulling the extra webbing through the cam buckle (B).
3. Roll up extra webbing toward cam buckle and secure using bungee and toggle (E) setup.
4. Place the zip line carabiner (F) onto zip line.
5. Attach the harness carabiner (G) to your dog’s harness (not included), or seatbelt tab.
6. Locate appropriate leash nook (H) that permits your dog to sit up and lay down then loop onto
carabiner attached to the zip line.
Seatbelt installation (Fig.2)
1. Buckle seatbelt and attach the zip line carabiner (F).
2. Locate appropriate leash nook (H) that permits your dog to sit up and lay down and loop onto the
carabiner attached to the zip line.
3. Attach the harness carabiner (G) to dog’s harness (not included) or seatbelt tab.
Cargo hook installation (Fig.3)
1. Attach the zip line carabiner (F) to cargo hook in the rear of the vehicle.
2. Locate appropriate leash nook (H) that permits your dog to sit up and lay down and loop onto the
carabiner attached to the cargo hook.
3. Attach the harness carabiner (G) to your dog’s harness (not included) or seatbelt tab.
Cargo hook installation (Fig.4)
1. Place the two s-hooks (A) onto the cargo hooks in the rear of the vehicle.
2. Tighten the zip line by pulling the extra webbing through the cam buckle (D)
3. Roll up extra webbing toward cam buckle and secure using the bungee and toggle (E) set up.
4. Place the zip line carabiner (F) on to zip line and harness carabiner (G) onto harness D-ring.
5. Locate the appropriate leash nook (H) that permits your dog to sit up and lay down and loop onto
the carabiner.
Fig. 3
Fig. 4
Fig. 2
Fig. 1
NOTICE: Please contact Kurgo directly with any product or warranty inquiries.
Kurgo Products
•
2D Fanaras Drive, Salisbury, MA 01952
•
877-847-3868
•
www.kurgo.com
•
info@kurgo.com
kurgo.com/product-instructions
4-15
Instructions and care
™
Seatbelt
Zip Line
 Loading...