TRUCKSTER ELECTRIC
SPREADER
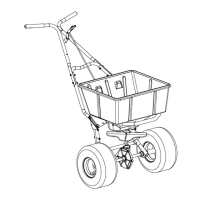
SPREADER MOUNTING
The LESCO Truckster Mount Electric Spreader is designed to be mounted to the rear of any turf maintainence vehicle with a 12-volt
electrical system. The vehicle could be anything from a golf cart to a pickup truck. For this reason, specifi c mounting instructions cannot
be given.
The spreader should be mounted at the center rear of the vehicle so that the impeller is 12 to 18 inches from the ground. This is important
to obtain the proper spreading pattern. The mounting is accomplished by drilling and bolting through the holes in the mounting plates and
the U-frame behind the hopper. The furnished 1/4-20 x 2 inch bolts, lockwashers and nuts should be used. In some cases, depending
on the vehicle, your mechanic may wish to fabricate mounting brackets.
On-Off Switch
This switch should be mounted on the instrument panel or in a position convenient to the driver. Do not overtighten the nuts on the switch
as damage to the Switch Housing could occur. Take care to route the wires through the Switch Housing openings and that the wires are
not pinched when mounting the switch.
WIRING
The spreader wire harness and motor have molded disconnect plugs that allows the spreader to be removed from the vehicle while
leaving the wire harness attached. Connect the wire harness to the vehicle 12-volt power source before connecting the molded plug to the
spreader electric motor. WARNING: AVOID DAMAGE TO THE WIRING! KEEP THE WIRES AWAY FROM THE ENGINE AND OTHER
SOURCES OF HEAT AT ALL TIMES. With a negative ground system, connect the red wire from the switch harness to the positive (+)
terminal of the vehicle’s 12-volt battery or 12-volt power source. Connect the black wire from the switch harness to a good ground point
on the vehicle frame or the negative (-) terminal of the vehicle’s 12-volt battery. Connect the molded plug to the spreaders electric motor.
Switch the On-Off switch to On and check for proper rotation of the impeller. When viewed from the top of the spreader, the impeller should
rotate counter-clockwise. If the rotation is incorrect, turn off the motor, disconnect the molded plug and reverse the wiring.
CONTROL CABLE
The control cable is used to open and close the spreader. It should be placed in a position easily reached by the driver.
OPERATION
PROPER VEHICLE SPEED IS 3 M.P.H.
Adjust the spreader setting rate as recommended by the manufacturer of the product to be applied. At a speed of 3 M.P.H., the product
will be distributed in a spread width of 8 to 12 feet. To spread material, switch on the On-Off switch to start the impeller when the vehicle
reaches the area to be treated, then use the control cable to open the spreader. When you reach the end of the area to be treated, use
the control cable again to close the spreader. Then with the spreader closed, turn around and then open the spreader again and make
a pass parallel to and 8 feet away from the fi rst. If you keep the passes 8 feet apart, the spread patterns will overlap at the sides where
they thin out and you will achieve an even distribution. Remember to close the spreader when you stop or turn the vehicle. Also switch
off the On-Off switch to stop the impeller if you stop or when traveling from one area to another.
The material in the Hopper should be kept dry at all times to avoid damage to the Equipment. Always use the included and Hopper Cover
when a risk of exposure to moisture is present.
SAFE OPERATION
Do not put hands inside the Hopper while the motor is on. Repair exposed wires before operating the Spreader. Only use materials
that are safe to spread in conjunction with this Spreader. Keep children away from the Spreader at all times. Do not use more than 80
pounds in the Hopper or 125 pounds with the Hopper Extension attached. Do not allow anyone to sit in or ride on the Hopper assembly.
MAINTENANCE
The spreader should be emptied and cleaned thoroughly after each use. Cover the motor and if possible clean the spreader,
hopper, and working parts with a high pressure water spray.
Do not spray water directly on the motor. The motor
should be cleaned by blowing it off with an air hose
(motor is not waterproof). The control cable is attached to the latch arm.
Oil the latch-arm pivots after each use.
Model #: 102479
Starting Date: 12/11