10 ENGLISH
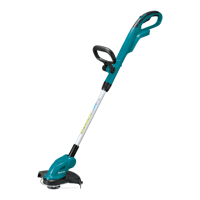
1. Attach the protector and the protector holder to the
motor housing as illustrated. Be sure to t the projec-
tions and grooves on them to their counter parts.
1
3
4
3
2
► 1. Protector 2. Groove 3. Projection 4. Protector
holder
2. Tighten the hex socket head bolts securely to
fasten the protector and the protector holder.
1
2
► 1. Hex socket head bolt 2. Hex wrench
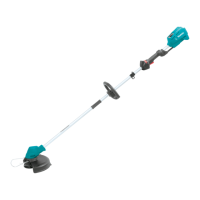
Installing the wire guard
CAUTION: Before adjusting the wire guard,
wait for the cutting head comes to standstill. Do
not adjust the wire guard with your foot.
To reduce the risk damaging the objects in front of the
cutting head, insert the wire guard so that it controls the
cutting range of the mowing line.
Slightly expand the wire guard outward and then insert
it into the holes on the protector.
1
2
► 1. Wire guard 2. Hole (on both sides)
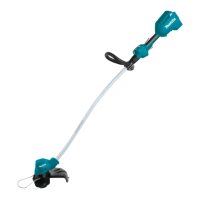
NOTICE: Do not expand the wire guard outward too
much. Otherwise it may break.
When wire guard is not in use, lift it for the idle position.
Installing nylon cutting head
Optional accessory
CAUTION: If the nylon cutting head acciden-
tally impacts a rock or hard object during oper-
ation, stop the tool and inspect for any damage.
If the nylon cutting head is damaged, replace it
immediately. Use of a damaged cutting tool could
result in serious personal injury.
CAUTION: Be sure to remove the hex wrench
after installation.
NOTICE: Be sure to use genuine Makita nylon
cutting head.
 Loading...