ENGLISH
Channel 1 - Acoustic Instrument Channel
1. Input Jack
Plug the lead from your guitar in here. The high
impedance of this input will help you to get the
best from the passive or active piezo or magnetic
pick-ups.
2. Volume Control
Controls the volume level of the Acoustic
Instrument channel. A good place to start with this
control is the half way, or 12 o clock position, then
adjust according to the sensitivity of your pick-up.
3. Bass Control
Adjusts the amount of bass, or bottom end of the
instrument’s tone. Care should be taken when
setting this control as adding excessive bass can
cause unnatural howling. Again, the half way
position is the best place to start.
4. Treble Control
Adjusts the treble, or top end of your sound.
Careful adjustment will make your high notes lively
but not too harsh. It is worth noting that set in
higher positions, this control will induce a certain
amount of noise.
Channel 2 - Microphone Channel
5. Phono Inputs
Inputs to take connection from a tape or CD player.
6. Microphone Input
Balanced XLR type input for connection of a
microphone and suitable for vocal or instrument
applications.
7. Jack Input
Input to take any source, such as drum machine,
keyboard etc.
8. Volume Control
Controls the volume level of the Microphone Aux
channel. A good place to start with this control is
the half way, or 12 o clock position, then adjust
according to the sensitivity of your pick-up
9. Bass Control
Adjusts the amount of bass, or bottom end of your
sound. Care should be taken when setting this
control as adding excessive bass can cause
unnatural howling. Again, the half way position is
probably the best place to start.
18.
Treble Control
Adjusts the treble, or top end of your sound.
Careful adjustment will make your high notes lively
but not too harsh. It is worth noting that set in
higher positions, this control will induce a certain
amount of noise.
Master Section
11.
Chorus Assign Switches
Allows the built in chorus effect to be selected on
either channel individually or both channels
together.
12.
Chorus Speed Control
Controls the speed of change of frequency for the
built-in chorus effect.
13.
Chorus Depth Control
Controls the amount of change of the frequency
shift for the built-in chorus effect.
Note: When using the chorus, higher speed
settings usually sound better with lower depth
settings and vice versa. Experiment to find which
selection suits you best.
14.
Reverb Balance Control
Controls the balance of the Reverb effect and the
parallel effects loop between channel 1 and
channel 2.
15.
Reverb Level Control
Controls the overall level of the reverb effect.
16.
Phase Switch
Switching the phase can considerably reduce the
amount of low frequency acoustic feedback.
17.
Notch Filter Switch
Further feedback reduction can be achieved using
the selectable frequency notch filter. When
activated, the filter cuts by 10dB the frequency
selected using the rotary control (item 18).
18.
Frequency Control
If feedback occurs when the Master Volume is set
to the desired performance level, select the switch
(item 17) and rotate this control until the offending
frequency is eliminated.
19.
Master Volume
Controls the overall volume output from the
amplifier.
20.
Power switch
Turns the amplifier on/off, with neon indicator to
show the ‘on’ position.
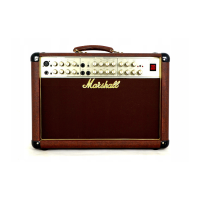
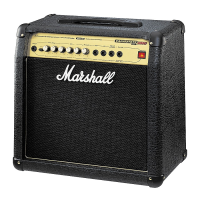
AS50R Front Panel Features
3
ENGLISH
2
Introduction
The AS50R is a compact and portable 50 watt combo amplifier specially designed for use with
acoustic instruments. Between its two channels, this combo has the flexibility to handle instruments
with transducers, such as piezo or magnetic pick-ups (channel 1), or microphone for either vocal or
instrument reproduction (channel 2).
The built-in Chorus effect is assignable to either or both channels and the reverb can be controlled
and balanced between the channels to create just the right ambience. If you want to add further
effects, then there is an on-board parallel effects loop which can be balanced between the channels in
the same way as the reverb.
One of the most difficult aspects of amplifying some acoustic instruments is feedback. To help you
eliminate this, the AS50R features several ‘anti-feedback’ controls, including a Phase switch and a
frequency controllable Notch Filter. The combination of these two elements will give you precise
control of the frequencies where feedback is likely to occur and help you to eliminate them.
For clear and detailed performance, the AS50R is loaded with two 8” speakers and a high efficiency
piezo tweeter. There is also an internal limiter which allows you to push the maximum level from the
50 Watt output, whilst remaining distortion free.
Neat and compact, flexible and portable, the AS50R is the ideal amplifier for the acoustic player who
wants a system as suitable for small gigs as it is at home.
WARNING! - Important safety instructions
A. ALWAYS fit a good quality mains plug conforming to the latest B.S.I. standards where necessary (UK only).
B. NEVER attempt to by-pass the fuses or fit ones of the incorrect value.
C. NEVER attempt to replace fuses or valves with the amplifier connected to the mains.
D. DO NOT attempt to remove the amplifier chassis, there are no user serviceable parts.
E. Refer all servicing to qualified service personnel. Servicing is required when the apparatus has been
damaged in any way, such as the power supply cord or plug is damaged, liquid has been spilled or objects
have fallen into the apparatus, the apparatus has been exposed to rain or moisture, does not operate normally
or has been dropped.
F. NEVER use an amplifier in damp or wet conditions.
G. ALWAYS unplug this apparatus during lightning storms or when unused for long periods of time.
H. Protect the power cord from being walked on or pinched particularly at plugs, convenience receptacles and at
the point where they exit from the apparatus.
I. DO NOT switch the amplifier on without the loudspeaker connected.
J. ENSURE that any extension cabinets used are of the correct impedance.
K. PLEASE read this instruction manual carefully before switching on.
Follow all instructions and heed all warnings.
WARNING : This apparatus must be earthed!
WARNING : Do not obstruct ventilation grille and always ensure free movement of air around the amplifier!
USA ONLY - DO NOT defeat the purpose of the polarised or grounding type plug. A polarised plug has two blades
with one wider than the other. A grounding type plug has two blades and a third grounding prong. The wide
blade or the third prong are provided for your safety. When the provided plug does not fit into your outlet,
consult an electrician for replacement of the obsolete outlet.
KEEP THESE INSTRUCTIONS
 Loading...