www.motorolasolutions.com
www.motorolasolutions.com
1
6
15
6
14
7
8
12
10
11
2
3
5
2
1
3
2
2
2
1
2
1
13
4
9
90% Charged
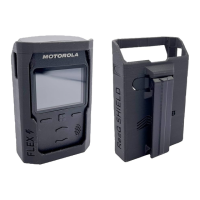
Advisor™ TPG2200
QUICK START GUIDE
Controls and Indicators
Getting Started
Installing the Battery
1. Insert the bottom part of the battery into the compatment.
2. Press down the top part of the battery into the compartment until it clicks.
LED Message and Status Indicators
Indication
Solid green
Blinking
green
Solid red
Blinking
red
Blinking
orange
No indication
Battery Capacity Information
Information Description
Full (80% – 100% capacity)
Middle (60% – 80% capacity)
Low (25% – 60% capacity)
Very low (5% – 25% capacity)
Less than 5% capacity
Battery Cover
Menu Key
Mute/Shortcut Button
Display
Down Navigation Key
USB-C Connector
Home Station Connector
LED Status Indicator
Speaker
Soft Keys
Power/Sleep/Wake Button
Landyard Holes
Connecting to a network
Entering DMO
Not applicable
Pager powered off
Fully Charged
Rapid Charge
Faulty or Invalid
Battery
Battery waiting
to charge
Looking After the Pager
Never leave the pager or battery in extreme temperatures (over +85 °C), for
example, behind a windscreen in direct sunlight.
The pager is not submersible (compliant with the IP54 standard, only when the
battery cover is attached).
To clean the pager, use a moistened or antistatic cloth.
Up Navigation Key
LED Message Indicator
Lock Key
Not applicable
Removing the Battery Cover
1. Slide the Lock key to the left to unlock the battery cover.
2. Lift up the battery cover.
1. Insert the bottom part of the battery cover into the slot.
2. Press down the top part of the battery cover.
3. Slide the Lock key to the right to lock the battery cover.
1
2
3
4
5
6
7
8
9
10
11
12
13
14
15
Solid orange
Transmit Inhibit in service
Channel busy in DMO
Not applicable
Attaching the Battery Cover
Status LED
In service
Out of service*
Charging
Status
Blinking
blue
Message LED
In use
Not applicable Not applicable
Not applicable
Not applicable
Not applicable
Not applicable
Not applicable
Not applicable
Not applicable
Message/Call Out
received or missing*
* The LED indication and flashing pattern can be configured in the Customer
Programming Software (CPS).