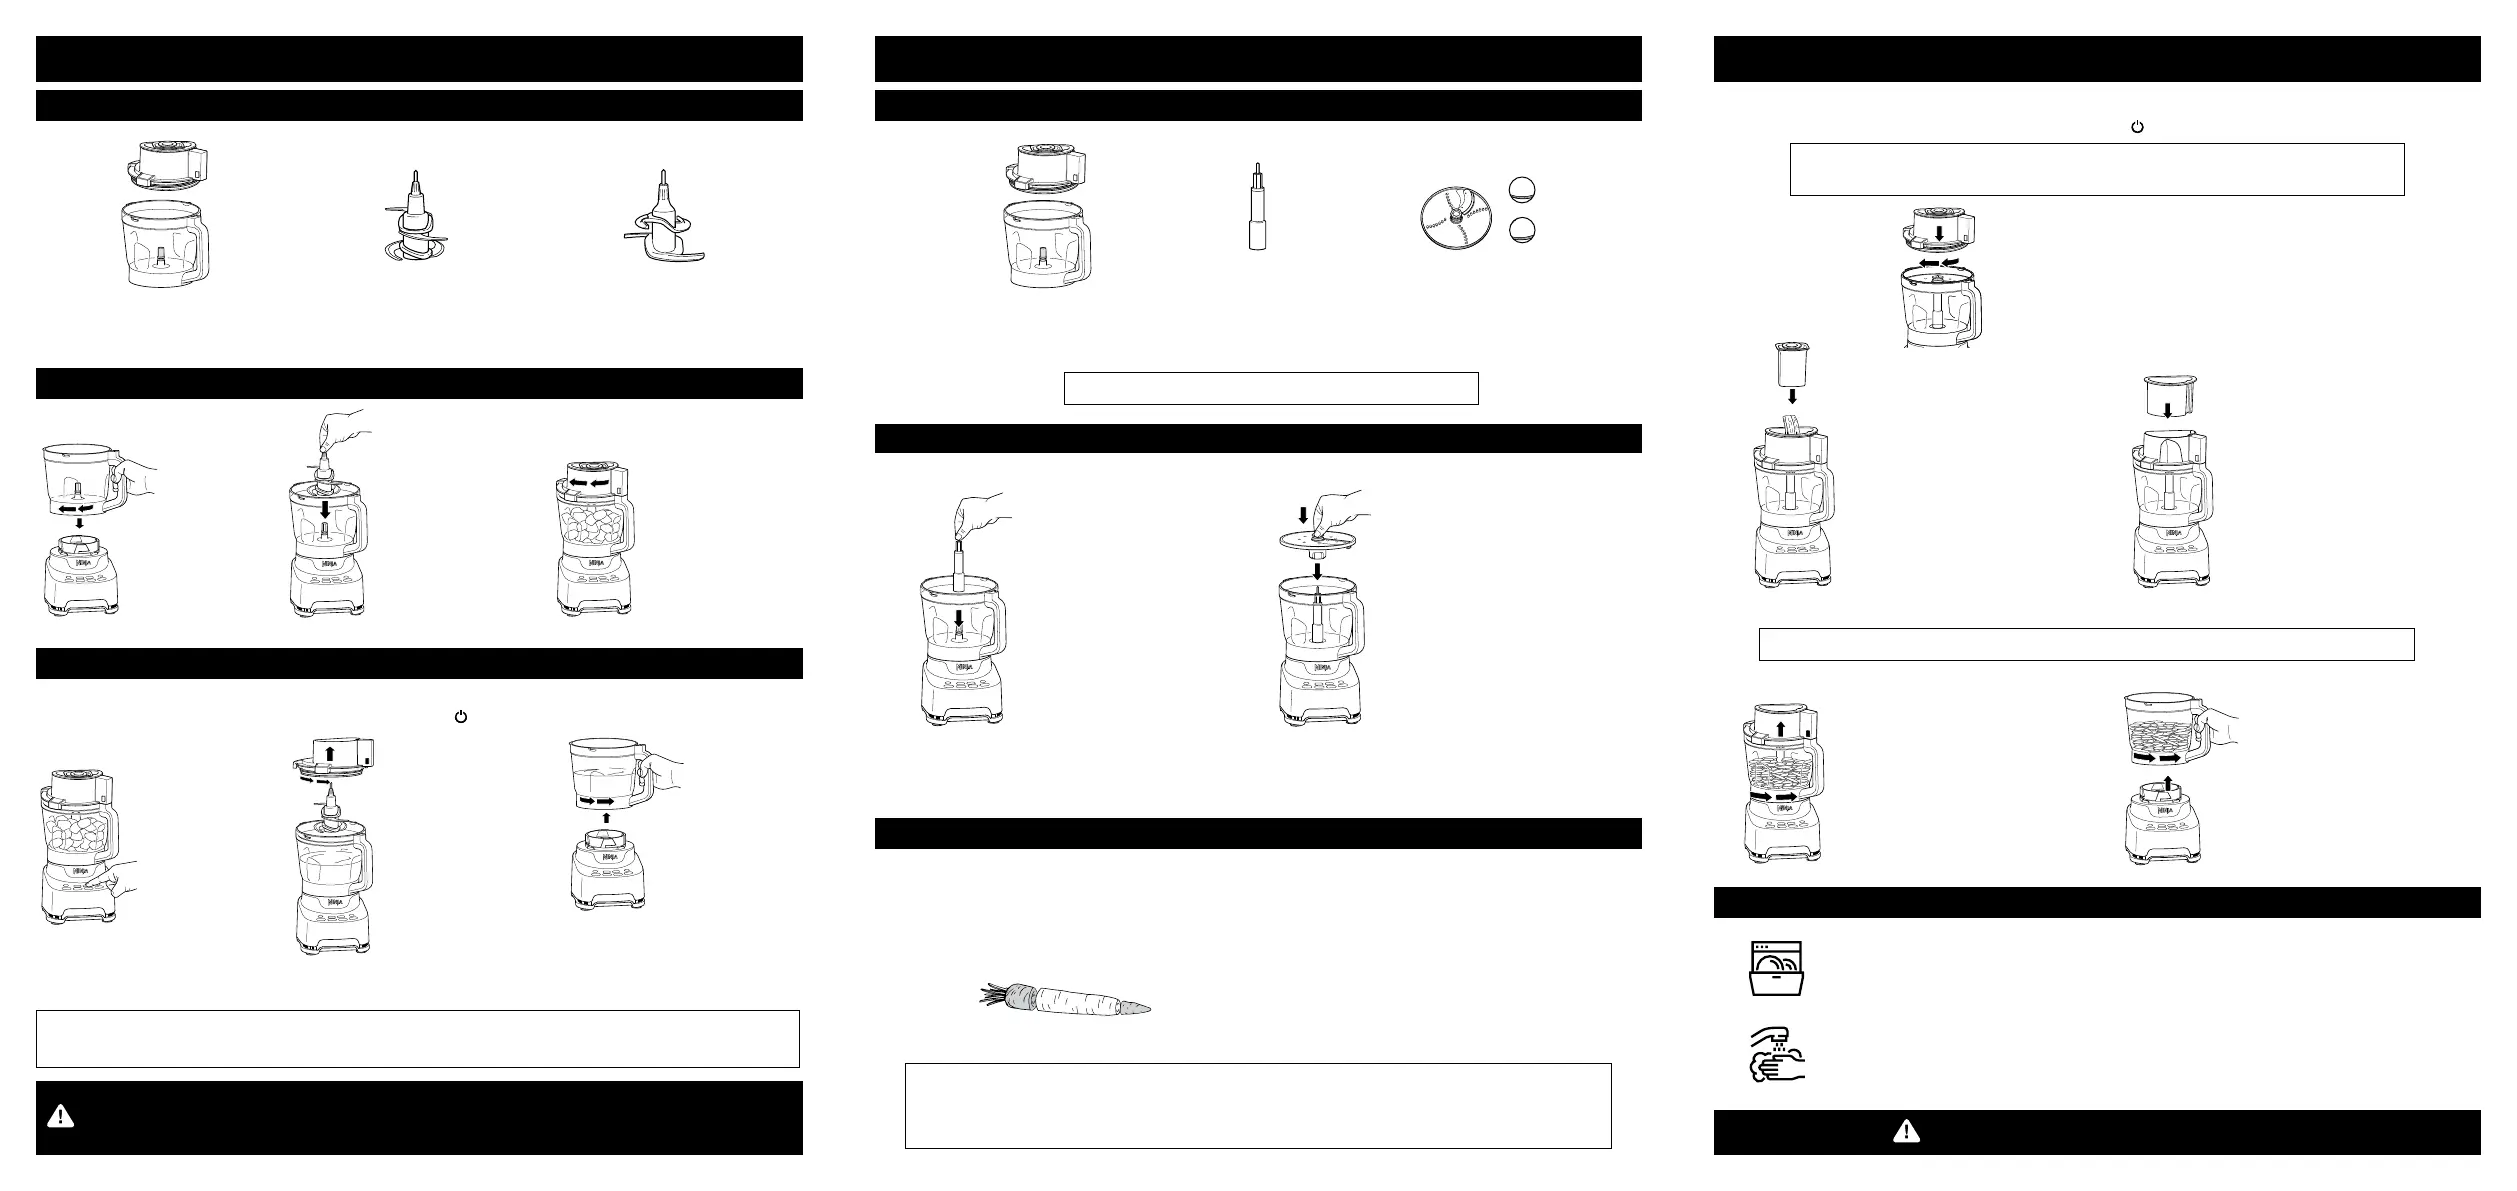
USING THE CHOPPING & DOUGH BLADE ASSEMBLIES
PROCESS & ENJOY
1.
Select desired
program to
begin processing.
2.
When processing
is complete, press
button on feed
chute lid near handle
to unlock. Turn lid
counterclockwise and
lift from bowl.
Remove blade assembly
before emptying bowl.
PARTS
3.
Place ingredients
in bowl. Place lid
on bowl and turn
clockwise to lock
in place.
BLADE ASSEMBLY
WARNING: Chopping Blade Assembly is sharp and not locked in place. Before pouring,
carefully remove Chopping Blade Assembly. Failure to do so will result in a risk of
laceration. Refer to the Ninja Safety Instructions for additional information.
1.
Place Precision
Processor Bowl
on base and
turn clockwise
to lock in place.
3.
Remove bowl
from base
by turning it
counterclockwise,
then lifting it up.
2.
Holding the blade
assembly by the
top of the shaft,
install it in bowl.
Once the Precision Processor Bowl is locked onto the base, plug in the unit,
then press the Power button
to turn the unit on.
PRECISION PROCESSOR®
BOWL & LID WITH
3-PART FOOD PUSHER
CHOPPING BLADE
ASSEMB LY
DOUGH BLADE
ASSEMB LY
PARTS
FOOD PREP
DISC ASSEMBLY
USING THE DISC ASSEMBLIES
2. REVERSIBLE
SLICING/SHREDDING
Use plastic grip to place
disc over spindle with the
desired output facing up.
Use the side labeled
SLICER for slicing and the
side labeled SHREDDER
for shredding.
1.
Place Precision Processor®
Bowl on base and turn
clockwise to lock in place.
Install the spindle, then
place the disc on the spindle.
REVERSIBLE
SLICING/SHREDDING DISC
If using the small or medium feed chute, trim ingredients to fit the feed chute height.
If using the larger feed chute, DO NOT exceed the CHUTE MAX FILL line on the large
feed chute. Unit will not run if ingredients exceed this line.
Cut both ends o ingredients to create
flat surfaces. Trim tapered ingredients like
carrots to make them more symmetrical.
SHREDDING
SLICING
DISC
SPINDLE
PRECISION PROCESSOR®
BOWL & LID WITH
3-PART FOOD PUSHER
2B.
If using the large feed chute
opening, place ingredients
up to, but not exceeding,
the CHUTE MAX FILL line.
Insert the pusher into the
feed chute, then select
DISC or LOW. The disc
will begin spinning.
2A.
If using the small or medium
feed chute opening, select
DISC or LOW. The disc will
begin spinning. Add
ingredients through the
feed chute on the lid.
4.
Remove the disc assembly
by grasping the plastic grip,
then remove the disc spindle.
Remove bowl from base by
turning it counterclockwise,
then lifting it up.
3.
The disc will automatically
stop spinning at the end
of the program. Wait for
disc to stop turning, then
press the button on the
feed chute lid near the
handle to unlock. Turn lid
counterclockwise and lift
lid from bowl.
PROCESS & ENJOY (DISCS)
1.
Place feed chute lid on bowl and turn
clockwise. Based on the ingredient, use
the smallest possible feed chute opening
for best slicing and shredding results.
IMPORTANT: As a safety feature, the large food pusher must be inserted in the feed
chute for the unit to run.
Once the Precision Processor® Bowl is locked onto base, plug in the unit,
then press the Power button to turn the unit on.
NOTE: Large food pusher must be inserted in the feed chute for the unit to run. For thinner recipes such
as sauces and chopping, make sure all 3 parts of the pusher are installed to avoid splatter.
NOTE:
• Ensure cheese is well chilled before slicing/shredding. DO NOT slice or shred frozen cheese.
• Keep ingredients as steady as possible when pushing through the feed chute. This will help
minimize waste.
NOTE: Not all accessories are included with all models.
IMPORTANT: Use only the DISC program or LOW setting when using the disc assemblies.
WARNING: Always unplug the base before cleaning.
Dishwasher: Accessories are top-rack dishwasher safe and should NOT be cleaned
with a heated dry cycle. Ensure the blade assembly is removed from the bowl
before placing in the dishwasher. Exercise care when handling blade assemblies.
Hand-washing: Wash bowl, lid, disc, and blade assemblies in warm, soapy water.
Exercise care when washing the blade assemblies. Use a dishwashing utensil with
a handle to avoid direct hand contact with blades. Rinse and air-dry thoroughly.
CLEANING
 Loading...