-
1
--
2
--
3
--
4
--
5
-
h How to Use the
Strap
State of the recorder Operation Display
While in stop mode Press and hold the STOP
(4 ) button
The total number of files recorded in the
folder and remaining recording time appears
on the display.
While in reco rd mode Press the DISP/MENU
button
The display switches between current
recording time and remaining recording
time.
While in stop mode or
playback mode
Press the DISP/MENU
button
Playing time ➔ Remaining playing time
➔ Recording date of the file ➔ Recording
time of the f ile ➔ Playing time …
DIGITAL VOICE RECORDER
VN-5500
VN-5000
EN
INSTRUCTIONS
Thank you f or purchasing a n Olympus Digi tal Voice Recorde r.
Please r ead these instr uctions for in formation abo ut using the pro duct correct ly and safely.
Keep the i nstruction s handy for futur e reference.
To ensure succ essful recor dings, we recomm end that
you test t he record funct ion and volume be fore use.
U1-BS 0120- 01
AP0807
Getting Started
Notes:
• You can switch the time indication between the 12-hour s ystem and the 24-hour system by
pressing the DISP/MENU button whil e you are setting the ho ur or minute.
• You can change the order of the date indication by pressing the DISP/MENU button while you
are setting the year, month, or day.
Example: July 14, 2008
Current folder
1 Press down on t he arrow and slide the
battery cover open.
2 Insert two size-AAA alkaline batteries,
observing the correct polarity.
3 Close the battery cover completely.
• Time and date display appears.
• The “Hour” indicator flashes, indicating the start
of the time an d date setup process. ( See “Setting
Time and Date [TIME]” for det ails).
h Inserting Batteries
1 Press and hold the
DISP
/
MENU
button for 1
second or longer.
h Setting Time and Date [
TIME
]
If you have set the time and date, information as to when a sound file was recorded is stored
automatically with that file.
h Notes on the Folders
The recorder provides four folders, [F], [G], [H] a nd [I]. To change the
folder selection, press the FOLDER/INDEX button while the recorder is
stopped. Each recorded fil e is stored in a folder.
Note:
• Using folders to classify les makes it convenient to nd les you want
to access later. Up to a total of 100 les can be recorded in each folder.
Strap hole
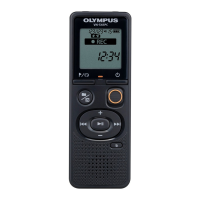
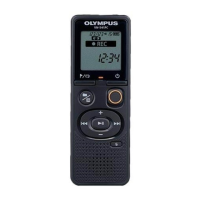
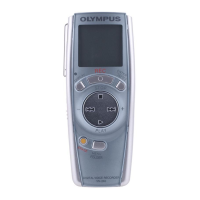
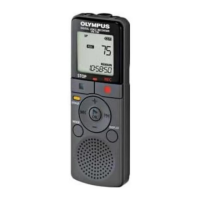
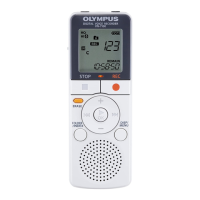
h Identification of Parts
When you install batteries for the f irst ti me or each t ime you replace the batteries, the
“Hour ” indication will flash. In such a case, be sure to set the time and date by following
steps 4 through 7 described below.
h Power Supply
The HOLD switch functions as a power button. When you do not use the recorder, set the HOLD
switch to the [HOLD] position while the recorder is stopp ed. This will power of f the recorder and
minimize the battery drain.
Built-in speaker
• Strap is not supplied.
1 Built-in Microphone
2
MIC
(Microphone) jack
3
HOLD
switch
4
STOP
(4 ) button
5
PLAY
( `) button
6 0 (Rewind) button
7 Battery cover
8
FOLDER
/
INDEX
button
Power on: Reset the
HOLD
switch.
Power off : Set the
HOLD
sw it ch t o t he [
HOLD
]
position.
Standby Mode and Display Shut Off:
If the recorder is stopped or paused for 60 minutes
or longer during recording or play back, it goes into
Standby (power-save) mode, and the display shuts off.
To exit Standby mode and turn on the display, press
any button.
hHold
Set the HOLD switch to the [HOLD] position. All opera-
tion buttons are disabled. This feature is useful when the
recorder has to be carried in a handbag or pocket.
Remember to reset the HOLD s witc h be fore atte mpt ing
to use the recorder.
Notes:
• The alarm w ill sound at the sche duled time even if the
recorder is set to [HOLD] position. The recorder will
then begin to play the le associated with the alarm
once you press any button.
• The re corder func tions as follow s with the HOLD switch
set to the [HOLD] position:
– If the record er is playing, the d isplay goes dark w hen
playback of the current f ile has completed.
– If the recorder is recording, the display goes dark
when the recorder stops recording automatically
upon running out of free memor y.
2 Press the
+
or
–
button to
select [
TIME
].
3 Press the
PLAY
(` ) but-
ton.
• The “Hour” indicator flashes.
4 Press the
+
or
–
button to
set the “
Hour
”.
5 Press the
PLAY
(` ) or
9 button to accept the
“
Minute
”.
• The “Minute” indicator flashes.
• Pressing the 0 button enables
the “Hour” set ting again.
6 Press the
+
or
–
button to
set the “
Minute
”.
• Repe at steps 5 and 6 to con-
tinue to set the “Yea r”, “Month”
and “Date” in the s ame way.
7 After setting the “
Date
”,
press the
PLAY
(`) or 9
button.
• This completes the time and date
setup procedure.
To Pause:
While the recorder is during recording mode, press
the
REC
(s) button
• [PAU SE] appea rs on the display and th e record/play indic ator
light flashes.
To Resume Recording:
Press the
REC
(s) button again.
• Recording will resume at the point of interruption.
h Notes for Recording
• If [FULL] appears on the display, you cannot record in the sele cted folder. In such a case, erase
unnecessary les.
• If the recorder is place d directly on a table when recording a meeting, it tends to pick up table
vibratio ns. Put a notebook o r other item betwe en the table and th e recorder so that th e vibration
is not easily transmitted for clearer recording.
• Even if you press the DISP/MENU but ton, the disp lay will not change to current recording time
if the remaining recording time is 5 minutes or less.
• When remaining recording time is less than 60 seconds, the record/play indicator light starts
ashing in red. When the recording time is decreased to 30 or 10 seconds, the light ashes
faster.
• The recorder will enter Stop mo de if it has been left paused for 6 0 minutes or longer.
• In case of di cult acoustic conditions or low speaker’s voice, recording in [HQ] is r ecommended.
Also, usage of an external microphone (sold separately) could improve the quality of
recordings.
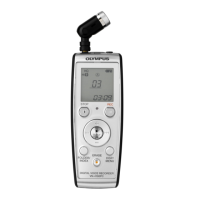
The external microphone and other devices can be connected
and the soun d can be recorded.
• When using an external microphone, select adequate
microphone, such as a Noise-Cancellation microphone or
Electret condenser microphone (optional).
• To connect the recorder to an external device, use the
connecting cord K A333 (optional), and the stereo/monaural
converting plug adapter supplied with KA333.
• The input level cannot be adjusted on this recorder. When
you connect the recorder to an external device, execute a test
recording a nd adjust the output level of the exte rnal device.
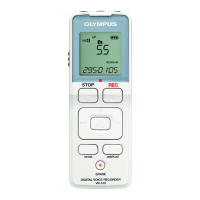
h LCD Display Information
Recording
1 Press t he
FOLDER
/
INDEX
button to select the desired
folder.
a Current microphone sensitivity
b Current folder
2 Press the
REC
(s) button
to start recording.
• The record/play indicator light
turns red, and recording starts.
c Current recordi ng mode
d Current file number
e Recording level meter
f Recording time
3 Press the
STOP
( 4) button
to stop recording.
• New recordings are saved as the
last fil e in the folder.
g Remaining recording time
h Recording from external Microphone or other Devices
Playback
1 Press t he
FOLDER
/
INDEX
button to select the de-
sired folder.
a Current folder
2 Press the 9 or 0 button to select the file
to playback.
3 Press the
PLAY
( `) button
to start playback.
• The record/play indicator light
turns green, and the elapsed
playing time is indicated on the
display.
b Current file number
c Playing time
To Stop:
Press the
STOP
(4 ) button.
• The recorder stops in the middle of the f ile being played.
Fast Forward:
While the recorder is during playback mode, press and
hold the 9 button.
• When you release the 9 button, the recorder will resume
normal playback.
Rewind:
While the recorder is during playback mode, press and
hold the 0 button.
• When you release the 0 button, the recorder will resume
normal playback.
Notes:
• When the slow playback mode is selected, the [ J] appears and, for the fast playback mode, [K]
appears o n the display while the recorder is playback.
• The reco rder stops play back when you press t he STOP (4 ) button while playback in the slow/fast
mode, or when it reaches to the end of the le. If you once press the STOP (4 ) button and start
playback again, the recorder will p layback l es in normal speed as well.
While th e recorder is du ring playback mo de (playback
or playback in slow/fast mode), press the 9 or 0
button forwards or rewinds to the beginning of the
next file or the file being played respectively.
Notes
• I f a n in de x m ar k is en cou nt ere d m id way , pl ay ba ck b eg in s at tha t
point. (See “Index Marks ” for details)
Normal speed
Slow Playback
(-25%)
Fast P layback
(+50% )
While the r ecorder is du ring playback mo de, press the
PLAY
( `) button.
You can select an option for the display of the recorder. This will help review and confirm different
recorder s ettings and file informatio n.
An optional Ni-MH Rechargeable Battery (BR401)
from Ol ympus can be used f or the recorde r.
Replacing Batteries:
When [N] appears on the display, replace the bat teries as soon aspossible. Size -AAA alkaline
batteries are recommended. When the bat teries are depleted, [O] appears on the display, and
the recorder shuts of f. It is recommended to set the HOLD switch to the [HOLD] position before
you replace batteries to maintain t he current settings (Time a nd date, etc.). For your co nvenience,
the recorder also logs the current se ttings in nonvolatile memory at hourly intervals.
A audio input
terminal of
other devices
9
EAR
(Earphone) jack
0 Display (LCD panel)
! Record/play indicator
light
@
REC
(s) button
#
+
button
$ 9 (Fast Forward)
button
%
–
button
^
DISP
/
MENU
button
&
ERASE
(s) button
h Changing Playback Speed:
h To Pause Recording
h Canceling Playback
h Forwarding and Rewinding
Notes:
• The end of the le is located by pressing and holding the 9 button during fast forwarding.
The record er will pause at the end of the le. If you do not release the 9 button, the recorder
will continue to fast forward.
• The b eginning of the le is located by pressing and holding the 0 button during rewinding.
The recorder will pause at the beginning of the le. If you do not release the 0 button, the
recorder will continue to rewinding.
• When the in dex mark is shown in t he middle of a le, it will stop temporarily in the position of the
index mark.
h Locating the Beginning of the File:
Introduction
• The contents of this document may be changed in the future without advanced
notice. Co ntact our Custome r Support Center f or the latest info rmation relat ing to
product names and model numbers.
• The utmost care has been taken to ensure the integrity of the contents of this
document. In the unlikely event that a questionable item, error, or omission is
found, please contact our Customer Support Center.
• Any liability for passive damages or damage of any kind occurred due to data loss
incurred by a defect of the product, repair performed by the third party other
than Olympus or an Olympus authorized service station, or any other reason is
excluded.
h Safe and Proper Usage
Before u sing your ne w recorder, re ad this manu al careful ly to ensure t hat you know ho w to operate
it safe ly and correct ly. Keep this manual i n an easily acces sible locati on for future ref erence.
• The war ning symbol s indicate impor tant safet y related infor mation. To protect you rself and othe rs from
pe rs on al i nj ur y or da mag e t o pr op er ty, it is e ss ent ia l th at you al way s re ad th e wa rn ing s a nd i nf or mat io n
provided.
4 Press the + or –
button to select the proper
sound volume.
• The display shows the volume level. You can choose
between [00] to [30].
Converting
plug adapter
of KA 333