Do not touch the terminals while power is being supplied.
Doing so may occasionally result in minor injury due to electric shock.
Do not touch the terminals immediately after turning the power supply OFF.
Minor injury from electric shock may occasionally occur.
Do not allow pieces of metal, wire clippings, or fine metallic shavings or filings from installation to enter the
product. Doing so may occasionally result in electric shock, fire, or malfunction.
Do not use the product where subject to flammable or explosive gas.
Otherwise, minor injury from explosion may occasionally occur.
Never disassemble, modify, or repair the product or touch any of the internal parts.
Minor electric shock, fire, or malfunction may occasionally occur.
If the output relays are used past their life expectancy, contact fusing or burning may occasionally occur.
Always consider the application conditions and use the output relays within their rated load and electrical
life expectancy. The life expectancy of output relays varies considerably with the output load and switching
conditions.
Tighten the terminal screws to between 0.74 and 0.9 N•m. Loose screws may occasionally result in fire.
Unexpected operation may result in equipment damage or accidents if the settings are not appropriate for
the controlled system. Set the Temperature Controller as follows:
• Set the parameters of the Temperature Controller so that they are appropriate for the controlled system.
• Do not set the temperature range selector switch to any setting that is specified not to be set. An
unexpected range may be set if any of these settings is used.
• Turn the power supply to the Temperature Controller OFF before changing any switch setting. Switch
settings are read only when the power supply is turned ON.
A malfunction in the Temperature Controller may occasionally make control operations impossible or
prevent alarm outputs, resulting in property damage. To maintain safety in the event of malfunction of the
Temperature Controller, take appropriate safety measures, such as installing a monitoring device on a
separate line.
Always leave the INIT switch set to OFF when using the Temperature Controller. The Temperature Controller
may occasionally malfunction if the INIT switch is ON. The equipment connected to the Temperature
Controller may be placed in a hazardous condition if the INIT switch is left ON.
Specifications
CAUTION
Model
E5CS / E5CS-X
Temperature Controller
Thank you for purchasing an OMRON Product. To ensure the safe
application of the Product, only a professional with an
understanding of electricity and electric devices must handle it.
Read this manual carefully before using the Product and always
keep it close at hand when the Product is in use.
©All Rights Reserved
INSTRUCTION MANUAL
1) Do not use this product in the following places:
• Places directly subject to heat radiated from heating equipment.
• Places subject to splashing liquid or oil atmosphere.
• Places subject to direct sunlight.
• Places subject to dust or corrosive gas (in particular, sulfide gas and ammonia gas).
• Places subject to intense temperature change.
• Places subject to icing and condensation.
• Places subject to vibration and large shocks.
2) Use/store within the rated temperature and humidity ranges.
Provide forced-cooling if required.
3) To allow heat to escape, do not block the area around the product.
Do not block the ventilation holes on the product.
4) Use specified size (M3.5, width 7.2 mm or less) crimped terminals for wiring.
5) Be sure to wire properly with correct polarity of terminals.
Do not wire any of the I/O terminals incorrectly.
6) Do not wire the terminals which are not used.
7) The voltage output (control output) is not electrically isolated from internal circuits. When using a grounded
thermocouple, do not connect any of the control output terminals to ground. If they are connected,
unwanted current paths will cause error in the measured temperature.
8) Allow as much space as possible between the controller and devices that generate a powerful high-
frequency or surge.
Separate the high-voltage or large-current power lines from other lines, and avoid parallel or common
wiring with the power lines when you are wiring to the terminals.
9) Use this product within the rated load and power supply.
10) Use a switch, relay, or other contact so that the power supply voltage reaches the rated voltage within 2
seconds. If the applied voltage is increased gradually, the power supply may not be reset or malfunctions
may occur.
11)Use a switch, relay, or other contact to turn the power supply OFF instantaneously. Outputs may mal-
function and memory errors may occur if the power supply voltage is decreased gradually.
12) When using PID operation (self-tuning), turn ON the power supply to the load at the same time or before
turning the power supply to the Temperature Controller ON.
13) Four seconds is required for Temperature Controller outputs to stabilize after turning ON the power
supply. Allow for this time when designing the control panel and control system.
14) A switch or circuit breaker should be provided close to this unit.
The switch or circuit breaker should be within easy reach of the operator, and must be marked as a
disconnecting means for this unit.
15) Approximately 30 minutes is required for the correct temperature to be displayed after turning the power
supply to the Temperature Controller ON. Turn the power supply ON at least 30 minutes prior to starting
control operations.
16) Be sure that the temperature sensor type and the input type set on the Temperature Controller are the
same.
17) When extending the lead wires on a thermocouple, be sure to use compensating conductors suitable for
the thermocouple type. When extending the lead wires on a platinum resistance thermometer, use lead
wires with a low resistance (5 Ω max. per line) and be sure that the resistance is the same for all three
lead wires.
18) Do not use a microwave receiver near the Temperature Controller. Microwave interference may affect
the Temperature Controller.
19) When drawing out the controller from the case, do not apply force that would deform or alter the Product.
20) When drawing out the controller from the case to replace the Product, check the status of the terminals.
If necessary, replace the rear case as well.
21) When drawing out the controller from the case, turn the power supply OFF first, and:
Absolutely do not touch the terminals or electronic components or apply shock to them. When inserting
the controller, do not allow the electronic components to come into contact with the case.
22) Static electricity can damage internal components. When drawing out the controller from the case, do
not touch the electronic components or patterns on the board with your hand. Hold the Product by the top
panel, supports, or edges of the board.
23) Do not use paint thinner or similar chemical to clean with. Use standard grade alcohol.
24) Use tools when separating parts for disposal.
25) EEPROM is used as backup memory. The EEPROM has a life of 100,000 writes. EEPROM is written
when settings are changed or self-tuning is performed.
Precautions for Safe Use
● Key to Warning Symbols
CAUTION
Indicates a potentially hazardous situation which, if not avoided,
is likely to result in minor or moderate injury or property damage.
Read this manual carefully before using the product.
● Warning Symbols
Safety Precautions
● Flush mounting (Panel cutout)
English
Power supply voltage 100 to 240V AC 50/60Hz
24V AC 50/60Hz / 24V DC
Operating voltage range
85 to 110% of the rated voltage
Power consumption Approx. 7VA(100 to 240V AC)
Approx. 4VA(24V AC)/Approx. 3W(24V DC)
Indication accuracy E5CS: ±1.0 % FS ±1 digit max.
E5CS-X: ±0.5 % FS ±1 digit max.
Control output Relay output: 250V AC 3A(resistive load)
Voltage output: 12V DC 20mA
Electrical life of relay: 100,000 operations
Control method ON/OFF or PID control
Alarm output Relay output: 250V AC 1A(resistive load)
Electrical life of relay: 100,000 operations
Ambient temperature –10 to 55°C
(Avoid freezing or condensation)
Ambient humidity RH 35 to 85%
Storage temperature –25 to 65°C
(Avoid freezing or condensation)
Altitude Max. 2,000m
Recommended fuse T1A, 250V AC, time-lag, low-breaking capacity
Weight E5CS: Approx. 150g (main unit only)
E5CS-X: Approx. 170g (main unit only)
Installation environment
Setup category II,
pollution degree 2 (as per IEC61010-1)
Applicable Connection
Sockets for no Alarm (8-pin):
Sockets
P2CF-08, P2CF-08-E, and P3G-08
(Order Separately) Sockets for Alarm (11-pin):
(E5CS Only) P2CF-11, P2CF-11-E, and P3GA-11
■ Operation
Setting
OMRONshallnotberesponsibleforconformitywithanystandards,codes,
orregulationsthatapplytothecombinationoftheproductsinthecustomer's
applicationoruseoftheproduct.
Takeallnecessarystepstodeterminethesuitabilityoftheproductforthe
systems,machines,andequipmentwithwhichitwillbeused.
Knowandobserveallprohibitionsofuseapplicabletothisproduct.
NEVERUSETHEPRODUCTSFORANAPPLICATIONINVOLVING
SERIOUSRISKTOLIFEORPROPERTYWITHOUTENSURINGTHAT
THESYSTEMASAWHOLEHASBEENDESIGNEDTOADDRESSTHE
RISKS,ANDTHATTHEOMRONPRODUCTISPROPERLYRATED
ANDINSTALLEDFORTHEINTENDEDUSEWITHINTHEOVERALL
EQUIPMENTORSYSTEM.
SeealsoProductcatalogforWarrantyandLimitationofLiability.
Suitability for Use
Step1 Step2
SELF-DIAGNOSTIC FUNCTION
If an error occurs, it will be displayed on the temperature display.
Check the type of error and correct the error accordingly.
E5CS (mm) E5CS-X (mm)
Screw
□48
6.25 72.5 14.4
□44.8
94.65
(7.75)
Panel
Adapter
Panel
Adapter
Screw
□48
6 100
10
□44.8
(106)
Package Contents (Same for E5CS and E5CS-X)
• Controller
• Adapter (1)
• Instruction Manual
• °C/°F labels, specifications entry label *1
*1 When changing the display unit, attach the °C/°F
label over the previous °C/°F label. Enter the set-
tings on the specifications entry label and use it to
manage the settings.
60min.
45
45
+0.6
0
+0.6
0
+0.6
0
(48 x number of units –2.5)
+1
0
45
Individual mounting (mm) Side-by-side mounting (mm)
• Insert the controller through the hole in the panel. Push the adapter on from the rear
and fasten temporarily, removing any gap between the controller, panel and adapter.
Finally, secure two fixing screws alternately keeping the torque to between 0.29 to
0.39 N•m.
Refer to the dimension diagram for the mounting status.
• When mounting more than one Temperature Controller, be sure that the heat
generated by the Temperature Controllers does not cause the ambient
temperature to exceed the specified value.
•Close side-by-side mounting is possible in one direction only, either horizontally
or vertically.
● Surface mounting
Whenmountingpluralunitsinverticalarrangement,leavespaceofapprox.20mm
aboveandbelowthemountingsocket.
P2CF-□
20
(mm
Panel
Hook
Duct and etc.
● E5CS-R □ ,-Q □(Noalarmoutputtype)
Suitable socket is P2CF-08- □ or P3G-08.
● E5CS-R1 □ ,-Q1 □(Alarmoutputtype)
Suitable socket is P2CF-11- □ or P3GA-11.
3
2
1
8
7
6
5
4
SOURCE
5
4
+
+
B
B
A
–
–
3A 250 VAC
(Resistive load)
20 mA 12 VDC
100 to 240 VAC, 50/60 Hz
or
24 VAC/DC, 50/60 Hz
Thermocouple
Thermistor
Platinum resistance thermometer
Control output *2
*1
3
4
5
6
7
8
9
10
11
1
2
SOURCE
5
4
+
+
B
B
A
–
–
3 A 250 VAC
(Resistive load)
1 A 250 VAC
(Resistive load)
20 mA 12 VDC
100 to 240 VAC, 50/60 Hz
or
24 VAC/DC, 50/60 Hz
Thermocouple
Thermistor
Platinum resistance thermometer
Control output *2
Alarm output
*1
● E5CS-R □ X,-Q □ X(Noalarmoutputtype)
● E5CS-R1 □ X,-Q1 □ X(Alarmoutputtype)
6 7 8 9 10
1 2 3 4 5
7 8
SOURCE
Thermocouple
Thermistor
Platinum resistance thermometer
3 A 250 VAC
(Resistive load)
20 mA 12 VDC
100 to 240 VAC, 50/60 Hz
or
24 VAC/DC, 50/60 Hz
+ −
+ −
A
B
B
NOT
USED
NOT
USED
Control output *2
*1
7 8
3 A 250 VAC
(Resistive load)
1 A 250 VAC
(Resistive load)
20 mA 12 VDC
100 to 240 VAC, 50/60 Hz
or
24 VAC/DC, 50/60 Hz
+ −
6 7 8 9 10
1 2 3 4 5
SOURCE
Thermocouple
+ −
Alarmoutput
Thermistor
Platinum resistance thermometer
A
B
B
Control output *2
*1
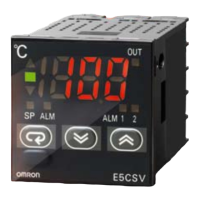
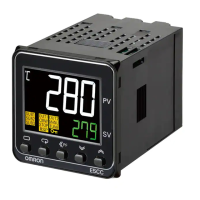
Temperature indicator
The present temperature, set temperature, alarm set temperature, or input shift value is displayed.
LED deviationindicators
▲: Lit when the present temperature is above the set temperature.
■ : Lit when the difference between the present temperature and set temperature is ±1% FS.
▼: Lit when the present temperature is below the set temperature.
Output operation indicator
Lit when the output function is ON; not light when the output function is OFF.
Alarm output operation indicator
Lit when the alarm function is ON.
Mode indicators
SP : Lit when the set temperature is displayed.
AL : Lit when the alarm set temperature is displayed.
Temperature indication switching key
Switches the display between the present temperature, set temperature, alarm set temperature, and input
shift value.
Up key / Down key
The set temperature, alarm set temperature, or input shift value will increase when the Up Key is pressed.
The set temperature, alarm set temperature, or input shift value will decrease when the Down Key is pressed.
Hidden protection key (E5CS-X only) *1
Set values can be changed when the protection switch is ON by holding down the hidden protection key and
pressing the Up/Down Keys.
*1 Only the E5CS-X has a hidden protection key. The E5CS does not have one.
Recommended panel thickness is 1 to 4 mm.
SP AL AL
ON
E5CS
Temperature
indicator
LED deviation
indicators
Mode indicators
Temperature
indication
switching key
Down key
Up key
Frontdooropen/closenotc
Front door
Alarm output
operation
indicator
Output operation
indicator
SP
AL
AL
ON
Down key
Up key
Alarm output
operation
indicator
Output operation
indicator
Temperature
indicator
LED
deviation
indicators
Mode
indicators
Hidden
Protection
key
Temperature
indication
switching key
Draw-outhook
(bottomoffrontpane
E5CS
Temperaturerangeselectorswitc
Alarmmodeselectorswitch
S
P
AL
AL
ON
E
5C
S
INITswitch
Protectionswitch
PX1 23456
ON
ON
Controlmode
selectorswitch
Controlmode
selectorswitch
Temperaturerange
selectorswitch
Alarmmodeselectorswitc
Protectionswitch
INITswitch
0
1
2
3
4
5
6
7
8
9
0
1
2
3
4
5
6
7
8
9
1
FUNCTIONPROTECT
ON
INPUT ALARM
23456
● Switch
Pressinonthehookon
thebottomofthefront
panelanddrawoutthe
controller.
Pullforwardonthefrontdooropen/closenotchontherightofthefront
paneltoopenthefrontdoor.
*1Thereisnoalarmmodeselectorswitchonmodelswithoutanalarm.
*2TheINITswitchisalwaysOFF.
● Protection switch
• The protection switch can be turned ON to disable the Up/Down Keys and
prevent setting mistakes.
• The temperature indication switching key, however, will operate even when
the protection switch is ON (i.e., the display can be switched between the
present temperature, set temperature, alarm set temperature, and input shift
value).
• Default: OFF
OMRON ELECTRONICS LLC
ONE COMMERCE DRIVE SCHAUMBURG, IL 60173-5302 U.S.A
Phone 1-847-843-7900 FAX:1-847-843-7787
EUROPEAN H.Q : OMRON EUROPE B.V.
Wegalaan 67-69 P.O.BOX.13 2130 AA Hoofddorp The
Netherlands
Phone 31-23-56-81-300 FAX 31-23-56-81-388
OMRON ASIA-PACIFIC PTE.LTD.
83, Clemenceau Avenue, #11-01, UE Square, Singapore
239920 SINGAPORE
Phone 65-6-835-3011 FAX 65-6-835-2711
Set the operating specifications with the switches.
● Controlmodeselectorswitch
Switch Function OFF ON
Control
Proportional period
Control output
Input shift
Input type
Scale indication
ON/OFF control
20 seconds
Reverse
Disable
Thermocouple: K,J
Resistance thermometer
: JPt100
°C
PID control
2 seconds
Normal
Enable
Thermocouple: K,L
Resistance thermometer
: Pt100
°F
1
2
3
4
5
6
12
ON
3456
ON
→
• All switches are OFF by default.
• The optimum proportional band is set automatically and offset is adjusted
automatically in the PID control.
• The input shift value is valid even if the input shift display is disabled. To disable
the input shift, set the input shift value to H0. The default setting is H0.
• The setting of switch 5 will not affect operation if a thermistor model is used.
0,9
1
2
3
4
5
6
7
8
Alarmtype
SW No.
Alarm output
OFF
Upper and lower
limit range alarm
Lower limit
alarm
Upper limit
alarm
Upper and lower
limit alarm
No alarm output
Upper and lower
limit alarm with
standby sequence
Upper limit alarm
with standby
sequence
Lower limit alarm
with standby
sequence
Absolute
value alarm
XX
SP
ON
OFF
ON
OFF
ON
OFF
ON
OFF
ON
OFF
ON
OFF
ON
OFF
ON
OFF
SP
SP
SP
SP
SP
SP
X
X
XX
XX
X
X
Y
0 °C
● Alarm mode selector switch
* For alarms 1 to 7, set the alarm value (X) to the deviation
from the set point.
For alarm 8, set the alarm value (Y) to the absolute value
from 0°C/°F.
* Default: 2 (upper limit alarm)
● Temperature range selector switch
• Thermocouple type (E5CS- □ KJ, E5CS- □ KJX)
0 to 200
0 to 300
0 to 400
0 to 500
0 to 600
0 to 999
0 to 200
0 to 300
0 to 400
0 to 500
Do not set
Do not set
0 to 400
0 to 500
0 to 600
0 to 999
0 to 999
Do not set
0 to 400
0 to 500
SW No.
Setting range
Input
0K
1
2
3
4
5
6J, L
7
8
9
°C °F
–50to50
0.0to50.0
–20to80
0.0to99.9
0to200
0to300
0to400
Do not set
Do not set
Do not set
Do not set
Do not set
Do not set
0.0to99.9
0to200
Do not set
0to400
0to600
0to800
Do not set
SW No.
Setting range
Input
0JPt100,
Pt100
1
2
3
4
5
6
7
8
9
°C °F
–50 to 50
0 to 100
50 to 150
100 to 200
150 to 300
Do not set
Do not set
Do not set
Do not set
Do not set
Do not set
Do not set
Do not set
Do not set
Do not set
–50 to 100
0 to 200
100 to 300
200 to 400
300 to 600
SW No.
Setting range
Input
0G
1
2
3
4
5
6
7
8
9
°C °F
• Platinum resistance thermometer type
(E5CS- □ P, E5CS- □ PX)
• Thermistor type (E5CS- □ G)
*Default="2" *Default="3" *Default="1"
Setthecontroltemperature.
Input shift value
Present
temperature
POWERON
Alarm set
temperature
Set temperature
M
M
M
M
●Temperature indication
*1 Displayedonlyformodelswithalarms.
Whenalarmmodeselectorswitchissetto0or9,no
alarmtemperatureisdisplayed.
*2 Inputshiftvalueisnotdisplayedwhenpin4ofcontrol
modeselectorswitchissettoOFF.
■ Mounting
Dimensions
Installation Diagrams Terminal Layout
Conformity to Safety standards
Basicinsulationisprovidedbetweenthepowersupply,input,andoutputterminals.
Whendoubleinsulationisrequired,applysupplementalinsulationdefinedinIEC60664thatissuitableforthemaximumoperating
voltagewithclearancesorsolidinsulation.
Display Error Meaning Action
fff
---
fff
(flashing)
---
(flashing)
e11
e33
OFF
ON
OFF
OFF
OFF
OFF
ON
OFF
OFF
OFF
OFF
OFF
Overflow
*1,*2
Underflow
*1,*2
Sensorerror
*1,*3
Memoryerror
A/Dconverter
error
・Thetemperaturehasrisenbeyondthesettemperaturerange.
・WithThermistortypes,thesensorisshorted.
・Thetemperaturehasfallenbelowthesettemperaturerange.
・WithThermistortypes,thesensorisdisconnected.
・Thetemperaturehasrisenexcessivelybeyondthesettemperaturerange.
・Thethermocoupleorplatinumresistancethermometerhasfailed.
・Thetemperaturehasfallenexcessivelybelowthesettemperaturerange.
・Thepolarity(positiveandnegative)ofthermocouplehasbeenreversed.
・Theplatinumresistancethermometerhasfailed.
Memoryhasfailed.
TheA/Dconverterhasfailed.
Check the wiring of
inputs,
disconnections,
shorts and input
type.
After the correction
of input error, turn
the power OFF then
back ON again.
Controloutput
ReverseNorma
*1 Alarm output (Models with alarm output type only)
• The alarm output will operate as an abnormally high temperature alarm output when fff is displayed (flashes).
• The alarm output will operate as an abnormally low temperature alarm output when --- is displayed (flashes).
• The alarm output will turn OFF when e11 or e33 is displayed.
*2 Errors are displayed only when the present temperature is being displayed.
Errors will not be displayed if the set temperature, alarm set temperature, or input shift value is displayed.
*3 Sensor error detection function is not provided for thermistor type.
Names of Front Parts
● Display
E5CS E5CS-X
E5CS
E5CS-X
*1
*1
*2
*2
1618455-6A
*1 Separate models are provided for 100 to 240 VAC and 24 VAC/DC. There is no polarity for 24 VDC.
*2 The following operation will be performed when the control output is turned ON.
Relay output: The NO contacts will close.
Voltage output: 12 V will be output.
OMRON Corporation