Example : ON at 125° and OFF at 180° for Cam 2, step 3
Manual Mode
Set the mode switch to PRGM mode
and MAN mode.
Press the ON/OFF key to flush
ON indication.
Select Cam 2 with the CAM keys.
Select Step 3 with the STEP keys.
Set 125° with the ANGLE keys.
Press the WRITE key.
Press the ON/OFF key to make the
OFF indicator flash.
Set 180° with ANGLE keys.
Press the WRITE key.
Repeat the above procedure from step for other steps and cams.
Rotation display
monitor
CAUTION
©All Rights Reserved
INSTRUCTION MANUAL
Mounting Methods
To ensure safety, please observe the following.
(1) Store the Positioner within the specified ratings. If the Positioner has been stored at
-10°C or lower, let it stand for 3 hours or longer at room temperature before turning
ON the power supply.
(2) Use the Positioner within the specified ratings for the ambient operating temperature
and humidity.
(3) Do not use in the following locations:
• Locations subject to sudden or extreme changes in temperature
• Locations where high humidity may result in condensation
(4) Do not use the Positioner in locations subject to vibration or shock. Extended use in
such locations may result in damage due to stress.
(5) Do not use the Positioner in locations subject to excessive dust, corrosive gas, or
direct sunlight.
(6) Install the Positioner well away from any sources of static electricity, such as pipes
transporting molding materials, powders, or liquids.
(7) The Positioner is not waterproof or oil resistance. Do not use it in locations subject
to water or oil.
(8) The life expectancy of internal components may be reduced if Positioners are
mounted side-by-side.
(9) Do not use organic solvents (such as paint thinners or benzine), strong alkali, or
strong acids. They will damage the external finish.
(10) Install a switch or circuit breaker that allows the operator to immediately turn OFF
the power, and label it to clearly indicate its function.
Precautions for Safe Use
Definition of Precautionary Information
CAUTION
Indicates a potentially hazardous situation which, if not avoided, may
result in minor or moderate injury or in property damage.
Precautionary Information
Safety Precautions
Mounting and Panel Dimensions
Installation Diagrams (Unit: mm)
An 8-output model is shown below. The encoder cable connects to the bottom
of 16/32-outputs models.
English
Refer to the H8PS User’s Manual (Cat. No. Z199) for details.
(11) Wire terminal polarity correctly.
(12) Do not connect more than two crimp terminals to the same terminal.
(13) Use the specified wires for wiring.
Applicable Wires
AWG24 to AWG18 (cross-sectional area of 0.208 to 0.823 mm
2
)
Solid or twisted wires of copper
(14) Do not connect loads that exceed the rated output current. The output elements may
be destroyed, possibly resulting in short-circuit or open-circuit faults.
(15) Always connect a diode to protect against counterelectromotive force when using
an inductive load. Counterelectromotive force may destroy output elements, possibly
resulting in short-circuit or open-circuit faults.
(16) Use the specified cables to connect outputs.
(17) Do not install input lines in the same duct or conduit as power supply or other high-
voltage lines. Doing so may result in malfunction due to noise. Separate the input
lines from high-voltage lines.
(18) Input elements may be destroyed if a voltage outside the rated voltages is applied.
(19) Maintain voltage fluctuations in the power supply within the specified operating
voltage range.
(20) Use a switch, relay, or other contact so that the rated power supply voltage will be
reached within 0.1 second. If the power supply voltage is not reached quickly enough,
the Positioner may malfunction or outputs may be unstable.
(21) Do not turn OFF the power supply when changing or deleting settings. The contents
of the EEPROM may be corrupted.
Precautions for Correct Use
(1) When using the Y92C-30 Parallel Operation Adapter for parallel operation, do
not connect more than two Positioners to the same encoder.
(2) Do not subject the connectors of outputs, encoder on the Positioner to more
than 30 N of force.
(3) Keep the USB cable connector straight when connecting or disconnecting it.
Otherwise the Positioner or connector may be damaged.
(4) Confirm the waveform of the power supply circuit and install a surge absorber.
Surge or noise applied to the power supply may destroy internal elements or
cause malfunctions.
(5) Switch the power supply circuit with a device rated at 3.5 A or higher.
(6) Inrush current of approximately 3.5 A will flow for a short period of time when
the power supply is turned ON. The Positioner may not start if the capacity of
the power supply is not sufficient. Be sure to use a power supply with sufficient
capacity.
(7) EEPROM is used as memory when the power is interrupted. The write life of
the EEPROM is 100,000 writes. The EEPROM is written when settings are
changed, settings are deleted, or the resolution is changed.
(8) Make sure that all settings are appropriate for the application. Unexpected
operation resulting in property damage or accidents may occur if the settings
are not appropriate.
(9) Inputs signals may be accepted, not accepted, or unstable for the following
times when the power supply is turned ON or OFF. Set the system to allow
leeway in the timing of input signals. Approximately 1 second is required from
the time the power supply is turned ON until outputs are made. Refer to the
User's Manual for information on other timing.
(10) Connect all of the minus (-), COM, and Vs terminals.
(11) When connecting only one Positioner to a Parallel Operation Adapter, con-
nect the cable with the mark.
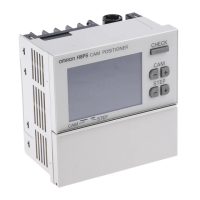
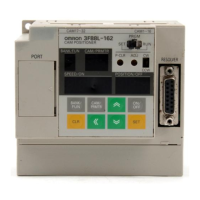
Names of Front Parts
• Connecting Outputs
Do not connect loads that exceed the
rated output current. Also, internal el-
ements will be destroyed if a load
short-circuits.
E5ZE-CBL- (Connector)
•
Output Cable Connections (sold separately) (16 / 32-output models Only)
Y92S-41- (Loose Wires)
•
Connecting Output Cables (sold separately)
(Positioners with 16/32-output models Only)
Specifications
• Power supply voltage 24 VDC 4.5 W (for 8-output models),
and power consumption 6.0 W (for 16/32-output models)
• Operating voltage range 85% to 110% of rated voltage
• Ambient operating temperature -10 to +55°C (When using USB : 0 to +40°C)
(with no icing or condensation)
• Ambient operating humidity 25% to 85%
• Storage temperature -25 to 65°C (with no icing or condensation)
)ylno renoitisoP( g003 .xorppAthgieW •
• Cam output, 8 outputs model
and RUN OUT Transistor outputs, 30 VDC,
100 mA (resistive load)
16/32 outputs models
(Total for all outputs: 1.6 A max.)
NPN transistor outputs, 30 VDC,
100 mA (resistive load);
PNP transistor outputs, 26.4 VDC,
100 mA (resistive load)
• Pulse output Positioners with 8 outputs
Transistor outputs, 30 VDC,
30 mA (resistive load)
Positioners with 16/32 outputs:
NPN transistor outputs, 30 VDC,
30 mA (resistive load);
PNP transistor outputs, 26.4 VDC,
30 mA (resistive load)
• Encoder input Dedicated Absolute Encoder
Response speed: 1,600 rpm max. for 256/360 resolution
Response speed: 800 rpm max. for 720 resolution
• Bank, start, and origin inputs No-voltage inputs, short-circuit impedance:
1 kΩ max.,
Short-circuit residual voltage: 2 V max.,
Minumum open impedance: 100 kΩ
• Degree of protection Front: IP40,
Rear: IP20
• Applicable Encoders E6CP-AG5C-C 256, E6C3-AG5C-C 256/360/720,
(sold separately) E6F-AG5C-C 256/360/720, and E6C2-AG5C-C 256
• Applicable Output cable Y92S-41-
(loose wires) or E5ZE-CBL-
(sold separately) (connector)
• Applicable USB Cable Y92S-40 (A-miniB)
(sold separately)
• Support Software H8PS-SOFT-V
• Contents of Package Positioner, instruction manual (this manual),
mounting bracket (Flush-mounting models only)
Mounting screws, 2
(M4 x 12, Flush-mounting models only)
Mounting screws, 4
(M4 x 16, Surfase-mounting models only)
Self Diagnosis Function
Operating Procedures
Operating Procedures
Step1
Step2
Step3
Operational Flow
Step4
Step5
Changing the Mode
Step1
The resolution and rotation direction of the Encoder are set on a DIP switch.
• DIP switch setting is updated when power is cycled.
• The reverse video shows the default setting.
• Check the direction of rotation after setting the resolution.
• All settings will be initialized when the resolution is changed.
Setting the Resolution
*<Setting a Resolution of 256 and a Dis-
play Angle of 360>
This setting is provided to allow the con-
venience of setting a 360° display angle
for an encoder with a 256 resolution per
rotation. Some angles will be skipped.
Checking the Rotation Direction
Turn the encoder in the direction it will
turn during actual operation and confirm
that the rotation display monitor indicates
the direction shown above (clockwise).
If the direction is reversed, turn OFF the
power supply and change the DIP switch
to reverse the operation.
Step2
Aligning the Encoder Origin
Set the mode switch to PRGM.
Set the programming mode switch to TCH.
Turn the encoder to the position to be set as the origin.
Press the ORIGIN key.
(for 16/32-output models, the ORIGIN input can also be turned ON.)
Confirm that display 1 shows an angle of 0°.
Step3
Set the ON/OFF angles.
There are three ways to set ON/OFF angles.
•
Using the ANGLE keys (Manual Mode).
•
Actually turning the encoder (Teaching Mode).
•
Using USB communications to set all angles at once . Support Software that is sold
separately is required to use USB communications.
The number of steps that can be set is as follows:
Up to 10 steps can be set for each cam (with up to 160 steps total for 32-output model).
Other Convenient Functions (Refer to the User’s Manual
for details.)
•
Banks (for 16/32-output models)
•
Advance functions (Advancing ON/OFF angles depending on the rotation speed.)
• Step number limit
• Cam protection
Precautions in Setting ON/OFF Angles
•
The output for a cam will remain ON if the set angles for two steps overlap for the
same cam number.
Step 1: 120°ON
170° OFF
Step 2: 150° ON
210° OFF
•
If the ON and OFF angles are the same for the same step, the output will not turn ON.
Step4
Performing Test Operation to Confirm Operation Timing
Set the mode switch to TEST mode.
Operate the Encoder.
(For Positioners with 16/32-output models, this must be
done with the start input turned ON. Outputs will not turn ON if the start input is
OFF.)
Check the operation timing. If it is not correct, perform the procedure for STEP 3
from step and correct the ON/OFF angles.
•
In Test Mode, the outputs will turn ON. Confirm that testing is safe before
starting the test operation.
Step5
Deleting settings is possible in PRGM mode or TEST mode.
Delete ON/OFF angle setting by
each step.
Select the step of Cam to be deleted.
Press the CLEAR key.
Press the WRITE key.
The displayed ON/OFF angles will be
deleted at the same time.
Deleting Settings
Terminal Layout
Dimensions (Unit: mm)
<Flush Mounting>
<Surface Mounting>
Input
Output
Output
Input device
COM
COM/−(Minus)
COM/−(Minus)
H8PS
Note: When connecting an inductive
load, connect a diode to absorb
counterelectromotive force.
Load
Load
Vs
NPN Outputs
PNP Outputs
See note
See
note
CN1
CN1: Cams 1 to 16, COM, (Vs)
CN2: Cams 17 to 32, COM, (Vs)
(16-output model do not have CN2.)
CN2 CN1 CN2
Flush-mounting
Positioners
Surface-mounting
Positioners
20
18
16
14
12
10
8
6
4
2
19
17
15
13
11
9
7
5
3
1
OFF
ON
Y92C-30
5 ms
Input status
Unstable
Not accepted
Unstable
Accepted
Connected to Positioner Connected to Positioner
From a dedicated absolute encoder
0 to 1 s0 to 1.3 s
Power supply
OFF
ON
3 4
Encoder resolution switch
OFF
ON
1
Direction switch
PRGM
TEST
RUN
TCH
MAN
PRGM
TEST
RUN
TCH
MAN
PRGM
TEST
RUN
PRGM
TEST
RUN
PRGM
TEST
RUN
19 20
17 18
15 16
13 14
11 12
9 10
7 8
5 6
3 4
1 2
ORIGIN
CHECK
CAM
STEP
CLEAR
ANGLE
ADV BANK
WRITE
ON
OFF
CAM POSITIONER
H8PS
OFF
ON
4321
DO NOT USE.
OFF
OFF
ON
ON
OFF
ON
OFF
720 360
360360
360256
256256
ON
43
ANG
DSPL
PLS
/R
CW
CCW
CAM
STEP
r/min
r/min
12345678910
PRG
TST
RUN
11 12 13 14 15 16 17 18 19 20
21 22 23 24 25 26 27 28 29 30
31 32
BANK
PV
SV
ST
ADV
ON OFF
CAM
STEP
r/min
/256
r/min
12345678910
PRG
TST
RUN
11 12 13 14 15 16 17 18 19 20
21 22 23 24 25 26 27 28 29 30
31 32
BANK
PV
SV
ST
ADV
ON OFF
Cam output display
PV/SV display
Start Input
Indication
Rotation display
monitor
Bank No. display
Cam No.
display
Step No.
display
All protect indication
Mode indicator
Display 1
Unit indication
Unit indication
256 indication
Display 2
ON/OFF indication
Advance indication
CHECK key
CAM keys
STEP keys
ON/OFF key
WRITE key
ANGLE keys
CLEAR key
ORIGIN key
ADVANCE key
Programming mode
switch
Rotation direction
switch
Encoder resolution
switch
USB connector
BANK key
Mode switch
Items with shading do not exist on an 8-output model.
The cam output display is an example for a 32-output model.
/256
PRGM
TEST
RUN
TCH
MAN
Operation Key
< 8-output models/Surface Mounting > <16/32-output models/Surface Mounting >
< 8-output models/Flush Mounting > <16/32-output models/Flush Mounting >
115.2±0.3
81.8±0.2
74.7(See note 1.)
83.1(See note 2.)
16
60.6
Mounting Hole Dimensions
Encoder
connection
Encoder
connection
Four, M4 tap holes
Output Cable (sold separately)
not necessary for 8-output models.
DIN Track
Y92F-91 DIN Track
Mounting Base
(sold separately)
Note 1: When mounting
to PFP-100N or
PFP-50N DIN Track.
Note 2: When mounting
to PFP-100N2 DIN Track.
12345
9 10111213
678
Pulse output
RUN OUT
Not used.
Cam 1
Cam 2
Cam 3
Cam 4
Cam 5
Cam 6
Cam 7
Cam 8
H8PS-8 Rear View
Encoder
connector
+–
24 VDC
9 10111213
12345678
Pulse output
RUN OUT
Not used.
Encoder connector
+–
24 VDC
H8PS-8 F Front View
Cam 1
Cam 2
Cam 3
Cam 4
Cam 5
Cam 6
Cam 7
Cam 8
12345
9 10111213
678
Pulse output
RUN OUT
Vs
H8PS-8 P Rear View
Encoder
connector
+–
24 VDC
Cam 1
Cam 2
Cam 3
Cam 4
Cam 5
Cam 6
Cam 7
Cam 8
910111213
12345678
Pulse output
RUN OUT
Vs
Encoder connector
+–
24 VDC
H8PS-8 FP Front View
Cam 1
Cam 2
Cam 3
Cam 4
Cam 5
Cam 6
Cam 7
Cam 8
678910
12345
11 12 13
Pulse output
RUN OUT
H8PS-16 , 32 Rear View
Encoder
connector
+ –
Not used.
Not used.
Not used.
24 VDC
COM
Origin
Bank 1
Bank 2
Bank 4
Start
12345
678910111213
Pulse output
RUN OUT
H8PS-16 F, 32 F Front View
Encoder connector
+ –
Not used.
Not used.
Not used.
24 VDC
COM
Origin
Bank 1
Bank 2
Bank 4
Start
678910
12345
11 12 13
Pulse output
RUN OUT
H8PS-16 P, 32 P Rear View
Encoder
connector
+–
Vs
Not used.
Not used.
24 VDC
COM
Origin
Bank 1
Bank 2
Bank 4
Start
12345
678910111213
Pulse output
RUN OUT
H8PS-16 FP, 32 FP Front View
Encoder connector
+ –
Vs
Not used.
Not used.
24 VDC
COM
Origin
Bank 1
Bank 2
Bank 4
Start
99
12
91.8
14.6
18.7
15.2
21.6
52.9
46
Y92A-96B Dust Cover
(sold separately)
96
96
15.2
21.6
99
12
91.8
14.6
18.7
52.9
46
Y92A-96B Dust Cover
(sold separately)
96
96
92
+0.8
0
14.6
53
52.3+α
α
φ11
Mounting screws, 2 (included),
M4 × 12
Mounting bracket (included)
Mounting panel (1 to 5 mm)
Output Cable (sold separately)
not necessary for 8-output models.
Panel Cutout
Dimensions
Encoder
connection
96
96
99
121.2
16
60.6
58
22.9
90
Y92F-91 DIN
Track Mounting Base
(sold separately)
Y92A-96B Dust Cover
(sold separately)
22.9
16
96
96
99
121.2
90
58
60.6
Y92F-91 DIN
Track Mounting Base
(sold separately)
Y92A-96B Dust Cover
(sold separately)
Set on the DIP
switch. DIP switch
setting is updated
when power is
cycled.
Align origin.
Set functions.
Set ON/OFF angles. [Programming mode]
Check ON/OFF angles (test operation).
[Test mode]
Start operation. [Run mode]
Set resolution and rotation direction of encoder.
Set the parameters
for each function to
enable advanced
applications.
Change mode switch setting.
Change mode switch setting.
:No. of pulse outputs *
: Pulse output start angle *
: Speed alarm upper limit
: Speed alarm lower limit
: Step number limit
Bank enable/disable
: Bank switching method
Bank copy
Shaded items are not
displayed for 8-output models.
TST
E24 detection enable/disable
The setting for any step can be checked in RUN Mode by using the CAM and
STEP keys. The settings can be checked in order from cam 1 by pressing the
CHECK key. The display will return to its original condition if a key is not
pressed for 10 s when checking settings using the CHECK key.
Press
for at least
3 s
Press
for at least
5 s
Press
for at least
1 s
Angle
Display 2
Speed
Angle
*The default setting for the pulse output is for 60 pulses per rotation
(output starting from 0°).
Programming
mode
Test mode
Run mode
PRG
Function setting mode
RUN
PRGM
TEST
RUN
PRGM
TEST
RUN
PRGM
TEST
RUN
ADV
key
ADV
key
ADV
key
ON/OFF
key
ADV
key
ADV
key
ADV
key
ADV
key
ADV
key
ADV
key
ADV
key
ADV
key
ADV
key
ADV
key
120 150 170 210
OFF
ON
ON
CAM STEP
Teaching Mode
Set the mode switch to PRGM mode
and TCH mode.
Press the ON/OFF key to make the
ON indicator flash.
Select Cam 2 with the CAM keys.
Select Step 3 with the STEP keys.
Rotate the encoder to the position of 125
°
Press the WRITE key.
Press the ON/OFF key to make the
OFF indicator flash.
Rotate the encoder to the position of 180
°
Press the WRITE key.
PRGM
TEST
RUN
TCH
MAN
ON
CAM STEP
The following displays will appear on display 1 if an error occurs, and all outputs will turn OFF.
• Connecting Bank, Start,
and Origin Inputs
The number in parentheses ( ) in the table is for CN2.
dohtem yrevoceRgninaeMyalpsiD
e00 Origin designation data error Press the CLEAR key for at least 3 seconds.
All settings will be initialized.
e11 Memory error: RAM error Cycle the power supply.
e12
Memory error: Checksum error
Press the CLEAR key for at least 3 seconds.
All settings will be initialized.
e13 CPU error Cycle the power supply.
e21 Response speed exceeded Reduce the speed of the Encoder to within the
allowable range and cycle the power supply.
e22 Encoder data error There are surges or noise around the product or in
the wiring. Check the wiring and protect the
product from surges or noise, and then cycle the
power supply.
e23
Encoder resolution inconsistent
Set the Encoder resolution according to the
specifications of the Encoder.
e24 Encoder not connected Con nec t th e Enc oder connector properly,
and cycle the power supply.
OMRON Corporation
MODEL H8PS
CAM Positioner
pin No.
Connector
pin No.
Connector
Connector
Pin
Arrangement
34Resolution
Display angle
ON ON 256 256
ON OFF 256 360
OFF ON 360 360
OFF OFF 720 360
1
ON
OFF
Direction
Forward
Reverse
1
2
3
4
5
1
2
3
4
5
6
7
8
9
1
3
4
5
6
7
8
9
OFF
CAM STEP
OFF
CAM STEP
1
2
3
2
Starting operation
Set the mode switch to RUN mode to start operation.
Deleting All Settings
Press the CLEAR key for at least 3 s.
Press the WRITE key.
All settings, except for the origin offset data,
will be deleted.
1
2
3
1
2
Cam 1 (17)
Cam 2 (18)
Cam 3 (19)
Cam 4 (20)
Cam 5 (21)
Cam 6 (22)
Cam 7 (23)
Cam 8 (24)
COM
Vs
Cam 9 (25)
Cam 10 (26)
Cam 11 (27)
Cam 12 (28)
Cam 13 (29)
Cam 14 (30)
Cam 15 (31)
Cam 16 (32)
COM
Vs
Thank you for purchasing this OMRON product. This
INSTRUCTION MANUAL describes the information such as
function, performance,. and how to use the product required for
using the product.
• Please operate the product by the qualified specialist having
the elelctrical know how.
• Read this instruction manual with enough, and use the product
with enoutgh understandaing.
• Keep this instruction manual close at hand and use it for
reference during operation.
• Tighten terminal screws to a torque of 0.6 to 0.8 N•m so that they do not
become loose. Minor fires may occasionally occur.
• Do not disassemble, modify, or repair the Positioner or touch any of the internal
parts. Minor electric shock, fire, or malfunction may occasionally occur.
• Do not allow metal fragments, lead wire scraps, or chips from processing
during installation to fall inside the Positioner. Otherwise minor electric shock,
fire, or malfunction may occasionally occur.
• Do not touch the terminals when power is being supplied. For Surface-mounting
Positioners, always connect the terminal cover after completing wiring.
Otherwise minor injury due to electric shock may occasionally occur.
2
2
1618408-4D
sledom tuptuo-23/61sledom tuptuo-8
Marks Marks
Cam 1 (17)
Cam 2 (18)
Cam 3 (19)
Cam 4 (20)
Cam 5 (21)
Cam 6 (22)
Cam 7 (23)
Cam 8 (24)
COM
Vs
Orange
Grey
White
Yellow
Peach
Orange
Grey
White
Yellow
Peach
Black
Black
Black
Black
Black
Black
Black
Black
Black
Black
Red
Red
Red
Red
Red
Red
Red
Red
Red
Red
color
Wire
color
Mark
Orange
Grey
White
Yel lo w
Peach
Orange
Grey
White
Yel lo w
Peach
color
Wire
color
Mark
Cam 9 (25)
Cam 10 (26)
Cam 11 (27)
Cam 12 (28)
Cam 13 (29)
Cam 14 (30)
Cam 15 (31)
Cam 16 (32)
COM
Vs
MIL connector XG4M-2030(OMRON)
Refer to the User’s Manual
for details.
For Forward
Conformance to UL Standard.
• There is no isolation between the power supply circuit, the output circuit and the
input circuit. Use a common supply for the power supply circuit and the output
circuit.
Cam output and RUN OUT
8 outputs model : 24 VDC,100 mA (resistive load)
16/32 outputs models : 24 VDC,100 mA (resistive load)
(Total for all outputs: 1.6 A max.)
Pulse output : 24 VDC,30 mA (resistive load)
• The USB connection is isolated from the other circuits.
• This Positioner is mounted on the flat surface of an enclosure that is rated and
marked "Type 1". (Flush-mounting models only)
• Do not allow wire clippings, shavings, or other foreign material to enter
any Unit. Otherwise, Unit burning, failure, or malfunction may occur.
Cover the Units or take other suitable countermeasures, especially
during wiring work.
• Do not allow foreign matter to enter the openings in the Unit. Doing so
may result in Unit burning, electric shock, or failure.
Regional Headquarters
OMRON EUROPE B.V.
Wegalaan 67-69,2132 JD Hoofddorp
The Netherlands
Tel: (31)2356-81-300
Fax: (31)2356-81-388
OMRON ASIA PACIFIC PTE. LTD.
No. 438A Alexandra Road #05-05/08
(Lobby 2), Alexandra Technopark,
Singapore 119967
Tel: (65) 6835-3011
Fax: (65) 6835-2711
OMRON ELECTRONICS LLC
2895 Greenspoint Parkway, Suite 200
Hoffman Estates, IL 60169 U.S.A.
Tel: (1) 847-843-7900
Fax: (1) 847-843-7787
OMRON (CHINA) CO., LTD.
Room 2211, Bank of China Tower,
200 Yin Cheng Zhong Road,
Pu Dong New Area, Shanghai,
200120, China
Tel: (86) 21-5037-2222
Fax: (86) 21-5037-2200
Note: Specifications subject to change without notice.
OMRON Corporation Industrial Automation Company
Contact: www.ia.omron.com
Kyoto, JAPAN
SUITABILITY FOR USE
Omron Companies shall not be responsible for conformity with any standards, codes
or regulations which apply to the combination of the Product in the Buyer's application
or use of the Product. At Buyer's request, Omron will provide applicable third party
certification documents identifying ratings and limitations of use which apply to the
Product. This information by itself is not sufficient for a complete determination of the
suitability of the Product in combination with the end product, machine, system, or
other application or use. Buyer shall be solely responsible for determining
appropriateness of the particular Product with respect to Buyer's application, product
or system. Buyer shall take application responsibility in all cases.
NEVER USE THE PRODUCT FOR AN APPLICATION INVOLVING SERIOUS RISK
TO LIFE OR PROPERTY WITHOUT ENSURING THAT THE SYSTEM AS A WHOLE
HAS BEEN DESIGNED TO ADDRESS THE RISKS, AND THAT THE OMRON
PRODUCT(S) IS PROPERLY RATED AND INSTALLED FOR THE INTENDED USE
WITHIN THE OVERALL EQUIPMENT OR SYSTEM.