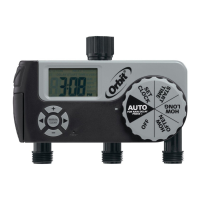
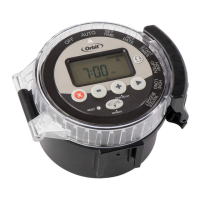
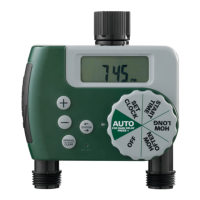
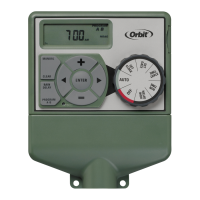
PROGRAMMING THE TIMER
■
Rotate the dial to positions indicated or setup.
■
Press the arrow button to switch between station
1 and 2 for all programming.
S
ET CLOCK
■
Press the + button to advance clock time (hold button for
quick advance).
■
Press the – button to reverse clock time (hold button for
quick reverse).
S
TART TIME
■
Press the + button to advance start time (hold button for
quick advance).
■
Press the – button to reverse start time (hold button for
quick reverse).
HOW LONG
Set watering duration from 1 to 240 minutes using the
+ and – buttons.
HOW OFTEN
Set watering frequency as every 6 hrs, 12 hrs, or from 1 to
7 days using the + and – buttons. 1 is every day, 2 is every
other day etc. up to 7 days.
AUTO
Timer waters according to programmed time, station,
duration, and frequency.
RAIN DELAY
■
When in AUTO, press + button for 24 hrs, 48 hrs, or 72 hrs.
■
Screen will flash between clock and hours remaining
before programmed cycle resumes.
■
To remove rain delay, turn dial to OFF and then
back to AUTO.
IN
STALLING THE BATTERIES
■
Remove the tray on the back of the timer by sliding it out.
■
Insert two AA (1.5V) alkaline batteries (batteries included)
and replace the tray.
■
Replace batteries when low battery icon appears.
INSTALLATION
■
After it is programmed attach it to your outdoor faucet.
Mounting to the wall:
1.
Use nut and bolt to attach brace to timer bracket.
2.
Mark where brace touches the wall.
For masonry:
3.
Drill a 1⁄2 in. (1.27 cm) hole.
4.
Insert lag shield and attach brace using 1⁄4 in. lag screw.
For stucco:
3.
Drill 5/16 in. (.79 cm) hole.
4.
Insert plastic anchor and attach brace using #14 round
head screw.
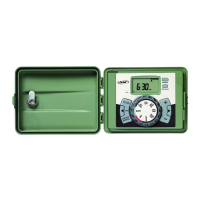
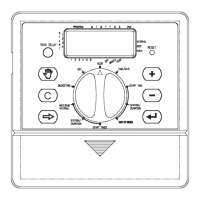
3-Outlet DIGItAl tImer
■
PROGRAMMING FOR THE 2 DIGITAL
O
UTLETS OF THE TIMER
AUTO MANUAL/HAND WATERING.
To water without interrupting the set cycle, press [MANUAL]
button and then use + and – buttons to set from
1 to 240 minutes.
■
To remove manual watering (turn off), turn dial to OFF.
■
To resume programmed cycle turn the dial back to AUTO.
MANUAL OUTLET
The manual port of the timer gives access to the hose faucet
without interrupting the programmed cycle of the digital port.
■
Open the valve in the port by turning the lever
counterclockwise to the open position.
■
Close the valve by turning the lever to the closed position.
TROUBLESHOOTING
Water does not come on at desired time.
Check if:
■
Clock is set to correct time including AM and PM.
■
Start time is set to desired time including AM and PM.
■
Rain Delay is on.
Timer does not water.
Check if:
■
Timer is set to AUTO.
■
Hose faucet is on.
■
Batteries are low.
■
Clock is set to correct time including AM and PM.
■
Rain Delay is on.
Water won’t turn off.
Check if:
■
Watering duration is set to desired time.
■
Start times begin after previous watering cycle has run
through all stations and set durations.
a
B
C D
LEVER CLOSED LEVER OPEN
www.fluid-studio.net
1065 South 500 West
Bountiful, Utah 84010
© 2011 Orbit Irrigation Products, Inc.
All rights reserved. All trade names are
registered trademarks of respective
manufacturers listed.
Orbit
®
Irrigation Products, Inc.
North Salt Lake, UT 84054
1-800-488-6156
www.orbitonline.com
PRODUCT INCLUDES:
a (1) 7 1/4 in. Brace
b (1) #14 Round Head Screw
C (1) 1/4 in. Lag Screw
D (1) Bolt
E (1) Lock Washer
F (1) Nut
a
b
f
g
e
h i
s
1
4
s
1
4
d
c
G (1) Lag Shield
(for masonry)
H
(1) Plastic Anchor
(for stucco)
i
(1) Timer Bracket
Working Water Pressure:
Minimum: 25 psi Maximum: 100 psi
Working
Temperature:
Maximum: Do not exceed 120°F
Minimum: Keep from freezing
Warnings:
For outdoor use with cold water only.
WHEN EXPECTING FREEZING TEMPERATURES,
TIMERS SHOULD BE REMOVED FROM THE HOSE
BIB TO AVOI
D POTENTIAL FREEZE DAMAGE.
801-797-2319