20 GB/IE
the workbench / table below the base plate
20
(see Figure E).
Screw the matching mounting bolt
8
through the front mounting piece
11
.
Fasten the front mounting piece
11
in place
by tightening the corresponding size of nut
9
on the mounting bolt
8
(i.e. by
turning it
in the direction of the mounting piece
11
).
Now set the adjustment screws
1
,
13
so
that the angle grinder is aligned at right
angles to the base plate
20
and firmly
attached to the mount
24
(see Fig. E).
After slightly loosening the hexagonal socket
head screws
23
, adjust the saddle
21
so
that the cutting disc of the angle grinder
lowers into centre of the slot provided in the
base plate
20
.
Now attach the safety guard
5
. To do this
push the safety guard
5
on to the metal
rod
2
and fasten it in place with the wing
nut
4
(see Fig. C).
Now insert the metal rod
2
into the corre-
sponding opening in the mount
24
and fasten
it in place with the wing screw
27
(see Fig. C).
Always keep the angle grinder’s mains lead
in place using the clip
25
.
After assembly is complete, switch the angle
grinder on for a few seconds and then
switch it off again. Check again that all the
screws, bolts and fixings are firmly seated.
Operation
Adjust the guide bolts
16
for desired work-
piece placement.
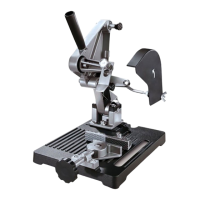
Place the workpiece on to the base plate
20
against the rear stop
18
and secure it by
rotating rotary adjustment knob
14
.
Note: Ensure that the workpiece lies
against the base plate
20
(see Fig. E).
CAUTION! DANGER OF INJURY! En-
sure that the length of the workpiece is at
least half the length of the stop
18
, other-
wise the workpiece may become loose and
slide out.
Set the vice stops
17
,
18
so that the work-
piece lines up with the centre of the cutting
disc.
Now switch on the angle grinder and press
it down on to the workpiece.
Avoid any backwards movement
and apply even pressure on the
workpiece.
Cleaning and care
Use a slightly moist, fluff-free cloth when you
are cleaning or polishing the product.
Disposal
The packaging is made entirely of recyclable
materials, which you may dispose of at local
recycling facilities.
Contact your local refuse disposal authority for
more details of how to dispose of your worn-out
product.
Warranty and service
Warranty claim procedure
To ensure quick processing of your case, please
observe the following instructions:
Please have the till receipt and the item number
(e.g. IAN 123456_7890) available as proof of
purchase.
You will find the item number on the type plate,
an engraving on the front page of the instruc-
tions (bottom left), or as a sticker on the rear or
bottom of the appliance.
If functional or other defects occur, please
contact the service department listed either by
telephone or by e-mail.
You can return a defective product to us free of
charge to the service address that will be pro-
vided to you. Ensure that you enclose the proof
 Loading...