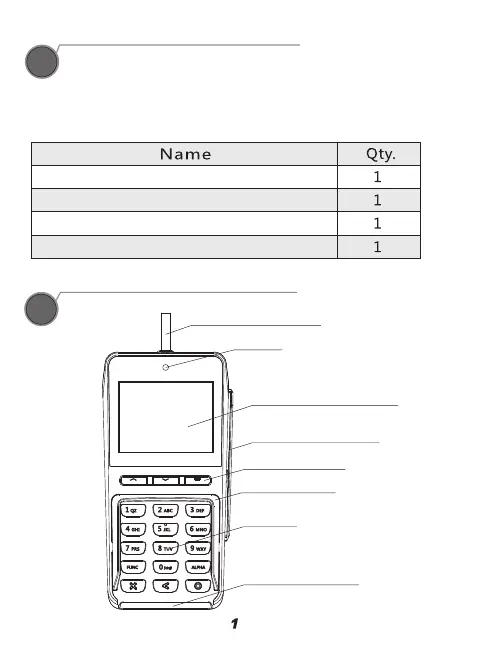
Contents Checklist
Please check the components after unpacking. If any are
missing, or if there is a page missing from the product manual,
etc., please contact the dealer.
Product Description
Instruction
3
Q25 POS Terminal
Communication Cable
Quick Setup Guide
Cable AC Power Adapter (Optional)
Communication Cable
Camera
LCD Display
Contactless Card Reader
Magstripe Card Reader
Functional Keys
Privacy Shield
Keypad
Smart Card Reader
The following sections cover basic operating instructions.
3.1 Power Connection
1) Power can be supplied to the Q25 by connecting the AC
power adapter to the communication cable, as in the case of
RS232 or USB configurations, or via a powered USB cable
(12V Powered USB) where the connected POS terminal
provides the power.
Please Note: To connect this communication cable to the
device, remove the back cover and connect the communication
cable head to the 2x7 pin interface.
2) Power can also be supplied to the Q25 by connecting the
AC power adapter to the Type-C USB port.
Do not use industrial strength or abrasive cleaner as it may
damage or scratch the screen.
Do not immerse the device in water or liquid.
Do not spray water or cleaner into EMV Card Reader or ports.
To clean the screen, apply distilled water or mild glass cleaner
onto a soft, lint-free cloth and gently wipe terminal.
Terminal Installation and Usage Tips
1) If any cables become damaged, seek a replacement.
2) Before inserting card, please check the inside and periphery
of the IC card slot. If there is any suspicious object, please
report to the related administrator.
3) Do not insert unknown materials into any port on the Q25; this
may cause serious damage.
3.2 Reset
The Q25 provides two reset options:
1) When the application is down, press and hold the 'X' button
for 3 seconds and confirm on the LCD screen; the operation
system and application will reset.
2) When the operation system is down, please disconnect and
reconnect the power cable to restart the device.
3.3 USB and PIN Pad Connection
The Q25's 2x7pin communication supports PIN Pad connection
as well as USB data connection for downloading and
debugging purposes. The 2x7 pin communication port is the
default port for USB and PIN Pad connection.
3.4 SAM Card Installation
The Q25 has three SAM card slots. These card slots are
normally hidden under the back cover. In order to install a SAM
card into any of these slots, insert a card into the card slot with
the contacts facing upwards and the clipped corner of the card
facing forward and to the right.
4
Card Readers
The Q25 comes with a Magnetic Stripe Reader, a Smart Card
Reader, and a Contactless Card Reader.
4.1 Magnetic Stripe Card
Slide the card through the card reader slot from top to bottom
or from bottom to top with the magnetic strip oriented towards
the body of the device. Make sure that the card is fully inserted
into the card reader while swiping the card.
4.2 Smart Card Reader
Insert the card fully into the reader with the metallic contacts
facing up and towards the device. Make sure that the card is
fully inserted into the card reader while scanning the card.
4.3 Contactless Card Reader
The contactless card reader reads cards and devices placed
roughly within an inch (2.5 mm). For best results, place as
close to the reader as possible and center the card over the
indicated area at the back of the terminal.
Environment
Working Environment Temperature: -10°C ~ 50°C (14°F ~ 122°F)
Humidity: 10% ~ 93% (non-condense)
Storage Environment Temperature: -20°C ~ 70°C (-4°F ~ 158°F)
Humidity: 10% ~ 93% (non-condense)
Cleaning the Device
PAX TECHNOLOGY INC. PAX TECHNOLOGY INC.
1
2
5
6
7
 Loading...