INITIAL BATTERY CHARGE
!• Connect battery charger to a 120vac wall
recepticle. Connect battery charger to
battery.
ASSEMBLY INSTRUCTIONS
CAUTION:
ADULT ASSEMBLY REQUIRED.
USE CARE WHEN UNPACKING AS
COMPONENTS TO BE ASSEMBLED
MAY POSE A SMALL PARTS/SHARP
EDGE HAZARD.
IF THE PRODUCT IS DAMAGED
WHEN YOU OPEN THE
PACKAGING, CONTACT THE
SERVICE CENTER AND DO NOT
USE THE PRODUCT.
BATTERY IS INCLUDED AND
MUST BE CONNECTED;
see instructions 30 - 33
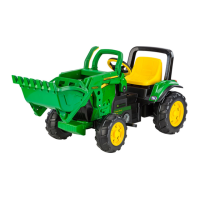
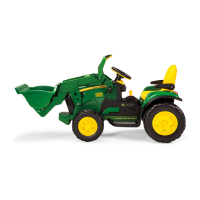
1 •Position the seat as shown in the figure.
2 •IMPORTANT: the seat can be adjusted to 2
positions depending on the height of the
child (see figure). Position 1: the seat is
higher and further back. Position 2: the seat
is lower and further forward.
3 •Turn the vehicle on its side, keeping the
seat in position. Unscrew the cover under
the vehicle.
4 •Open the cover to access the seat
attachment screws.
5 •Fasten the two seat screws as shown in
the figure. Close and screw on the cover.
6 •Snap on the 2 rear lights.
7 •Press on the 2 headlights as shown in
detail A.
8 •Position the steering wheel. Fix the
steering wheel with the screw and washer
provided.
9 •Push on the steering wheel cap as shown
in the figure.
10 •On the underside of the scoop frame, find
the end with the slot and insert the spring
through the slot as shown in figure.
11 •Position large front scoop under frame as
shown in figure. While pressing down on
spring (a), insert pin screw through bracket
holes and spring (b). Repeat process,
except without spring, on opposite side
(c).
12 •Attach nut to end of pin screw and use
included tool to hold nut while turning
opposite end with screwdriver. Repeat
operation on other side.
ENGLISH FRANÇAIS ESPAÑOL
PREMIERE CHARGE DE BATTERIE
!• Reliez le chargeur de batterie à une prise
domestique. Reliez le chargeur de batterie
à la batterie.
INSTRUCTIONS D'ASSEMBLAGE
ATTENTION:
ASSEMBLAGE PAR UN ADULTE
REQUIS.
OUVRIR LES EMBALLAGES AVEC
PRÉCAUTION CAR LES PIÈCES À
ASSEMBLER PEUVENT
COMPORTER DES RISQUES DE
COUPURES OU DE BLESSURES.
SI LE PRODUIT EST ENDOMMAGÉ
LORSQUE VOUS OUVREZ
L’EMBALLAGE, CONTACTEZ LE
SERVICE APRÈS-VENTE ET
N’UTILISEZ PAS LE PRODUIT.
LA BATTERIE EST INCLUSE
ET DOIT ETRE CONNECTÉE;
voir les instructions 30 - 33
1 •Placer le siège comme indiqué sur la figure.
2 •ATTENTION : le siège est réglable en 2
positions en fonction de la hauteur de
l’enfant (voir la figure). Position 1 : le siège
est plus haut et en arrière. Position 2 : le
siège est plus bas et en avant.
3 •Coucher le véhicule sur un flanc en
maintenant le siège en position. Dévisser le
couvercle du compartiment de la chaîne
situé sous le véhicule.
4 •Ouvrir le couvercle pour accéder aux
visses de fixation du siège.
5 •Visser les visses de fixation du siège
comme indiqué sur la figure. Fermer et
revisser le couvercle.
6 •Enclencher les 2 verres des phares arrière.
7 •Monter correctement par pression les 2
phares avant comme indiqué sur la figure
A.
8 •Mettre le volant en place. Fixer le volant
avec la rondelle et la vis fournies.
9 •Monter par pression le bouchon du volant
comme indiqué sur la figure.
10 •Sous le cadre de la pelle, localisez
l'extrémité munie d'une fente et insérez le
ressort dans cette dernière, comme
l'indique le schéma.
11 •Positionnez la grande pelle de devant sous
le cadre, comme l'indique le schéma. En
appuyant sur le ressort (a), insérez la vis-
languette dans les ouvertures du support
et dans le ressort (b). Refaites la même
chose sur l'autre côté, cette fois sans le
ressort (c).
12 •Insérez un écrou à l'extrémité de la vis et
servez-vous de l'outil compris afin de tenir
l'écrou tout en vissant l'autre extrémité de
la vis au moyen d'un tournevis. Refaites la
même chose de l'autre côté.
PRIMERA CARGA DE LA BATERÍA
!• Conecte el cargador de la batería con un
socket doméstico. Conecte el cargador de
batería con la batería.
INSTRUCCIONES DE MONTAJE
PRECAUTION:
REQUIERE MONTAJE DE UN
ADULTO. ALGUNOS
COMPONENTES AL SER
ENSAMBLADOS PODRÍAN TENER
PARTES PEQUEÑAS/RIESGO POR
BORDES CONTANTES.
SI AL ABRIR EL PAQUETE SE
NOTASEN DAÑOS EN EL
PRODUCTO, CONTACTE CON EL
CENTRO DE ASISTENCIA. NO
UTILICE EL PRODUCTO.
LA BATERÍA VIENE
INCLUIDA Y DEBE ESTAR
CONECTADO, vea
instrucciónes 30 - 33
1 •Poner el asiento como indica la figura.
2 •ATENCIÓN: el asiento se puede regular en
2 posiciones según la altura del niño (véase
la figura). Posición 1: el asiento está más
alto y retrasado; posición 2: el asiento está
más bajo y adelantado.
3 •Poner el vehículo de lado manteniendo en
posición el asiento. Destornillar la tapa del
alojamiento-cadena que está debajo del
vehículo.
4 •Abrir la tapa para acceder a los 2 tornillos
de fijación del asiento.
5 •Enroscar los tornillos de fijación del
asiento como indica la figura. Cerrar y
volver a atornillar la tapa.
6 •Montar a presión los 2 cristales de los
faros posteriores.
7 •Montar a presión los dos faros delanteros
de manera correcta como indica la figura
A.
8 •Colocar el volante. Fijar el volante con la
arandela y el tornillo que se entrega.
9 •Poner a presión el tapón del volante como
indica la figura.
10 •En la parte baja del lado en el marco de la
pala, localiza la ranura y coloca el resorte
como indica la figura.
11 •Posiciona la pala grande delantera, debajo
de el marco como indica la figura. Presiona
el resorte hacia abajo (a), coloque el
tornillo remache entre los hoyos del
marco y el resorte (b). Repita el proceso,
exepto sin el resorte, en el lado opuesto
(c).
12 •Coloca la tuerca en el tornillo usando la
llave incluida para detener tuerca mientras
atornillas con un desarmador, repite
operacion en el otro lado.
 Loading...