EasyManua.ls Logo

Pfaff Automatic 362 User Manual

Pfaff Automatic 362
59 pages
To Next Page IconTo Next Page
To Previous Page IconTo Previous Page
Page #48 background image
Instructions
for
Buttonholing
I
Sew
first
side over
a
filler
cord.
When
beginning
of
seam
reaches
slide
indicator
on
buttonhole
gauge,
it
is
the
right
length.
Leave
needle
in
fabric
on
right side
of
its
throw.
2
Lift
foot,
turn
fabric
around
clockwise,
using
needle as
a
pivot.
Pull
filler
cord
around
the
needle
to
the
left
and
lay
it
parallel
to
completed
line
of
stitching.
Lower
foot
and
take
one
stitch
to
the
left.
3
Press lever
F
down.
Make
4
to
6
bartack
stitches,
slightly
closing
to
gether
buttonhole
end
to
reduce
length
of
bar.
47
D
PIIEI
‘p
c
5)
Li,
0
0
Li
a)
U
4
Release
lever
F.
Trim filler
cord
at
end
of
first
stitch
row.
Sew
second
row
and
stop
about
4
to
6
stitches
from
end
of
first
row.
5
Press
lever
F
dawn.
Make
second
tock,
as
instructed
a bove.
6
Push
lever
F
up
and
make
3
to
4
tying
stitches.
7
Trim
both
the
sewing
ond
filler
threads.
Open
the
buttonhole
with
your
seam
ripper.
Be
careful
not
to
injure
the
bartacks.
0
©
0
©
©
Question and Answer IconNeed help?

Do you have a question about the Pfaff Automatic 362 and is the answer not in the manual?

Pfaff Automatic 362 Specifications

General IconGeneral
Free ArmYes
Stitch LengthAdjustable
Stitch WidthAdjustable
Reverse SewingYes
Stitch SelectionDial
Built-in StitchesVarious
Presser FeetVarious
Included Presser FeetButtonhole foot, Zipper foot
Power SupplyElectric
WeightApproximately 25 lbs (11.3 kg)
DimensionsApproximately 18" x 7" x 14" (45.7 x 17.8 x 35.6 cm)

Summary

Foreword

Essential Parts of Machine

Electrical Information

Machine Operation Fundamentals

The Stopmatic Function

Explanation of the Stopmatic lever's operation for threading and work removal.

Basic Machine Operation

Core principles for operating the sewing machine correctly.

Stitching Modes

Straight Stitching

How to set up and perform straight stitch sewing.

Zigzag Sewing

Instructions for performing zigzag stitches and width adjustments.

Automatic Embroidery

Bobbin Procedures

Winding the Bobbin

Step-by-step process for winding a bobbin.

Inserting the Bobbin Case

Correctly placing the bobbin case into the machine.

Threading Procedures

Upper Threading

Guide to threading the upper thread through the machine.

Operating the Needle Threader

How to use the automatic needle threading mechanism.

Stitch Control

Tension Regulation

Adjusting thread tension for optimal sewing results.

Stitch Length and Reverse Sewing

Adjusting stitch length and performing reverse stitching.

Machine Adjustments

Dropping the Machine Feed

How to lower the feed dogs for darning or embroidery.

Changing the Sewing Foot

Process for replacing the sewing foot.

Care and Maintenance

General Care and Oiling

Guidelines for cleaning and oiling the machine.

Regular Machine Care

Routine cleaning practices to ensure smooth operation.

Workplate and Lighting

Sewlight Facts

Information about the machine's built-in sewing light.

The Snap-Out Workplate

How to use the snap-out workplate for increased sewing area.

Troubleshooting Common Issues

Stitch and Needle Problems

Solutions for skipped stitches, thread breaks, and needle issues.

Feed and Stitch Formation Issues

Diagnosing and correcting feed problems and poor stitch quality.

Special Stitching Techniques

Zipper Insertion and Edge Stitching

Techniques for zipper insertion and edge stitching.

Hemming and Rolled Hems

Methods for creating hems and rolled hems.

Buttonholes and Darning

Sewing Buttonholes

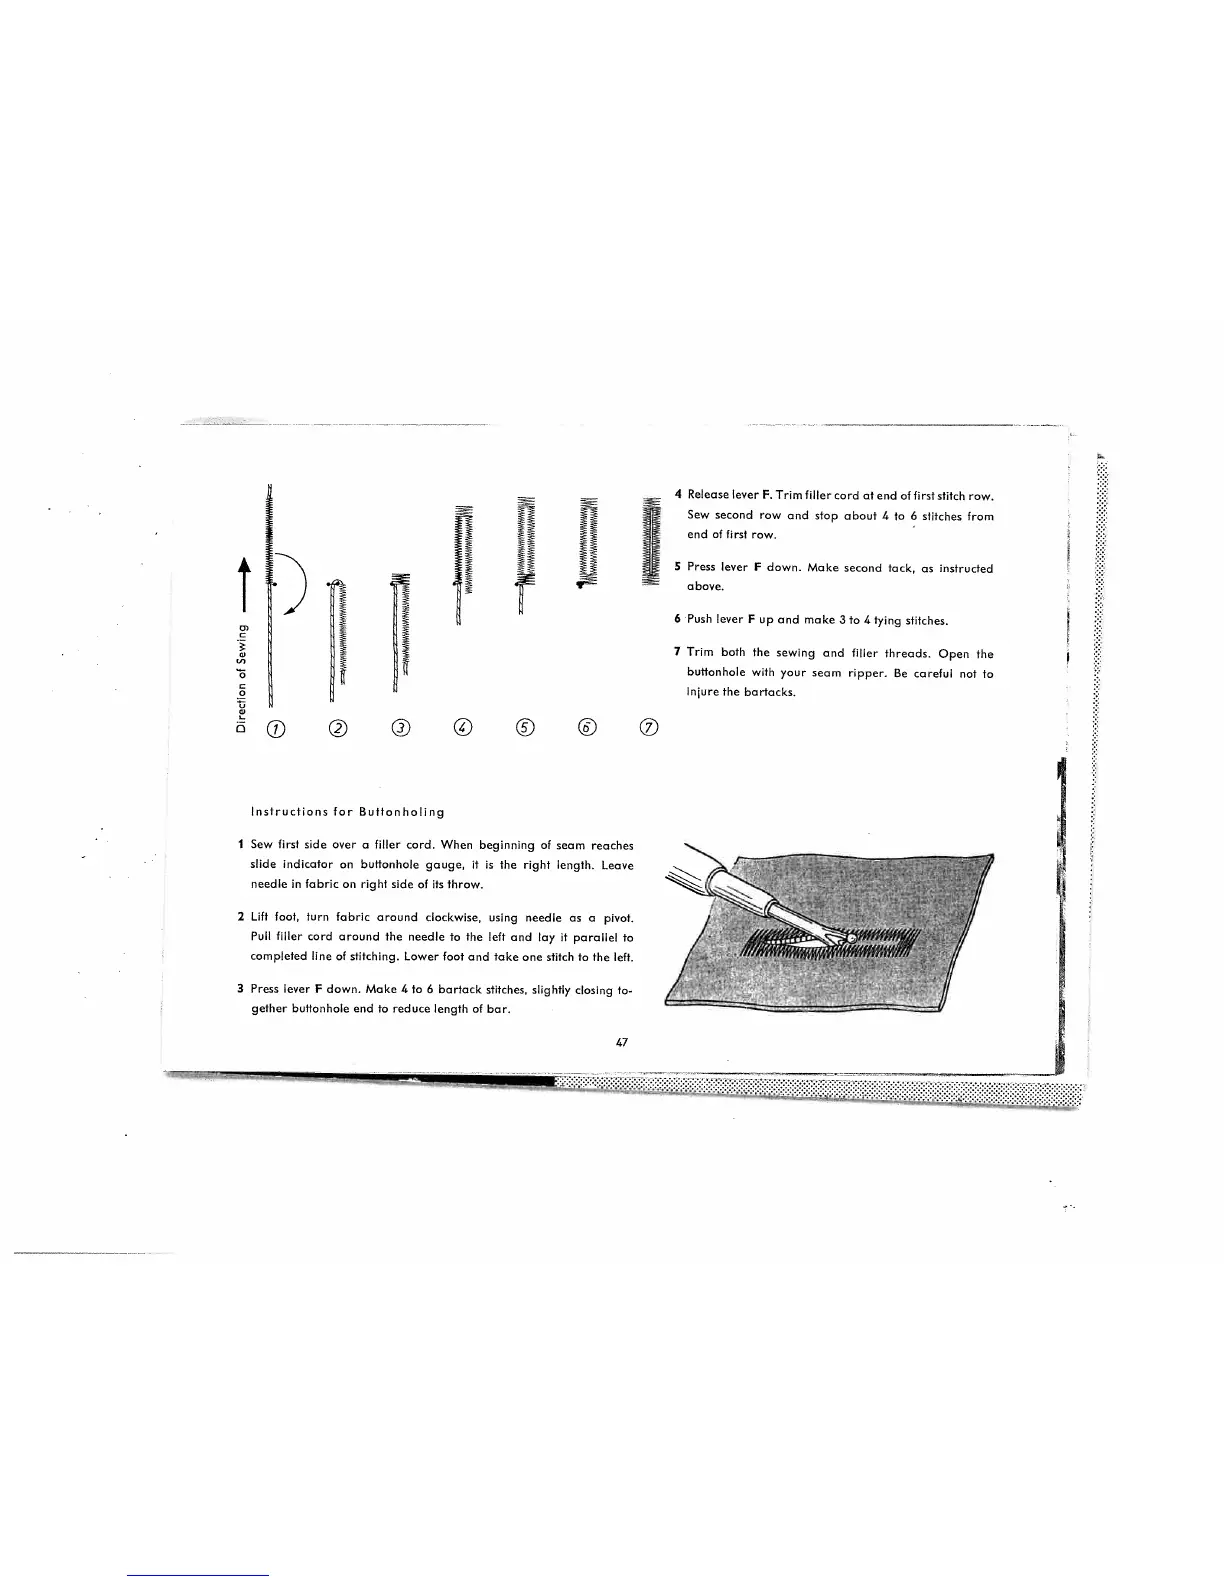
Step-by-step guide to sewing buttonholes automatically.

Darning Techniques

Methods for repairing fabric holes and worn areas.

Decorative Sewing

Cording and Monogramming

Adding decorative cording and monograms to projects.

Multi-Needle Decorative Sewing

Using two or three needles for decorative stitching effects.

Related product manuals