E9480UD_EN.qx3 04.7.22 8:26 PM Page 27 <_
Rear Panel 27
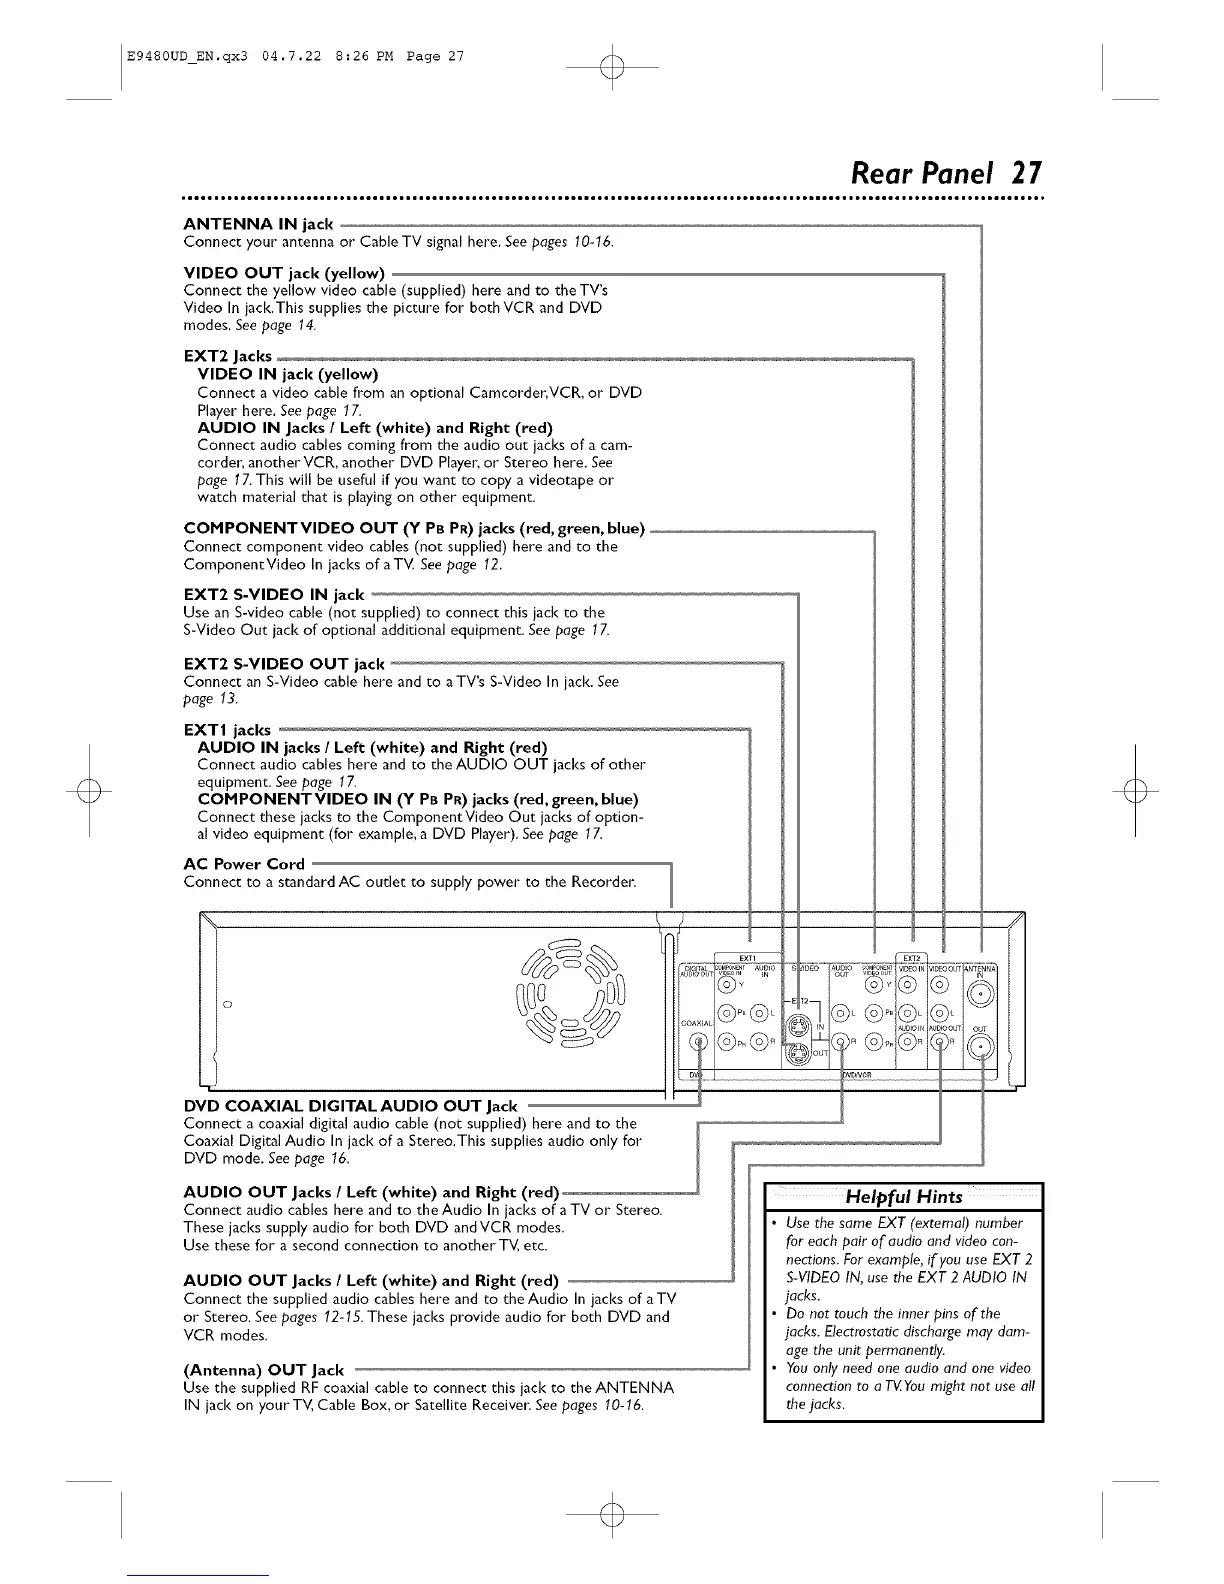
ANTENNA IN jack
Connect your antenna or Cable TV signal here. See pages 10-16.
VIDEO OUT jack (yellow)
Connect the yellow video cable (supplied) here and to the TV's
Video In jack.This supplies the picture for bothVCR and DVD
modes, See page 14.
EXT2 Jacks
VIDEO IN jack (yellow)
Connect a video cable from an optional Camcorder, VCR, or DVD
Player here. Seepage 17.
AUDIO IN Jacks / Left (white) and Right (red)
Connect audio cables coming from the audio out jacks of a cam-
corder, another VCR, another DVD Player. or Stereo here, See
page 17. This will be useful if you want to copy a videotape or
watch material that is playing on other equipment,
CONPONENTVIDEO OUT (Y PB PR) jacks (red, green, blue)
Connect component video cables (not supplied) here and to the
ComponentVideo In jacks of aTV. See page 12,
EXT2 S-VIDEO IN jack
Use an S-video cable (not supplied) to connect this iack to the
S-Video Out iack of optional additional equipment, See page 17.
EXT2 S-VIDEO OUT jack
Connect an S-Video cable here and to aTV's S-Video In iack. See
page 13.
EXTI jacks
AUDIO IN jacks / Left (white) and Right (red)
Connect audio cables here and to the AUDIO OUT jacks of other"
equipment, See page 17.
CONPONENTVIDEO IN (Y PB PR) jacks (red, green, blue)
Connect these jacks to the ComponentVideo Out iacks of option-
al video equipment (for" example, a DVD Player). See page 17.
AC Power Cord
Connect to a standard AC outlet to supply power to the Recorder_
DVD COAXIAL DIGITAL AUDIO OUT Jack
Connect a coaxial digital audio cable (not supplied) here and to the
Coaxial Digital Audio In jack of a Stereo.This supplies audio only for
DVD mode. See page 16.
AUDIO OUT Jacks / Left (white) and Right (red)
Connect audio cables here and to the Audio In iacks of a TV or Stereo.
These jacks supply audio for both DVD andVCR modes.
Use these for a second connection to another TV, etc.
AUDIO OUT Jacks / Left (white) and Right (red)
Connect the supplied audio cables here and to theAudio In jacks of aTV
or Stereo. See pages 12-15. These jacks provide audio for both DVD and
VCR modes.
(Antenna) OUT Jack
Use the supplied RF coaxial cable to connect this jack to theANTENNA
IN jack on your TV, Cable Box, or Satellite Receiver: See pages 10-16.
_ANT_
OUTI O
Helpful Hints
Use the same EXT (external) number
for each pair of audio and video con-
nections. For example, if you use EXT 2
S-VIDEO IN, use the EXT 2 AUDIO IN
jacks.
De net touch the inner pins of the
jacks. Electrostatic discharge may dam-
age the unit permanently.
You only need one audio and one video
connection to a T_ Youmight not use all
the jacks.
o
 Loading...