INSTRUCTION
MANUAL
Dimensions: 5.39x4.13x10.62 in
(137x105x270mm)
Battery Capacity: 3200mAh
Charging: 5V/2.5A
Charging Time: 90 minutes
Temperature Settings: 482 to 842°F (250 to
450°C)
Heating Coil Resistance: 0.7Ω
Sesh Mode Time: 40 seconds after reaching
set temperature
Auto Shut-Off: After 5 minutes of inactivity
KIT INCLUDES:
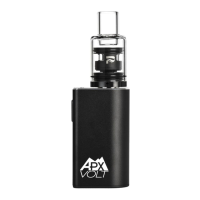
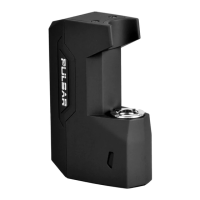
1x APX
™
eRig main body with pivoting
detachable atomizer connection
1x Coil-less quartz cup atomizer
1x Removable airpath tube
1x Glass mouthpiece
1x Base jar
1x Downstem
1x Glass coil collar
1x Glass carb cap
1x Silicone carb cap tether
2x Quartz terp pearls (6mm diameter)
1x Terp Tong
1x Stainless steel dab tool
1x USB-C charging cord
2x Replacement O-rings
4x Alcohol swabs
1x Cleaning brush
How to Use Your New Device:
1. Plug the APX
™
eRig into an appropriate wall charger using the
provided cable. The light above the charging port will flash red when the
battery is between 0%-30%, yellow when the battery is between
30%-64%, and green when the battery is between 65%-100%. The light
will turn solid green when the device is fully charged.
2. Once the unit is fully charged, it’s time to assemble the device. Attach
the mouthpiece to the main body by gently pushing with a small twisting
motion. Next, fill the base jar with water up to the fill line, then gently
push the downstem into the bottom of the main body. With the
downstem in place, push the main body down onto the base jar with a
small twisting motion. Screw on the atomizer, being careful not to over
tighten. Once the atomizer is in place, press the glass collar on the
atomizer connection. Finally, place the carb cap tether on the collar and
insert the top of the carb cap into the small hole at the end of the tether.
3. Click the power button 5 times to turn the APX eRig on or off. When
you turn the eRig on, the light around the power button will indicate the
current temperature setting and the lower LED will flash green in the base
jar. When you turn the device off, the lower LED will flash white.
4. After the device is on, click the power button 3 times to change the
temperature setting.
482°F (250°C) - Blue
572°F (300°C) - Cyan
662°F (350°C) - Green
752°F (400°C) - Purple
842°F (450°C) - Red
5. Once your preferred temperature is selected, load the atomizer with
your concentrate. Be careful not to overfill the atomizer. Once the
atomizer is loaded, press and hold the power button to start heating.
Release the button to stop heating. During the heating process, the light
around the power button will pulse and the lower LED will cycle through
multiple colors. The light around the power button and bottom LEDs will
turn one solid color when the temperature has been reached. Haptic
feedback will let you know when your set temperature has been reached
and when the heating cycle has finished.
6. Click the power button twice to start Sesh Mode. Click twice again to
stop Sesh Mode heating. During the heating process, the light around
the power button will pulse and the lower LED will cycle multiple colors
while the device heats up. The light around the power button and lower
LEDs will turn solid when the temperature has been reached. Haptic
feedback will let you know when your set temperature has been reached
and when the heating cycle has finished.
7. Once the device has finished its heating cycle it will enter standby
mode for 5 minutes before powering off.
Charging Your Device:
Battery Levels:
100-65%: Green
64-30%: Yellow
30-0%: Red
Only charge using Pulsar
®
brand chargers and Pulsar brand accessories,
as not all cables are manufactured the same and we can’t control for
variation between electronics. To prolong the battery life and for your
safety, only use a charger with an output of 5V/2.5A or lower. The light
above the charging port indicates battery level. When the device is on,
the battery level will be shown. When the device is off, press the power
button one time to check the battery level.
For the most current version of the manual go to https://www.pulsarshop.com/pages/manuals
Pulsar
®
Pro Tips!
Before you begin your sesh, grab the atomizer connection and pivot
the APX
™
eRig main body so the mouthpiece is pointing towards you.
This will keep you more comfortable during your session while keeping
the atomizer in the optimal position. The atomizer should stay in its
vertical position so the oil distributes evenly across the entire surface
area of the coil. (See illustrations to the left)
Terp Beads
Use one terp bead in the atomizer to enhace the quality of your
session. The terp beads retain heat, so use caution when removing the
bead while the atomizer is still hot. We recommend waiting until the
atomizer is cool to the touch and using the provided terp tong to
remove the bead.
Cleaning Instructions
Our favorite cleaning supplies are cotton-tipped swabs and isopropyl
alcohol with a concentration of 91% or above.
Coil Maintenance
For optimal performance, wipe out your quartz atomizer with a
cotton-tipped swab after each session.
After multiple sessions, clean out any lingering build-up to keep your
concentrates tasting great and the coil working as long as possible. Dip
a cotton-tipped swab in isopropyl alcohol before wiping out the
atomizer.
Please be sure to let the atomizer cool down before cleaning, and wipe
up any residual solvent left inside.
Glass
Disassemble all glass parts before cleaning.
Soak the glass in isopropyl alcohol or use an alcohol wipe to remove
any build-up.
Once the glass appears free of build-up, rinse with cold water and allow
to air dry before reassembly.
Air Path
With the glass mouthpiece removed, pull the metal air path out of the
silicone housing and soak in isopropyl alcohol.
Use the included cleaning brush to remove any stubborn clogs.
Once clean, rinse with cold water and allow it to air dry.
For further air path cleaning, remove the air path and use a
cotton-tipped swab and alcohol to wipe out the silicone housing.
Allow all parts to air dry before reassembly.
Atomizer Connection
To clean this section, remove the glass collar and coil from the 510
connection.
Use a cotton-tipped swab and isopropyl alcohol to clean around the
510 connection and in the vapor path.
To clean the lower air path, pull out the silicone plug.
Allow the parts to air dry before reassembly.