感谢您选择莱仕达产品,感谢您对莱仕达品牌的支持,
在使用之前请仔细阅读本手册。
Thank you for choosing PXN s product and
supporting our brand. Please read the manual
carefully before using.
产品外观
.
功能特征
.
1、具有四轴,八方向苦力帽和12个可编程动作键。
2、内置振动马达再现游戏逼真感觉,带振动开关控制。
3、高精度线性电位器,配合硬件校正功能,实现精确控制。
4、强大的驱动设置功能,支持多项自定义调节和键鼠映
射。
5、舒适的握把和人体工程学设计,带给你卓越的飞行体
验。
6、四个大而耐用的吸盘使之牢牢固定易于操作。
1、将驱动光盘放入电脑光驱,打开后双击“setup”,按
照提示安装驱动程序。
2、如电脑无光驱,可打开莱仕达官网
(www.e-pxn.com.cn)下载驱动并安装,具体路径
为:莱仕达官网 服务 下载中心 摇杆驱动。
3、下载“莱仕达雷霆PRO PXN-2113” 驱动,然后按说
明进行解压安装。
4、将摇杆USB插头插入电脑USB接口,电脑将提示发现
新硬件并自动完成安装。
系统要求
.
1、支持平台:PC电脑
2、支持系统:Windows XP/VISTA/7/8/10
产品安装
.
1 2 3 4 5 6 7 8 9
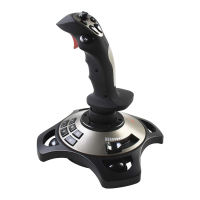
莱仕达雷霆PRO有线振动飞行摇杆
快速入门指南
摇杆检测
.
1、打开电脑游戏控制器,可以对摇杆的各按键及轴
进行功能自检,具体如下:
2、XP系统:打开控制面板 游戏控制器,点击属性
测试。
3、WIN 7/8/10,打开控制面板 设备和打印机
右键“PC Game Controller”图标 游戏控
制器设置,点击属性测试。
4、打开的游戏控制器测试界面如下图:
键盘&鼠标设置
.
产品设定
.
校准设定
.
1、对一些不直接支持摇杆控制的飞行游戏,可以通过
驱动中的键盘、鼠标映射功能,将摇杆按键和轴映
射成电脑键盘、鼠标,来实现游戏操作。
2、单击上图测试界面中的“键盘&鼠标设置”按钮,
在弹出的下图中,再单击“键盘&鼠标模式”选项。
3、单击要设置按键的下拉框,在弹出的下拉菜单中选
择你要映射成的功能键。
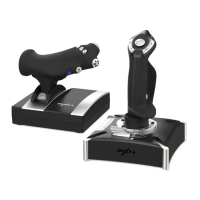
油门控制
方向舵控制
8方向苦力帽
振动开关
固定吸盘
4、如果要映射电脑键盘,可以在弹出的下拉框中选择
“键盘设置”,在弹出的键盘界面中选择你要自定义
的键盘按键,再点击“确认”。
6、对设置方案,可以点击下方的“保存”按钮保存,
在后续使用时可点击“加载”按钮来选择保存的设
定方案。
7、点击“使用12按键切换模式”,可以用摇杆12号
按键来切换摇杆模式和键盘模式。点击默认则清除
当前所有设定,恢复到摇杆模式。
1、当摇杆轴偏离中心时,可以打开“校准页”,依提
示进行操作,对摇杆进行重新校准。
振动功能
.
1、点击“振动测试”页,可以对摇杆振动强度自定义
调节及振动功能测试。
2、在摇杆底部有一个振动开关,可以根据个人需要打
开或关闭振动功能。
注意事项
.
1、避免强烈振动、不可自行分拆、改装及修理。
2、避免水或其它液体进入产品内部,以免造成损坏。
3、避免存放于潮湿、高温、油烟等场所。
4、连接和移除设备时,注意力度适中。
5、儿童需在成年人的监护下使用本产品。
1、点击“设备配置”,可对摇杆轴死区进行自定议
调节,同时可以对各功能键,轴进行互换设定。
2、设置完成后点击“应用”生效,点击“默认”则取
消设定。
5、设置完成后,点击确认完成设定。
产品规格
.
产品名称 莱仕达雷霆PRO
产品型号 PXN-2113
连接方式 USB有线,线长约2.2米
工作电源 DC 5V
工作电流 常态下小于20mA,振动状态小于100mA
包装尺寸 约220 x 190 x 250MM
本体尺寸 约225 x 185 x 185MM
本体重量 约495克
使用温度 10-40℃
使用湿度 20~80%
快速开火扳机键
12个可编程动作键
Product Overview
.
Functional Features
.
1. 4 axis controlling,8-Way HAT switch and 12
Programmable Buttons.
2. Vibration feedback for a realistic game experience.
3. Precision Linear Potentiometer with hardware
correction, assures a accurate flight control.
4. Advanced software can support various custom
adjustment and keyboard mapping.
5. Ergonomics design, provides excellent flight
experience.
6. 4 cupules, easy to fix and reliable to play.
1. Insert driver disk into your CD-ROM, double click
“setup” and install the driver according to the
prompt.
2. If you don t have a CD-ROM on your PC, please go
to www.e-pxn.com to download and install the
driver at: Home Support Driver Download.
3. Download “PXN Thunder PRO PXN-2113”
driver program and unzip and install it following
the instruction.
4. Insert the USB plug of Joystick into PC, your PC
will find a hardware and install it automaticlly.
System Requirement
.
1. Support Platform: PC
2. Support System: Windows XP/VISTA/7/8/10
Installation
.
1 2 3 4 5 6 7 8 9
Joystick Test
.
1. Start Game Controller on your PC to test
the buttons and axis functions of the
joystick:
2. For Windows XP: enter Control
Panel Game Controller and click
Properties Test.
3. For Windows 7/8/10, enter Control
Panel Device and Printer Right click
“PC Game Controller” icon Enter Game
Controller setup and click Properties Test.
4. The testing interface of the Game
Controller is shown as the picture below:
Keyboard & Mouse Setup
.
Product Setup
.
Calibration Setup
.
1. For flight games which don’t support
control, you can use the mapping function
included in the driver to map the buttons
of the to the keyboard and mouse of your
PC to control the game.
2. In the testing interface as shown above,
click the “Keyboard & Mouse Setting”
button, and then click “Keyboard & Mouse
Mode”, as shown in the picture below.
3. Click the button you want to set, and then
select the function keys you want to map
to the keyboard or mouse in the
drop-down menu.
Throttle
Control
Twist Rudder
Control
8-Way
HAT Switch
Vibration switch
Fastening sucker
4. To map to your keyboard, you can select
“Keyboard Key” in the drop-down menu
and select the keyboard buttons you want
to use to control the game in the pop-up
soft keyboard, and then click “OK” to
confirm.
7. By checking the option “Use Button 12 to
switch mode”, you can use the “12” Key
on the to switch between joystick mode
and keyboard mode. You can also clear all
settings by clicking the “Default” button
and return to mode.
1. In case of off-centering of the axis, you
can click the tab “Calibration” to
recalibrate the joystick according to the
prompt.
Vibration Function
.
1. Click the tab “Vibration Test”, you can
adjust the intensity of vibration of the
joystick and test the vibration function.
2. A Vibration switch is provided at the
bottom of the joystick and you can turn it
on or off according to your need.
Precautions
.
1. Avoid intensive vibration and do not
disassemble, repair or reconstruct the
product.
2. Prevent water or other liquid from entering
the product to avoid damage.
3. Keep the product away from humid, high
temperature or smoky places.
4. Use proper care when connecting and
disconnecting the device.
5. Children must be under guardian of an audit
to use the product.
1. In the tab “Device Config”, you can adjust
the dead zone of the axis of the joystick
and exchange the functions keys and axis.
2. After setting, click “Apply” to confirm
the setting, or click “Default” to cancel
the setting.
5. After setting, click OK again to complete
setup.
6. You can click the “Save” button at the
bottom to save your setting and in the
future you can select your saved setting
by clicking the “Load” button.
Specifications
.
Product name PXN Thunder PRO
Model PXN-2113
Connection USB cable length 2.2m
Power source DC 5V
<20mA in normal mode, and <100mA
in vibration mode
Working current
temperature
10-40℃
Package size Appr. 220 x 190 x 250MM
Dimensions Appr. 225 x 185 x 185MM
Product weight Appr. 495g
Working
Working humidity 20~80%
Rapid-Fire
Trigger
12 Programmable
Buttons
User Manual
PXN-2113
PXN Thunder PRO
’
’
装订成品尺寸: 80*120mm
材质: 105g铜版纸
装订方式: 风琴折
印刷:单黑