Slide the PCB module upwards. The
sprung back-tamper arm can be
retracted to allow removal.
This must be done in order to install
the revolving guides - see step 4.
Place the base on a at surface and
ensure it is vertical using the Spirit level
that is already installed. Drill and plug in
each of the xing locations. The revolving
guides will correct any misalignment. If
the Deltabell E/Plus must be mounted on an uneven surface, it
is recommended that a tamper levelling screw is used to ensure
correct back-tamper operation. See step 2.
Turn each guide until they line
up with the drilled holes, while
referencing the spirit level for
the correct alignment and x the
base rmly to the wall.
Please note, if the Deltabell E/Plus is installed on an uneven
surface, it is recommended that you don’t tighten up the wall
screws until after the module is installed (step 6)
Insert the guides in as shown.
Make sure that the guides ‘B’
is aligned with the tabs to
the right (this is so the PCB
module slides in)
Mounting the Deltabell E/Plus
on an uneven surface may
cause false triggering, through
incorrect operation of the back-
tamper.
A POZI number 2 screw driver
is recommended for adjusting
back tamper screw
Tamper
Levelling
screw
The cables to the Deltabell E/Plus should be routed away
from the mains supply and telephone cables to avoid any
electrical interference.
Route the wires
through the guides
as shown and then
up to the ‘teeth’ that
separates the cables
Cable ‘teeth’
Lid
Fit the lid by sliding its hinges into
place. The lid can be supported in the
fully open position, to close the lid,
apply a little force to push the lid past
the holds.
Close the cover, ensure the tamper
is operating correctly and insert the
25mm long screw supplied and rotate
the screw cover to a close.
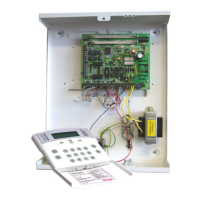
Place the PCB module, ensuring
that the arrow is aligned with the
marker (on the left of the module).
Expose the terminals by releasing
the latch on the top of the PCB
module.
The default polarity input triggers are negative applied. To
change the polarity please see below:
Deltabell Plus: Once the strobe is activated, the backlight LEDs will strobe
until the activation has stopped.
Delatbell E: Once the strobe is activated, the LEDs at the bottom of the PCB will
strobe until the activation has stopped.
The Deltabell E/Plus also has a self
activating engineer hold o function. If the
sounder is only powered by the battery
(before any auxiliary inputs are connected),
the siren will not activate until the auxiliary
inputs are connected.
The comfort LEDs on the Deltabell E/Plus
will ash alternatively three times which
conrms to the engineer that the tampers
are closed correctly.
Once the auxiliary inputs are connected the
Deltabell E/Plus will be fully operable.
8) Deltabell to Control Panel Connection7) Self Activating Engineer Hold O
9) Technical Specication 10) Warranty and Compliance 11) Connections to other control panels 12) Contact Information
1) Installation Steps: Step 1
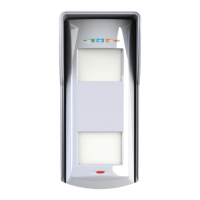
External Sounder
Installation Guide
RINS1270-10
Step 2 Step 3
Step 4 Step 5 Step 6
2) Bell/Strobe Polarity
3) Backlight 4) Battery Connection 5) LED Enable/Disable and SAB/SCB Mode 6) External Engineer Hold O
The battery will already be
connected, to enable, the
‘BATT DISCONNECT’ link must
be placed. An external battery
may also be connected and the
‘BAT+’ terminal space may be
used for this.
The Deltabell Plus
now incorporates an
LDR feature where the
backlight is only enabled
at night time.
The backlight can be
disabled as shown below
There is the option
to enable/disable
the comfort LEDs by
enabling/disabling
the ‘LED DISABLE’
link:
SAB Mode
Uses power from the control
panel 12V output
SCB Mode
Uses power from backup battery
(Useful for when there are 2 x Deltabells on the same
system)
CONTROL PANEL
DELTABELL
The Deltabell E/Plus has an external
engineer hold o function. When rst
powered with the tamper switch open,
the sounder will not activate. To enable
the sounder for specied operation,
the tamper switch must be closed
The Engineer Hold O terminal is used
to disable the cover tamper switch
when a control panel is in Engineer
Mode. Applying 0V to the ‘ENG HOLD’
terminal over-rides the tamper circuit
allowing access to the Deltabell E/Plus
without sounding the alarm.
+Removed +Applied-Removed-Applied
LED
Disabled
LED
Enabled
Supply Voltage 9-16VDC
Quiescent Current Deltabell E = <30mA.
Deltabell Plus = <60mA
Alarm Current Deltabell E = <250mA,
Deltabell Plus = <300mA
Strobe Duration 10mS
Strobe Frequency 1Hz
Sound Pressure Level 104dBA
Dimensions 290 x 285 x 50mm
Reverse Polarity Protected
This product is sold subject to our standard
warranty against defects in workmanship for a
period of two years. Please note: In positions where
the Deltabell E/Plus casing is subjected to high
levels of U.V. sunlight, there maybe risk of case
colour fading, this is not covered by the warranty. In
the interest of continuing improvement of quality,
customer care and design, Pyronix Ltd reserve the
right to amend specications without giving prior
notice.
Technical Support Line: 0845 6434 999 (local rate)
or call +44(0)1709 535225
Hours: 8.00am - 6:30pm, Monday to Friday
customer.support@pyronix.com
marketing@pyronix.com
www.pyronix.com
Pyronix Ltd, Braithwell Way, Hellaby,
Rotherham, S66 8QY, UK
Deltabell E/Plus + - BELL STB TAMPER
Sterling 10 Bell+ Bell- Bell NO STB NO BT Bell-
Matrix Aux+ Aux- PGM1(No) PGM2(No) BT B-
PCX/Euro 1 Aux+/B+ Aux-/B- PGM1/BELL PGM2/STB TR Aux-/B-
ADE D A B STROBE- T A
Scantronic 12V 0V BELL STROBE- TR 0V
Texecom A D B S C D
Menvier Bell +12V HOLD OFF BELL TRIG STB TAMP RTN HOLD OFF
GE BELL +12V BHO EXT BELL- STROBE- 270R TR HO
Risco/Gardtec BELL+ SCBA BELL -STB SCBP SCBA
DSC Range BELL+ AUX- BELL- PSM1 ZONE
HKC EXT BELL+ SAB HOLD EXT BELL-
PGM
Output 4
TAMPER
RTN
SAB HOLD
(with 4k7)
Negative Tamper Return: Link between TAMPER and B-
Positive Tamper Return: Link between TAMPER and B+