2
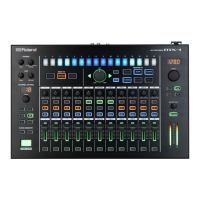
Performances that Combine Live with the MX-1
In this setup, you can use the MX-1 to mix the output of Live and apply eects to the audio output while you perform.
NOTE
To prevent high volume from damaging your hearing, check the fader positions of each MX-1 channel before you continue.
Realtime performance
In EXTERNAL MIXING mode you can use the MX-1’s faders to adjust the levels of the output
from Live, and apply pan and eects while you mix and perform in real time.
1.
Launch Live.
2.
On the “Create” menu, click “Insert Audio Track” to create a track.
If you want to create multiple tracks, repeat step 2.
3.
Place clips on the tracks that you added.
4.
Press the [IO] button to display the track input/output section.
[I•O] buttonInput/output section
5.
Set each track’s output to “Ext. Out,” and specify the output channel.
Live’s output channels correspond with the MX-1’s channels as follows.
Live’s output channels
Corresponding MX-1
channels
Notes
1 1
2 2
3 3
4 4
1/2 1 and 2
If you’re outputting in stereo, enable
channel link on the MX-1.
(->Owner’s Manual: Various Settings)
3/4 3 and 4
5/6 5/6
7/8 DIGITAL
9/10 USB 1
11/12 USB 2
13/14 USB 3
15/16 USB 4
17/18 PC
6.
Play back the song.
Operate the MX-1’s faders to adjust the audio output from Live.
By using the MX-1 to apply pan and eect settings, you can mix and perform in real time.
Advanced performance
In addition to mixing and performing in real time, you can also use EXTERNAL MIXING mode to
record an external input and instantly apply the result to your performance, just as if you were
using a loop recorder.
* The explanations in the following procedure assume that you are performing (Live and the
MX-1 are playing back).
1.
Press the [IO] button to display the track input/output section.
2.
On the track that’s recording the external source, assign the track input to “Ext. IN” and
the output to “Ext. Out,” and specify the channel for each.
Live’s input channels Input from the MX-1 Notes
1 INPUT 1 jack
Mono
2 INPUT 2 jack
3 INPUT 3 jack
4 INPUT 4 jack
1/2 INPUT 1 jack and INPUT 2 jack
Stereo
(INPUT 1 and 3 are L;
INPUT 2 and 4 are R)
3/4 INPUT 3 jack and INPUT 4 jack
5/6 INPUT 5/6 jacks
Stereo
7/8 DIGITAL IN jack
9/10 USB HOST 1
11/12 USB HOST 2
13/14 USB HOST 3
15/16 USB HOST 4
17/18 Same sound as the MIX OUT jacks
NOTE
If you select “17/18” for both input channel and output channel and set the Monitor setting
to AUTO or IN, an audio signal feedback loop will occur.
Take care with the Monitor setting if you select “17/18.”
3.
Lower the MX-1 fader that corresponds to the track that you’re recording.
4.
On the track that you’re recording, press the [Arm Session Recording(record-ready)]
button to make it light.
[Arm Session Recording] button
[Record] button
5.
Click the [Record] button to start recording.
Recording starts on the beat.
6.
Click the [Record] button once again to stop recording.
Recording stops on the beat, and the recorded clip plays.
7.
On the MX-1, adjust the pan and eects, and raise the faders.
The recorded sound is added to the performance.
[I•O] button
Input/output section
 Loading...