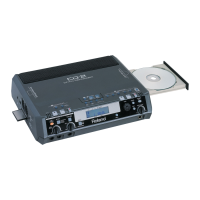
Roland U-220 – Front & Rear Panel Layout Revision 1.0 / March 2014 Page: 2
[ FRONT PANEL ]
1. Power Switch
This switch turns the power On/Off.
2. MIDI Message Indicator (LED)
This indicator lights when a MIDI message is
received.
3. PCM Card Slot
Separately sold sound library cards (SN-U110
series) can be inserted into this slot.
4. Part / Rhythm instrument select buttons
Use these buttons to select parts 1 to 6 in play
mode or when editing.
5. Value Buttons
Value Buttons change setting values. The value will
decrease each time you press (Down), and will
increase each time you press (Up). If you press
and hold either button ( Up or Down ) the
value will begin to change more rapidly.
6. Enter Button
This button is used mainly to specify a menu item
from a menu display in Edit Mode or Data Mode.
7. Exit button
Use the Exit button to return to the previous higher
level in Editing Mode or Data Mode. (This button
moves in the opposite direction of Enter).
8. Cursor Buttons
In Edit Mode or Data Mode, use these buttons to
move the blinking cursor to select menu items or
parameters. In Play Mode use these buttons to
select displays.
9. Data (Reverb) Button
Press this button to enter Data Mode, where you
can store edited settings or transmit data. If you
press this button after pressing the Jump Button
you will move to the Reverb display.
10. Edit (Chorus) Button
Press this button to enter Edit Mode, where you
can edit (modify) the settings of a patch or sound.
If you press this button after pressing the Jump
Button you will move to the Chorus display.
11. Jump Button
Use this button to jump (as a short-cut) to a specific
display.
12. Mark button
Use this button to memorize the display to which
you want to Jump.
13. LCD Display
The LCD Display shows the various settings and
parameter values available.
14. Volume Knob
This adjusts the overall Volume that is output from
the Mix Out jacks and the Phones jack. (This knob is
effective only when the Fixed/Variable switch is set
to Variable.)
15. Phones Jack
A set of headphones can be connected to this jack.
Use stereo headphones of impedance 5-150 ohms.
Sound will appear at the output jacks regardless of
whether the Phones jack is being used.
[ REAR PANEL ]
16. MIDI Connectors (In, Thru, Out)
Use these connectors to connect and communicate
with other MIDI devices.
17. Direct Out 1 (L/R), Direct Out 2 (L/R) Jacks
The direct sound without the effect will be output
in stereo from these jacks.
*When the U-220 is shipped, the direct outputs are
turned off.
18. Mix Out Jacks (R & L/Mono)
The sound of each part processed through the
effect will be output in stereo from these jacks.
For normal use, connect these jacks to your
amp/speaker system.
19. Fixed / Variable Switch
This switch determines whether or not the front
panel Volume knob will adjust the volume of the
sound from the Mix Out outputs.
When set to Fixed the volume will be at maximum
regardless of the setting of the Volume knob.
When set to Variable the Volume knob will
regulate the volume.
*Turn the power off before changing the setting of
the Fixed / Variable Switch.
Off-The-Grid Home Music Recording Studio - http://musicstudio.bigredroo.com.au/ All artwork has been redrawn based on available references
 Loading...