ROYAL
®
Quick Reference Guide
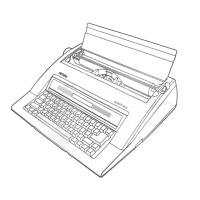
SCRIPTOR
II
Unpa
ck
in
g
Remove the three
pieces
of
tape
securing the
keyboard cover.
With both hands,
grasp the front
edges
of
the
top
cover and lift.
Inserting Paper
PH2
With the top cover up,
remove the
ca
rdboard
print head shipping
brakes
PH1 and PH2.
Remove the foam
ribbon brake
R3 and
the plastic ribbon
brake
R4.
,d,
---
Power
Switch
Open the cord compartment cover
locat
ed
at the rear of the unit and
remove the power cord. Plug
the power cord
in
any
11
0v
outlet.
Pu
ll
the paper support up. Turn on
the Power Switch. The typewriter
will cycle, beep and the green
power
LED
light on the keyboard
will illuminate.
Align a sheet of letter size
paper with the (L>) symbol on
the paper support. Lift the
paper
ba
il and turn the platen
knob un
ti
l the paper is
inserted.
-
Rey
board Layout
~
SHIFT
I •
,-
\>-,
,.._
,;.,
lf;
ii
'
~
- •
·-~
--
-
-._
- -
-:
~
:
..
!-~-
---
-.
~~
Getting Started
Lower the top
cover back into
position and
press unt
il
locked.
Push the paper release
lever forward. Adjust the
paper so it is straight.
Pull the lever back
to
secure the shee
t.
SET MARGINS: When the unit is turned on, the margins automalically are set to 10 (Left) and
75
(R
ight). You can set your own margins
by
moving the carri
age
to the position where you want to set the new margin.
To
set the Left margin, position the carriage and press the
MAR LEFT key.
To
set the Right margin, positon the
ca
rriage and press
CODE+
MAR LEFT/RIGHT keys. When a new margin is set, the
typewriter will beep.
MARGIN RELEASE: Pressing MAR REL will release the set margins so that you can type beyond the margin or change the margin
settings.
SET
TABS: Move the
ca
rriage to the postion where you want to set a tab and then press the TAB SET/CLEAR
key.
The typewriter
th
en
beeps to indicate that the tab has been set.
You
can store up to 16 t
ab
positions on this unit.
CLEAR A TAB: Move the carriage to the position where you want to clear a t
ab
and then press
CODE+
TAB
SET/CLEAR. The typewriter
then beeps to indicate that the tab has been cleared.
001-02640