08/2022
A5E51844350-AB
SIMATIC
SIMATIC IOT
SIMATIC IOT 2050
Quick Install Guide
Mounting the device
Gerät einbauen
Connecting the device
Gerät anschließen
Expand Device
Gerät erweitern
1
2
3
3.6
Replacing the backup battery - Pufferbatterie austauschen
3.3
Install Mini PCIe card - Mini PCIe-Karte Installieren
Inserting Micro SD/ Nano SIM card – Einsetzen Micro SD/ Nano SIM-Karte3.5
3.4 Install M.2 card - M.2-Karte Installieren
3
Expand device
Gerät erweitern
3
Illustrations
This document contains illustrations of the described devices a
nd accessories
.
The illustrations may deviate from the particularities of the delivered device and accessories.
Abbildungen
Das vorliegende Dokument enthält Abbildungen zu den beschriebenen Geräten und Zubehör.
Die Abbildungen können bezogen auf das gelieferte Gerät und Zubehör in Einzelheiten abweichen.
Central Technical Support
Technische Support-Zentrale
https://support.industry.siemens.com
Service and spare parts
Reparatur und Ersatzteile
https://support.industry.siemens.com/sc/de/en/sc
Disclaimer of Liabil
ity
We have reviewed the contents of this publication to ensure consistency with the hardware and
software described. Since variance cannot be precluded entirely, we cannot guarantee full
consistency. However, the information in this publication is reviewed regularly and any necessary
corrections are included in subsequent editions.
Haftungsausschluss
Wir haben den Inhalt der Druckschrift auf Übereinstimmung mit der beschriebenen Hard- und
Software geprüft. Dennoch können Abweichungen nicht ausgeschlos sen werden, so dass wir für die
vollständige Übereinstimmung keine Gewähr übernehmen. Die Angab en in dieser Druckschrift
werden regelmäßig überprüft, notwendige Korrekturen sind in den nachfolgenden Auflagen
enthalten.
Siemens AG
DI FA
Postfach 48 48
90026 NÜRNBERG
© Siemens AG 2022. All rights reserved
A5E51844350-AB, 08/2022
1
2
3
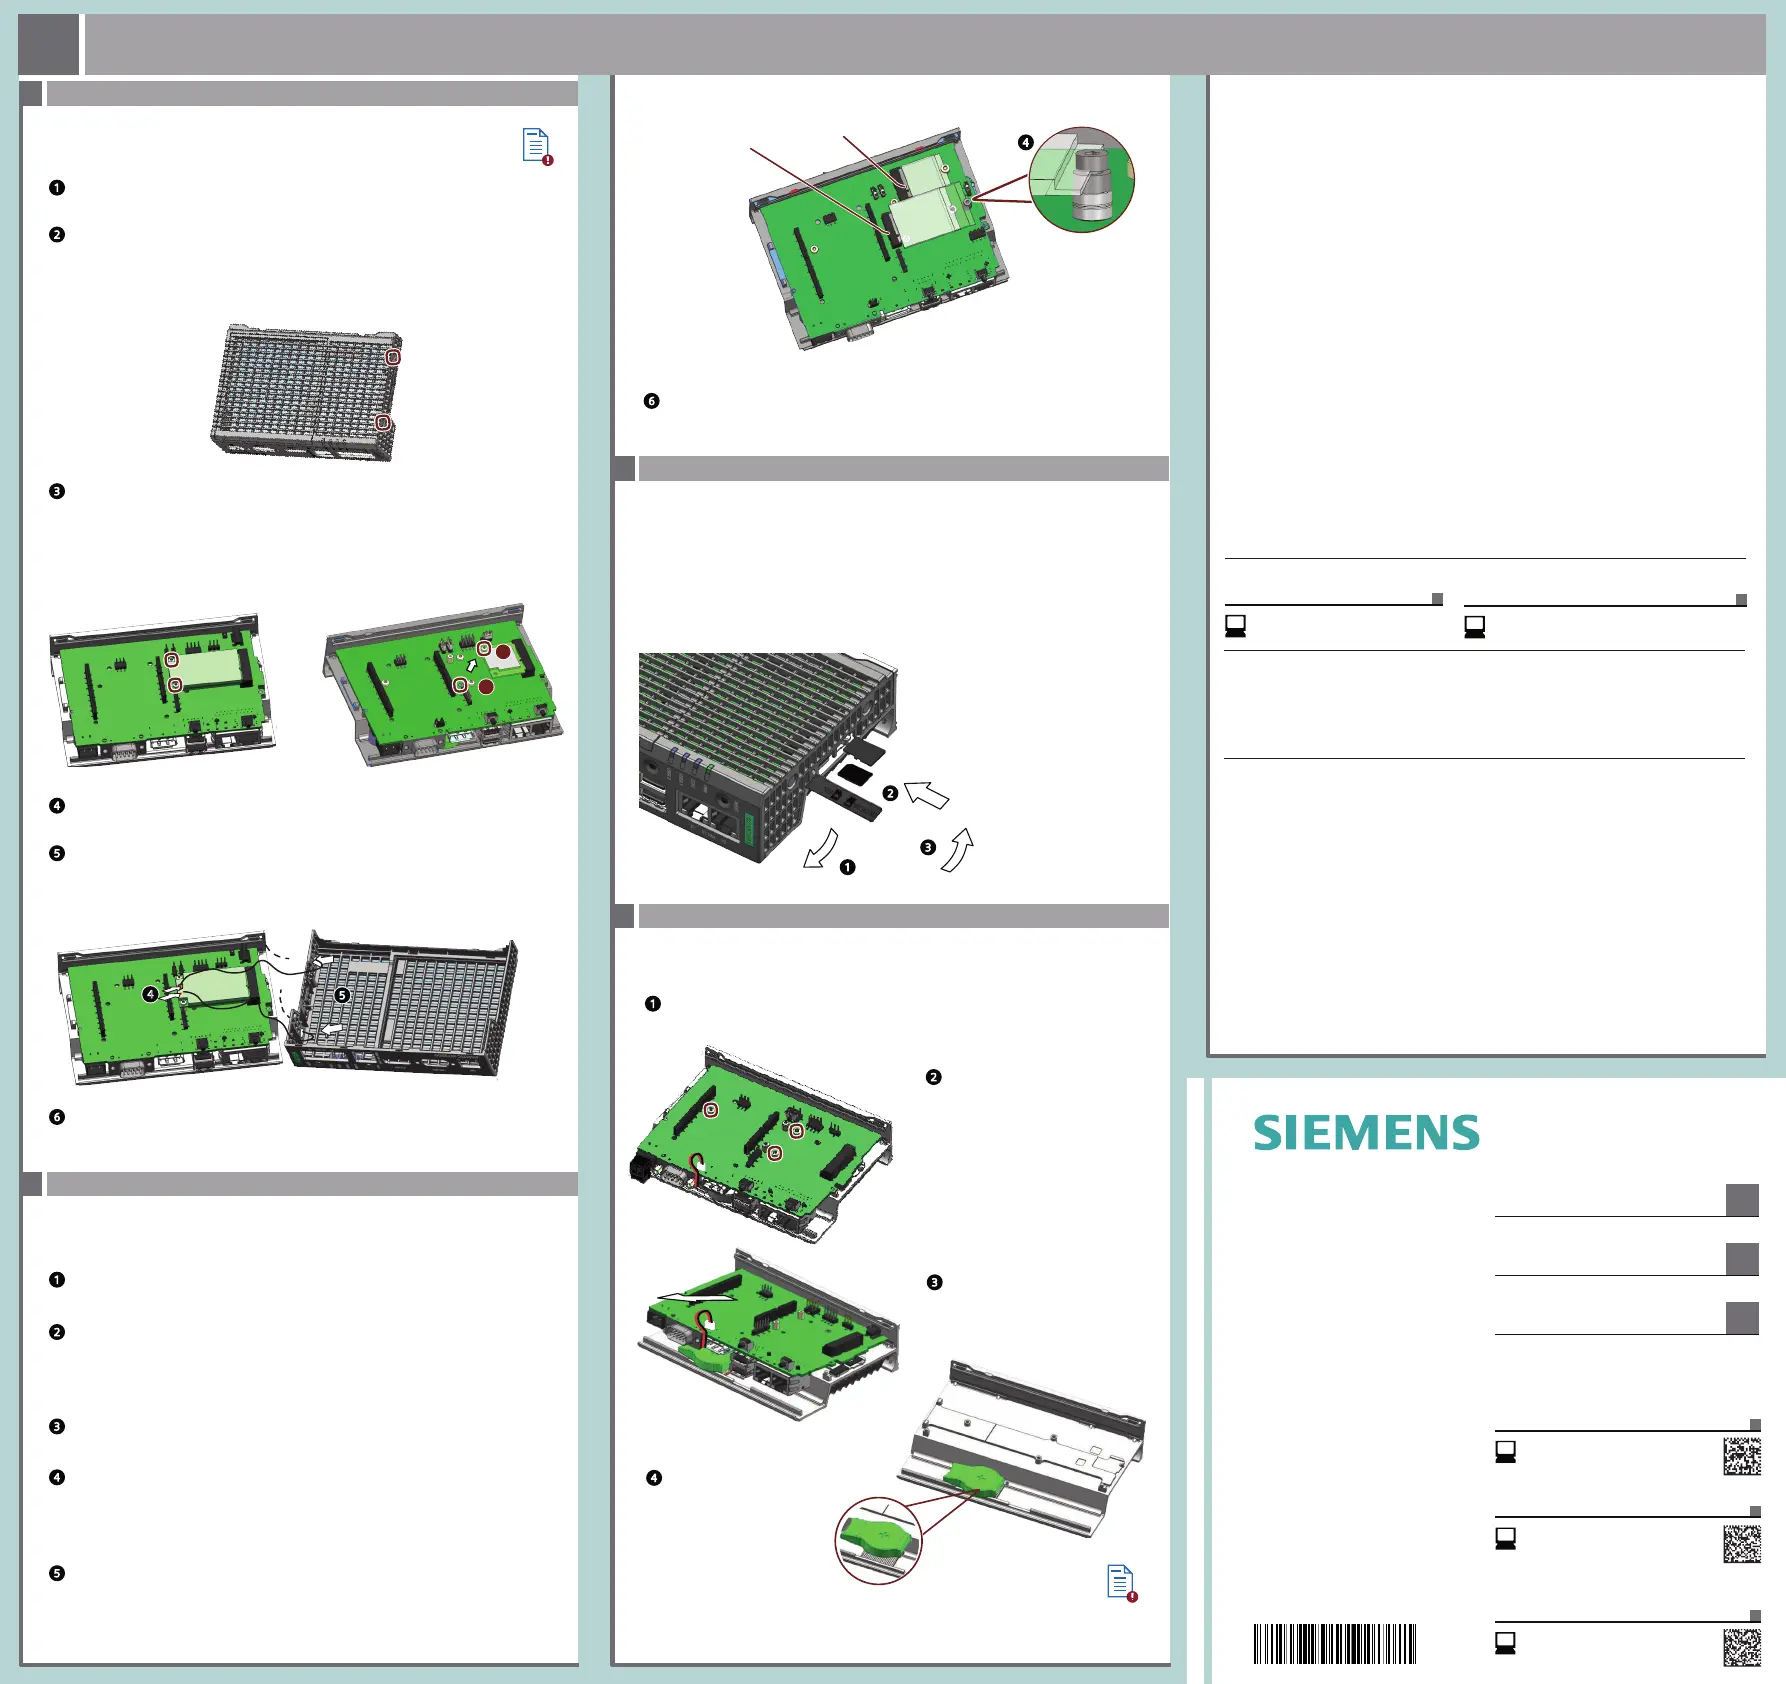
n Sie das Gehäuse.
3
4
2
4
length of E-Key card /
Länge Key E-Karte:
30 mm
length of B-key card /
Länge Key B-Karte:
42 mm or 52 mm
Produktlieferung: Rückmeldung zur
Qualitätskontrolle
Product Delivery: Feedback on Quality Control
http://www.siemens.com/asis
Technical Support
https://support.industry.siemens
.com/cs/ww/en/sc/4868
Ersatzteil-Services
Spare Parts Services
https://support.industry.siemens
.com/cs/ww/en/sc/2110
A
B
Note: This part is not applied for 6ES7647-0BA00-0YA2 .
Hinweis: Dieses Ersatzteil ist nicht fuer 6ES7647-0BA00-0YA2 vorgesehen.
Note: This part is not applied for 6ES7647-0BB00-1YA2.
Hinweis: Dieses Ersatzteil ist nicht fuer 6ES7647-0BB00-1YA2 vorgesehen.
Then install the motherboard again and close the housing.
Bauen Sie anschließend die Grundplatine wieder ein und schließe
Remove the marked screws on the
motherboard.
Replace the battery and lock tape.
Unplug the battery cable
and remove the motherboard.
Entfernen Sie die gekennzeichneten
Schrauben an der Hauptplatine.
Stecken Sie das Batteriekabel aus und
entfernen Sie die Hauptplatine.
Tauschen Sie die Batterie und
das Klebeband aus.
Betriebssystem und Software für die SIMATIC IOT-Geräte sind frei programmierbar und werden
beim Booten des Geräts von der Micro SD-Karte geladen. Weitere Informationen zu den Themen
Software, Inbetriebnahme und Micro SD-Image finden Sie im SIMATIC IOT2000-Forum
(https://support.industry.siemens.com/tf/ww/de/threads/303/
).
Operating system and software for the SIMATIC IOT devices are freely programmable and are
downloaded from the Micro SD card when the devi
ce is booted. Additional information on the
topics software, commissioning and Micro SD image is available in the SIMATIC IOT2000 Forum.
(https://support.industry.siemens.com/tf/ww/en/threads/303/).
Note: This part is for 6ES7647-0BB00-1YA2 only.
Hinweis: Dieses Ersatzteil ist nur für das 6ES7647-0BB00-1YA2 vorgesehen.
4
5
1
Remove the top housing
Then close the housing.
Dann schließen Sie das Gehäuse.
6
1
Remove the top housing.
2
Nehmen Sie das obere Gehäuse ab.
Drill holes with a corresponding diameter at the marking shown for mini PCIe installation
accessory. There are four reserved antenna holes, two on each side.
Bohren Sie an der dargestellten Kennzeichnung für das Mini PCIe-Montagezubehör
Löcher mit entsprechendem Durchmesser. Es sind insgesamt vier Antennenbohrungen
reserviert, jeweils zwei auf jeder Seite.
Insert the Mini PCIe card in the Mini PCIe interface and fix it with two M2 screws.
For half size Mini PCIe card, you need to move one standoff from A to B. Then install the half
size Mini PCIe card and fix it with a M2 screw.
3
Setzen Sie die Mini PCIe-Karte in die Mini PCIe-Schnittstelle ein und befestigen Sie sie mit
zwei Schrauben M2. Bei einer Mini PCIe Half Size-Karte müssen Sie einen Abstandshalter von
A nach B schieben. Installieren Sie anschließend die Mini PCIe-Karte und befestigen Sie sie
mit einer Schraube M2.
Connect the cables of mini PCIe installation accessory to the Mini PCIe card.
4
Schließen Sie die Kabel des Mini PCIe-Montagezubehörs an die Mini PCIe-Karte an.
Get the cable of mini PCIe installation accessory out of the housing through the hole
drilled.
5
Führen Sie das Kabel des Mini PCIe-Montagezubehörs über die gebohrte Öffnung aus dem
Gehäuse heraus.
1
Remove the top housing.
Nehmen Sie das obere Gehäuse ab.
2
Drill holes with a corresponding diameter for M.2 installation accessory. There are four
reserved antenna holes, two on each side.
Bohren Sie an der dargestellten Kennzeichnung für das Mini PCIe-Montagezubehör
Löcher mit entsprechendem Durchmesser. Es sind insgesamt vier Antennenbohrungen
reserviert, jeweils zwei auf jeder Seite.
3
Insert the M.2 card in the interface on the motherboard as illustrated.
Setzen Sie die M.2-Karte wie dargestellt in die Schnittstelle auf der Hauptplatine ein.
4
Fix the M.2 card with a M3 screw in the accessory package.
When fixing the M.2 card in B-key, make sure you fix the card between the spacer and
the screw head.
Befestigen Sie die M.2-Karte mit einer M3 Schraube aus dem Zubehörpaket. Bei Key B
müssen Sie die M.2-Karte zwischen Abstandshalter und Schraubenkopf befestigen.
Nehmen Sie das obere Gehäuse ab.
Get the cable of M.2 installation accessory out of the housing through the hole drilled.
5
Führen Sie das Kabel des M.2-Montagezubehörs über die gebohrte Öffnung aus dem
Gehäuse heraus.
Then close the housing.
Dann schließen Sie das Gehäuse.
6

 Loading...