Do you have a question about the Singer 221-1 and is the answer not in the manual?
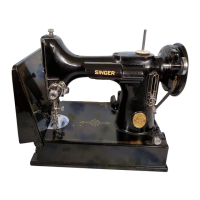
| Model | 221-1 |
|---|---|
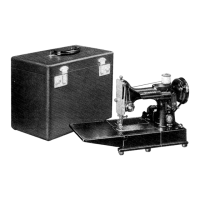
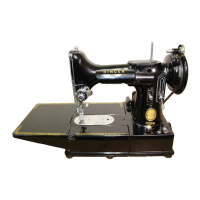
| Type | Portable |
| Power | Electric |
| Bobbin Type | Class 66 |
| Needle System | 15x1 |
| Stitch Type | Straight |
| Motor | External |
| Operation | Manual or Electric |
| Stitch Length | Adjustable |
| Voltage | 110-120V |
Explains the importance and usage of Singer's specific oil for the sewing machine.
Details the use of Singer's motor lubricant for the machine's electric motor and gears.
Encourages users to visit Singer shops for assistance, supplies, and authorized service.
Provides guidance on determining voltage and cycles before connecting the motor to the power supply.
Warns users to always disconnect the power plug after finishing sewing.
Instructs on the procedure for safely removing and replacing the sewing machine's light bulb.
Guides users on how to properly place the sewing machine and its accessories into the carrying case.
Explains how to use the stop motion feature to wind a bobbin without running the stitching mechanism.
Details the correct way to hold the bobbin and thread it through the bobbin case tension spring.
Provides instructions for correctly inserting the threaded bobbin case back into the machine.
Guides on the correct positioning and tightening of the needle in the needle clamp.
Outlines the sequential steps for threading the needle and upper thread path of the machine.
Explains how to draw the bobbin thread up through the needle plate to meet the upper thread.
Instructs on placing the fabric and beginning the sewing process.
Details the procedure for safely removing stitched material from the machine.
Explains how to properly turn the work while sewing without removing it from the machine.
Explains how to adjust the presser foot pressure for different fabric types.
Describes how to use the stitch regulator for forward and reverse feeding.
Guides on adjusting the stitch length using the stitch indicator and regulator.
Recommends using the longest stitch setting for basting and loosening needle thread tension.
Provides advice on sewing these specific seam types with appropriate stitch and tension settings.
Explains how to balance needle and bobbin thread tensions for optimal stitch formation.
Details how to adjust the tension of the needle thread using the numbered dial and thumb nut.
Explains how to adjust the tension of the bobbin thread via the screw on the bobbin case.
Provides step-by-step instructions for taking apart the needle thread tension mechanism.
Guides on putting the needle thread tension assembly back together correctly.
Explains how to adjust the tension settings to achieve the desired minimum tension at zero.
Offers procedures for troubleshooting when a correct stitch cannot be obtained.
Details specific points on the machine requiring oil for smooth operation.
Provides instructions for applying oil to the hook mechanism bearing.
Explains the importance of using only Singer Motor Lubricant and how to apply it.
Guides on refilling the motor grease tubes with Singer Motor Lubricant every six months.
Instructions on checking and adjusting the belt tension for optimal machine performance.
Provides a solution for a machine that runs hard after being idle for some time.
Offers advice on avoiding needle breakage, including secure attachments and proper needle use.
Lists potential reasons for both needle and bobbin thread breaking during sewing.
Explains common causes for skipped stitches and how to resolve them.
Introduces the Foot Hemmer attachment and its basic installation.
Guides on properly starting a hem at the very edge of the material for best results.
Explains how to create a hemmed seam using the Foot Hemmer attachment.
Details how to simultaneously hem fabric and sew lace onto it.
Explains how to use the Adjustable Hemmer for basic hemming.
Guides on adjusting the Adjustable Hemmer to create wider hems.
Provides instructions for attaching the Binder attachment to the sewing machine.
Details the process of inserting binding material into the Binder attachment.
Explains how to use pre-folded bias binding with the Binder attachment.
Guides on adjusting the Binder for various materials and curves to ensure proper stitching.
Provides techniques for properly binding outside curves without stretching.
Explains how to bind inside curves and prepare soft materials for this process.
Guides on applying French folds to curved edges using the Edge-Stitcher.
Introduces the Edge-Stitcher as a tool for precise edge stitching and various seam types.
Explains how to adjust the Edge-Stitcher for precise stitching distance from the edge.
Details how to use the Edge-Stitcher to accurately sew two lace edges together.
Guides on using the Edge-Stitcher to apply piping to fabric edges.
Explains how to use the Edge-Stitcher for applying bias folds or military braid for trimming.
Details how to stitch wide hems evenly using the Edge-Stitcher.
Describes how to create an even French seam using the Edge-Stitcher.
Explains how to create narrow tucking using the Edge-Stitcher and crease folds.
Details how to use the Gatherer attachment for shirring and adjust fullness.
Identifies Ruffler parts and where to place material for various operations.
Provides instructions on how to correctly attach the Ruffler to the sewing machine.
Guides on adjusting the Ruffler for varying degrees of gathering fullness.
Details how to attach a ruffle to a garment in a single operation.
Explains how to simultaneously ruffle material and sew on a facing.
Guides on how to pipe a ruffle using the Ruffler attachment.
Details how to adjust the Ruffler for different plaiting intervals and widths.
Explains how to adjust the Ruffler for creating groups of plaits with plain spaces.
Provides instructions on oiling the Ruffler attachment and troubleshooting issues.
A chart correlating needle sizes with classes of work and thread sizes for optimal stitching.
Explains why using Singer needles provides the best stitching results and where to purchase them.