INSTRUCTION MANUAL
Star Adventurer
How the Star Adventurer Works for Astrophotography
Due to the rotation of the Earth, stars are not stationary. They appear to circle around the celestial
poles of the Earth (Fig1). Thus, being very faint and constantly moving across the sky, stars are
impossible to be captured on photographs, unless the camera is able to track them steadily to
allow long exposure. Star Adventurer provides the solution. With the high precision motor and
built-in Polar Scope, Star Adventurer can be set to compensate exactly for the star movement by
rotating the camera in the direction opposite to that of the Earth (Fig 2). The result is, the celestial
objects appearing in the field of view of your camera do not move anymore and so, taking a picture
with a long exposure time is possible while star trails(Fig 1) are eliminated. Fig. 3 illustrates how
rich and sharp your night sky pictures can be with Star Adventurer. In addition, Star Adventurer is
also capable of tracking at solar and lunar speeds.
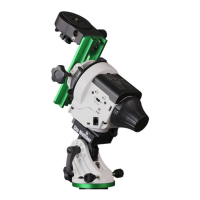
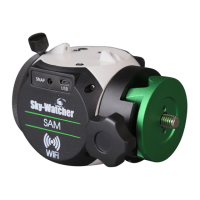
Introduction:
The Sky-Watcher Star Adventurer Body
1:Mode Dial 13:Mounting Platform
2:Mode Index 14:Locking Knob
3:Polar Scope Cap 15:Knurled Ring of Polar Scope
4:Battery Case Cover 16:Polar Scope
5:Polar Scope Cover 17:Date Graduation Circle
6:Mini USB Port 18:Time Meridian Indicator
7:RJ-12 6-pins Auto-guider Interface 19:AAx4 Battery Case
8:DSLR Shutter Control Port 20:Time Graduation Circle
9:3-Position Slide Switch 21:Time Meridian Indicator Calibration Screw
10:Right Button and LED Indication 22:Polar Scope Calibration Screw
11:Left Button and LED Indication 23:Worm Gear Meshing Adjustment Screw
12:Clutch Knob 24:Socket for 3/8" Thread Screw
25:1/4” to 3/8” Convert Screw Adapter
The Optional Accessories:
(The default included accessories
may vary. Please refer to local dealers for details).
Polar Scope Illuminator - To provide lighting source for Polar
Scope. Also compatible with
Sky-Watcher EQ3, EQ5 and EQ8.
Fine-Tuning Mounting Assembly
- To mount a telescope with
¼” thread screw on the
Star Adventurer. Allows pointing and
fine-tuning pointing in two directions.
3/8” Ball Head Adapter - To mount a standard camera ball-head
with 3/8” thread screw on the
Star Adventurer.
Equatorial Wedge
- To adjust the latitude of the Star
Adventurer
for polar alignment. Offers higher accuracy and
stability than a standard photo tripod head.
Counterweight - To balance the telescope or camera loading
with 1kg counterweight.
1/4" to 3/8" Convert Screw Adapter - To convert the default
socket for 3/8" thread screw to the socket for 1/4" thread screw in
order to mount the
Star Adventurer to a standard quick release
plate of the tripod with 1/4" thread screw.
DSLR Shutter Control Cable - To connect the DSLR Shutter
Control Port of Star Adventurer to your DSLR's external
shutter control port. This allows Star Adventurer to directly
control the DSLR's shutter release with pre-programmed
shutter interval. You can order an optional cable for your
camera from your local resellers. The Following list shows the
cables that we offer as optional items.
Preparation :
Setup Tripod:
Without Tilt-head: take a standard photo tripod or video tripod with a
3/8” connection screw. Spread the legs and secure the tripod legs at the
desired height to provide a stable support for your
Star Adventuer .
Assemble
Equatorial Wedge to the tripod as Fig 4.
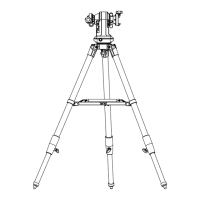
With Tilt-head/Ball-head: Take a standard photo tripod or video
tripod with Tilt-head or Ball-head. Spread the legs and secure the tripod
legs at the desired height to provide a stable support for your Star
Adventurer as Fig 5.
Mount Star Adventurer:
With Equatorial Wedge: Make sure the 1/4" to 3/8" Convert Screw Adapter is not in the
3/8" threaded socket at the bottom side of the
Star Adventurer. If it is, use a Slot Screwdriver
to remove it. Mount the
Star Adventurer on the (optional) Equatorial Wedge (Fig 6). Make sure
the Stopper is facing forward. Then point the
Polar Scope to the direction of the North Pole (For
Northern Hemisphere observing) or South Pole (For Southern Hemisphere observing) (Fig 7).
Lastly, complete the Polar Alignment process (Please see
Polar Alignment session for
reference).
With Tilt-head/ Ball-head: Make sure the 1/4" to 3/8" Convert
Screw Adapter
is in the 3/8" threaded socket at the bottom of the
Star Adventurer. If it is not, use an Slot Screwdriver to install it.
Mount the
Star Adventurer to the quick release plate on the tripod.
Then point the Polar Scope to the direction of the North Pole (For
Northern Hemisphere observing) or South Pole (For Southern
Hemisphere observing) (Fig 8). Then complete the polar alignment
process (Please see
Polar Alignment session for reference).
Please DO NOT move the tripod or change the angle of Equatorial Wedge or
tilt-head in order to keep the polar alignment. IF you did, please redo the polar
alignment process.
Mount The Imaging Equipment:
Now you can mount your imaging equipment according to your need, including the Shutter
Control Cable,
as the following figures show. You can contact Sky-Watcher authorized
dealers to acquire the optional accessories as needed. During mounting, please DO NOT move
the tripod or change the angle of the
Equatorial Wedge or tilt-head in order to keep the polar
alignment.
For Astrophotography:
Star Adventurer +3/8” Ball Head Adapter + Ball head + Camera + Shutter Control
Cable:
Note: Make sure the locking bolt of the Mounting Platform has locked on the indentation on the
side of the
3/8" Ball Head Adapter for better locking and support.
Star Adventurer + Fine-Tuning Mounting Assembly + 1kg
Counterweight + Telescope:
Star Adventurer + Dovetail + Dual Ball Heads +Dual Cameras + Shutter Control
Cable:
Star Adventurer + Fine-Tuning Mounting Assembly +
Ball-Head + Camera+ Telescope (+ Auto-guider):
For Time-Lapse Photography:
(For reference only: you can assemble very different configurations to create more interesting
time-lapse photography)
Horizontal Rotation Time-Lapse Photography:
Vertical Rotation Time-Lapse Photography:
Provide Power Source:
Star Adventurer allows two power source options. One is inserting 4 AA type batteries; the other is
providing DC 5V through USB port (type mini-B). (Fig 15)
Start Using Star Adventurer
Quick Function Reference:
Mode Dial:
For power control and selection of pre-programmed modes.
3-Position Slide Switch: for selection of rotation direction and camera shutter interval.
Buttons: The Right / Left buttons are used for rotating in higher speed (about 12X celestial tracking speed).
LEDs : The LEDs built-in buttons provide the lighting source in the dark and indicate the device
status such as low battery and motor error.
Snap : This is a 2.5mm 3-segment stereo jack for connecting to a camera’s shutter control port
to control camera shutter interval.
After finishing the preparation steps, you can start to enjoy the
Star Adventurer. Its major
functions are described as follows:
Main Function: Star Adventurer has a user-friendly Mode Dial and 3-Position Slide Switch
to allow users easy selection of the pre-programmed movement pattern. At the other side of the
Star Adventurer, the two buttons give direct access to higher speed movement for quick
positioning.
Mode Dial: Used to turn on/off power and select the desired modes shown in table 1. When the
Mode Index is pointing at OFF, the mount has no power. If rotated to other modes besides the
OFF mode, the power is turned on. The LED on the Mode Dial will light up to indicate the current
mode, and the LED on the buttons will light up, too. Meanwhile,
Star Adventurer will start
tracking at the constant speed corresponding to the mode selected (Please refer to table 1).
.
.
3-Position Slide Switch: Selects the rotation direction of the Star Adventurer and the
camera shutter interval. When the switch is slid to
N or TIMELAPSE, the Star Adventurer will
rotate in the astronomical tracking direction in the Northern Hemisphere, which is
counter-clockwise around the North Celestial Pole; when the switch is slid to
S, the mount will
rotate in the astronomical tracking direction in the Southern Hemisphere, which is clockwise
around the South Celestial Pole.
Right/Left Buttons: Used to rotate the Star Adventurer at the highest speed for easier
positioning towards the desired object. When the Right Button is pushed, the Star Adventurer will
rotate at 12-time sidereal rate and in the same direction as when sliding the switch to
N or
TIMELAPSE; when Left Button is pushed, the Star Adventurer will rotate at 12-time sidereal
rate and in the same direction as when the switch is slid to
S;
SNAP (DSLR Shutter Control Port): Star Adventurer provides a camera shutter control
interface to control the shutter interval. The SNAP port is a 2.5 mm 3-segment stereo jack and the
trigger signal connects to the tip and base segments. By using the proper
Shutter Control
Cable
, the mount can control the camera's shutter release ( please refer to DSLR Shutter
Control Cable in the Optional Accessories).
The Shutter interval period of every selected
mode has been pre-programmed. Please refer to Table 1 for detail. For example, when the
Mode
Dial
is set to Mode and Slide Switch is set to N, the shutter interval period is 100
seconds, or 50 seconds if the
Slide Switch is set to TIMELAPSE (See Table 1). whenever any
change is applied to the buttons, mode dial, or switch, the timer is reset and the selected shutter
interval period will restart from 0 sec.
Osc Range: To avoid the shutter release cable from twisting after a long period of use under the
Astrophotography applications,
Star Adventurer will reverse after reaching 360° rotation. That
is, for
Mode and 0.5X, Star Adventurer will oscillate within a 360° range. For the
other modes, in order to provide more attractive scene while filming for time-lapse photography,
under time-lapse applications such as Mode 2X, 6X and 12X,
Star Adventurer will oscillate
within 180°(See Table 1). Every button pushed or mode changed will reset the starting point of the
range. For example, when the
Mode Dial is set at 6X and Slide Switch at N, the position
where the particular mode is entered will be the left boundary of the oscillation. That is, it will rotate
to the right first until it reaches 180°, then oscillates within this range (Fig 21 & 22). If any button is
pushed, the position at which the button is released will become the new left boundary of the 180°
range. If the switch is set at
S, it will rotate to the left first until it reaches 180°, then reverse the
direction for another 180°, and repeat the cycle (Fig 21 & 22).
Auto-Guider: Star Adventurer also contains auto-guiding interface to accept single axis (RA
axis) auto-guiding signal to provide more accurate celestial tracking for better quality of
astrophotography. The RJ-12 6-pin outlet is for connecting an autoguider. It is compatible with any
autoguider with a ST-4 type interface. This function only works in
Mode . For other modes,
the auto-guiding signal has no effect.
USB Port: Star Adventurer contains a USB port (Type Mini-B) to support external USB power
and support firmware upgrade. Please refer to
"Firmware Upgrade" on page 26.
Motor Status Detection: If the motor stalls (rotation speed does not reach 10% of the targeted
speed) over 5 seconds, in order to protect the motor and the mounted equipment,
Star
Adventurer
will stop the motor and indicate "Motor Error" by flashing the LED on the buttons.
Pushing buttons or switching mode will restart the motor and restart the detection. Moreover, if the
motor speed error is over 5% ( if it is not within the 95%~105% of the targeted speed),
Star
Adventurer
will indicate "Motor Error" by flashing the LED on the buttons, but it will not apply
any change to the motor control.
LED Indication: Star Adventurer has LEDs behind the buttons to indicating the current
status. There are three different ways the LEDs will light up. If the LEDs don't light up, the
Star
Adventurer
is not in working mode.
Normal Status: LED will light up continuously at low intensity.
LED will light up at low intensity to provide light source in the dark when the motor status is normal
and the power level is normal.
Warning Status: LEDs will blink at a 0.5-second rate in two cases:
1.
Firmware upgrading: When updating the firmware, LEDs on the Star Adventurer will
blink as a warning not to turn off power.
2.
Battery low (The battery voltage is lower than roughly 4.5V): Star Adventurer supports
most of the AA batteries. When using rechargeable Nickel Metal Hydride (Ni-Mh) batteries, please
replace the batteries when it indicates low battery in order to protect the batteries from over
discharge. When using Alkaline batteries, the system will run normally for a while after indicating
battery low.
Motor Error Status: LED will blink at a 3-times-per-second rate in two cases:
1.
Motor speed accuracy violation: The motor speed error is over 5%. If this keeps
happening, the user may need to check for overloading (Max load is 5kg) or low battery l
2.
Motor stall: the motor stalls over 5 seconds. May be caused by external interference.
Please check if the mount is blocked by an external force.
Polar Alignment:
Before starting with the polar alignment procedure, please review the following figure to get
familiar with the scales and dials of the Polar Scope.
Use the built-in Polar Scope to complete the polar alignment. First, remove the Polar Scope
Cap
and insert the Polar Scope Illuminator (Fig 24). Rotate its Power Dial to turn on the
power to illuminate the
Polar Scope , then keep rotating the Power Dial until reaching optimal
illumination (Calibrate the
Polar Scope as needed. Please refer to " Appendix Ⅰ:Calibrate
The Polar Scope").
For Observing in The Northern Hemisphere:
find Polaris (the brightest star near the North
Celestial Pole) in the Polar Scope by adjusting the angle of the (optional)
Equatorial Wedge or
tilt-head on the tripod. Use third party Polaris Finder application or APP to find the corresponding
orientation of Polaris in the
Polar Scope by simply entering the date, time, longitude and latitude
of your observing location. Then move Polaris to that corresponding position in the Polar Scope
by using the fine-tuning movements of the
Equatorial Wedge or by moving the tilt-head on your
tripod(Fig 24). If you cannot acquire the application to find the orientation of the Polaris, please
refer to the "
The Orientation of Polaris inThe Polar Scope " in the following portion.
For Observing in The Southern Hemisphere: locate in the Polar Scope the 4 dim stars
(Around Magnitude 5 to 6) which form the pattern “Octans” (see drawing in the Polar Scope as
Fig 26). Align the orientation of the “Octans” drawing to the 4 stars. Then move the 4 stars to the
4 small circles of the “Octans” drawing by using the horizontal adjustment knob to fine-tune the
Equatorial Wedge or by moving the tilt-head of your tripod.
The Orientation of Polaris in The Polar Scope
As Polaris is not located exactly at the North Celestial Pole, we can see it orbiting the North
Celestial Pole in a Polar Scope. The large circle seen in the center of the pattern in the Polar
Scope is a representation of Polaris’ orbit around the North Celestial Pole. When performing the
polar alignment process, it is necessary to determine the orientation of Polaris on the circle. We
can use the following 2 methods to get the orientation:
1. Locate both Polaris and Kochab in the sky near the North Celestial Pole. The relative position
of Kochab to Polaris is an approximation of the orientation of Polaris in the Polar Scope. For
example, if Kochab is at the 11 o’clock position of Polaris, then Polaris should also be placed at
the 11 o’clock position on the reticle circle (See Fig 27).
2. Use the built-in
Date Graduation Circle, Time Graduation Circle and Time Meridian
Indicator
to find the orientation of Polaris in the Polar Scope following the steps described below:
1. First, rotate the Wedge and adjust the latitude to bring Polaris within the field of view of the
Polar Scope.
2. Then rotate the
Date Graduation Circle to align Oct 31 to the 0 of the Time Graduation
Circle
and turn the Eyepiece/Mounting Platform to align the Time Meridian Indicator to the
0 of the
Time Meridian Circle (Fig 28). This is the date and time when the orientation of Polaris
is directly below the north pole ( 6 o'clock ).
3. At this point, the "6" in the reticle should point straight down (as shown in Fig. 29). If not so,
please refer to "
Appendix I: Calibrate the Polar Scope"
4.
Adjust the Date Graduation Circle. Find out the difference in degree between your
observing site longitude and the central meridian of your time zone and determine if you are on the
east or the west side of the central meridian. Now, adjust the
Date Graduation Circle
accordingly.
Example: If you are located in Prince Rupert, Canada, your longitude is 130.32°W. The standard
meridian (STDM) for this time zone is 120°W. This means Prince Rupert is about 10° westward in
relation to the STDM. Turn the Date Graduation Circle to W10 to compensate for this (Fig 30).
5. Match the Date Graduation Circle with your observing time by turning the eyepiece/
Mounting Platform. Please
DO NOT rotate Date Graduation Circle directly at this step. For
example, if your observing date is March 4 and observing time is 8:00PM (Standard Time, that is
Daylight Time -1 if applied), then hold and turn the mounting platform until the 2
nd
scale mark of
March is aligned with the “20” on the Time Graduation Circle, which represents 8:00pm(Fig 31).
6. Put Polaris at the 6 o'clock position in the FOV of the Polar cope to finish the polar alignment.
Example for Astrophotography for Celestial Tracking:
1. Assemble the tripod and Star Adventurer according to your need. Then finish the polar
alignment.
2. Mount the camera or telescope. Install the cables (
Shutter Control Cable and auto-guiding)
if needed.
3. Slide the 3-Position
Slide Switch to N if you are in Northern Hemisphere (Fig 32).
4. Rotate the
Mode Dial to Mode . The LED on the Mode Dial will light up Mode
. The LED in the buttons will light up, too. The
Star Adventurer will start tracking the celestial
objects at sidereal rate (86164 seconds per revolution,about 23.9 hours per revolution). At the
same time, it will assume control of the camera by activating the camera’s shutter release function
with an interval period of 100 seconds (as if you are pushing on the shutter release button of the
camera for 99.5 seconds and not pushing for 0.5 second and pushing again for 99.5 seconds).
5. You can push the left and right buttons to move the
Star Adventurer at the highest speed
(12 times sidereal rate) to approach the targeted object in RA direction. When you reach the targeted
object, release the button. The
Star Adventurer will continue celestial tracking and restart the
shutter interval period of 100 seconds.
Example for Time-Lapse Photography in Mode 12X:
1. Assemble the tripod and Star Adventurer according to your need.
2. Assemble the camera and connect the camera and
Star Adventurer with the Shutter
Control Cable.
3. Slide the Slide Switch to position N. Rotate the Mode Dial to Mode 12X.
4. Star Adventurer will rotate firstly to the right with a speed of 2 hour per revolution until
reaching 180° , then oscillate witihin this range. (Fig 33). At the same time, it will assume control
of the camera by activating the camera’s shutter release function with an interval period of 2
seconds (as if you are pushing on the shutter release button of the camera for 1.5 seconds, and
not pushing for 0.5 seconds and pushing again for 1.5 seconds).
Firmware Upgrade:
1. Download “ Motor Controller Firmware Loader " V1.60 or higher and the newest
firmware from www.skywatcher.com
2. Connect
Star Adventurer to the computer with the mini USB cable. If this is the first time
the device is connected to this computer, please wait for a few minutes for the computer to load the
driver.
3. Rotate the
Mode Dial to leave the OFF mode to turn on the power.
4. Double click on
Motor Controller Firmware Loader and load the previously
downloaded firmware.
5. Select "
auto-detect COM port ", click on the "update" button. Please do NOT turn off
power while updating the firmware. After about 25 seconds, the Software will display ”
Update
Complete. Turn off power
". Then the firmware upgrade is completed.
6. If you did not select "
auto-detect COM port ",or you have multiple Star Adventurers
connected to the same computer, please manually select the correct serial COM port. Then click
on the "
update" button. Please do NOT turn off power while upgrading is in progress. After
about 25 seconds, the Software will display "
Update Complete. Turn off power“. Then the
firmware upgrade is completed.
7. Rotate the
Mode Dial to "OFF" to turn off the power. Then Turn on the power to use
normally.
8. If you encounter power loss during the firmware update, you can just repeat Step 3 through
7 after restoring the power.
Advanced Version Firmware:
Part of the advantage of Star Adventurer lies in its capability to evolve and adapt to your specific
needs! If you want to maximize all the fun you can get from it while seeking for new challenges, the
Advanced Version Firmware is for you. This firmware provides greater amount of freedom, as you
can now user-define various parameters such as exposure time, interval between pictures, rotation
speed, and even number of pictures!
In addition, 2 extra shooting modes are now available:
1. Astro-Timelapse mode – E.g., producing exquisite time-lapse video of round-and-brilliant
stars sailing across the landscape.
2. Night-Time Timelapse mode – E.g., using this mode to create panning time-lapse video
of city scenery at night or even aurora!
To download the firmware and manual, please visit http://www.skywatcher.com.
Appendix I
Calibrate The Polar Scope
Before using the Polar Scope for polar alignment, the Polar Scope itself must be calibrated
to ensure the pattern in the
Polar Scope is aligned to the mount’s R.A. axis. The following
steps will outline how to calibrate the
Polar Scope. Calibrating during daytime is
strongly recommended :
1. Choose a fixed object (the Polaris at night, or a faraway object in daytime); orient Star
Adventurer
to put the crosshair of the Polar Scope exactly on the chosen object.
2. Rotate the mount in R.A. axis for half a turn.
3. If the object remains exactly behind the crosshair in the
Polar Scope after the rotation,
then it means the
Polar Scope is aligned to the R.A. axis and no calibration is needed.
4. If, during rotation, you see the object wandering off, calibration is needed. You should
rotate the
Star Adventurer to find the point where the object is at the longest distance from the
crosshair center, and then you should move the crosshair halfway towards the object (Fig 35),
using the 3 tiny adjustment screws on the side of the Polar Scope (Fig 34). A 1.5mm Allen
wrench is needed.
IMPORTANT WARNING: Adjusting with the very small Allen screws is delicate. Read the note
below.
5. Repeat steps 1 to 4 a few times until the object remains at the center of the reticle when
rotating the mount in R.A. axis.
6. Turn the
Date Graduation Circle to align Oct 31 to the 0 of the Time Graduation
Circle.
Then hold the Date Graduation Circle and turn the eyepiece/Mounting Platform to
align the
Time Meridian Indicator to the 0 of the Time Meridian Circle (Fig 36). Then,
when looking through the eyepiece, you should see the pattern aligned as shown in Fig 37. If the
pattern is oriented differently, then scales need readjustment. To readjust, turn the
Date
Graduation Circle
to align Oct 31 to the 0 of the Time Graduation Circle. Then hold it and
turn the eyepiece/mounting platform to orient the pattern in the position shown in Fig 36. Loosen
the
Time Meridian Indicator Calibration Screw and move the meridian indicator to align it
to the 0 of the
Time Meridian Circle without turning the Date Graduation Circle and
Eyepiece/Mounting Platform. Tighten the Time Meridian Indicator calibration screw. See
through the eyepiece. Now the pattern should still be in the right position.
Note:
• When adjusting the Allen screws, loosen one screw only ¼ of a turn, and then tighten the
other two gently.
• Do not over tighten the Allen screws; it might damage the pattern plate in the Polar Scope.
• Do not loosen one screw completely or loosen more than one screw at a time; otherwise,
the pattern plate in the
Polar Scope will be disengaged and further adjustment is impossible.
• If the pattern plate does disengage, remove the
Polar Scope’s eyepiece by turning the
Knurled Ring counterclockwise and then engage the pattern plate again.
• It is recommended to do this calibration at daytime, aiming at a point object (such as a distant
rooftop) because the delicate operation with the tiny allen screws is even more delicate in the
dark.
Appendix I I
Fine-Tuning Mounting Assembly:
The Fine-Tuning Mounting Assembly connects a telescope to Star Adventurer and allows
rotation in the other direction (at 90°, DEC direction). You can adjust the tightness of the rotation
with the clutch knob. You also can fine-tune the camera or telescope orientation slightly in DEC
direction by using the fine-tuning knob. You can also remove the Fine-Tuning ¼’’ Mounting
Element from the dovetail and then mount two ball heads on the dovetail to carry two cameras or
one camera and another instrument. Y
ou can also use the Fine-Tuning ¼’’ Mounting Element at
one side and use ball head at the other side. You can implement various combinations to fit your
needs.
Equatorial Wedge:
The
Equatorial Wedge is a device to adjust the latitude for polar alignment. Rotate the
Latitude Adjustment Knob can adjust the latitude of the
Star Adventurer indicated by the
Latitude Indicator. The range is from 0° to 90°. The Horizontal Adjustment Knob can adjust the
Wedge to rotate to right or left horizontally. The Horizontal bubble is for checking if the base
plate of the wedge is horizontal. The accuracy is 1°. When you install the
Mounting Plate on
the
Star Adventurer, Make sure the Stopper is facing forward as Fig 39 shows to avoid
equipment slippage, before you fasten the Locking Knob.
SA-F-150527V2-EN
Copyright © Sky-Watcher