EN
TR
EL
5151499A
Ref: 1822663
EN
IZYMO™ LED dimmer receiver io
INTRODUCTION
The IZYMO™ LED dimmer receiver io is a radio micromodule designed
for controlling and dimming a LED lighting. It can be installed in the flush-
mounted box behind the wall switch, in a derivation box or at the light
source level. It can be controlled via an io-homecontrol radio transmitter,
via TaHoma and/or via any simple or double push-button wall switch.
This micromodule is designed for LED lightbulbs and
resistive loads.
COMPATIBILITY
Light sources
This micromodule is adapted for dimmable LED
lightbulbs.
Type of load Power range
220-240V 50Hz dimmable LED lightbulbs 0-100W
12/24V LED or halogen spot lights with
trailing-edge-compatible dimmable electronic
transformer
0-100W
Trailing-edge dimmable LED driver for LED strips 0-100W
220-240V non-dimmable LED lightbulbs 0-100W, in ON/OFF
mode only
Resistive loads (incandescent and halogen) 0-150W
12/24V LED or halogen spot lights with dimmable
ferromagnetic transformer
Not compatible
Dimmable fluo-compact Not compatible
Tips for an enhanced user experience:
Ɣ Use only one type of light source, and make sure to use the same brand
and same reference if you have several lightbulbs.
Ɣ Use preferably a lightbulb from our compatibility list.
→ List available by scanning the QR code below:
Ɣ Use preferably a double push-button to choose the dimming direction:
left push-button for dimming down, right push-button for dimming
up.
Wall fixtures (types of wall switch)
Ɣ Any single push-button
Ɣ Any double push-button
Ɣ Without any wall fixture. Controlled using only one or more io
transmitters.
Not compatible with the push buttons with indicator light, the rocker
switches, the rotary knob dimmers and the wall switches with integrated
dimmers.
io-homecontrol transmitters
Ɣ IZYMO™ transmitter io
Ɣ Smoove Lighting io (in mode 2)
Ɣ TaHoma
Ɣ Connexoon io
Ɣ Nina
Ɣ All the io-homecontrol remote controls (incl. Situo Variation io)
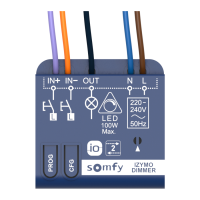
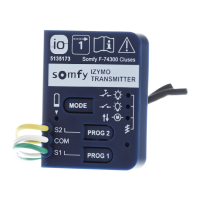
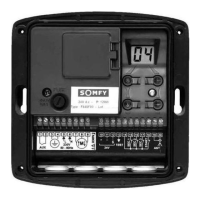
DESCRIPTION
PROG
CFG
A B C D E
F
G H
Designation Cable Mark
Input + (IN+) Violet A
Input - (IN-) Orange B
Output (OUT) Black C
Neutral power supply N Blue D
Live power supply L Brown E
Multi-coloured LED - F
PROG button (association) - G
CFG button (configuration) - H
Use the IN+ input OR the IN- input if you connect the receiver to a
single push-button.
Use the IN+ input AND the IN- input if you connect the receiver to a
double push-button. In this case, the push-button wired to the IN+ input
dims the light in the MAX direction and the push-button wired to the IN-
input dims the light in the MIN direction.
INSTALLATION
Before installing, switch the mains power supply o at the electrical
panel.
Connect the product in accordance with the electrical installation
standards and directives in force in the country in which the appliance is being
installed.
The wires of inputs IN+ and IN- are not isolated from the mains.
The IZYMO™ LED dimmer receiver io must be supplied with a mains
voltage of 220-240V AC, 50Hz with the live and neutral.
It can be installed in:
A) The flush-mounted box behind the wall switch (min. 50 mm depth or
with a micromodule pocket) if both the live and neutral are available:
B) The flush-mounted box in the ceiling above the lamp:
C) A junction box:
WIRING & USAGE
A) Wiring with one or several single push-buttons in parallel
not connected
Unconnected wires must be insulated using an insulating terminal lug. It
is possible to use the same terminal lug to connect the IN+ and IN- inputs.
In this case, please consult the “Resetting the dimming range” part in the
“SET-UP” section to set the right MIN and MAX values without using any
push-button.
Nb. Within the 3 options above (A, B and C), the IZYMO™ LED dimmer
receiver io can also be controlled with io remote controls, including the
UP/MY/DOWN remote controls:
Action on UP/MY/DOWN io
remote control (i.e. Situo 1 & 5)
Action on the load
Short press on UP MAX value
Short press on MY 50% by default (*)
Short press on DOWN OFF
Press & hold on UP Dim in the MAX direction
Press & hold on DOWN Dim in the MIN direction
Wheel (Situo Variation only) Dim in the MIN or MAX direction
(*) The MY value can be set on another value via a UP/MY/DOWN
remote control.
Checking the wiring
Briefly press the PROG button (<0.5s) on the receiver to switch on the
light.
Press again to switch it o.
SET-UP
Enter the configuration mode
Switch the IZYMO™ LED dimmer receiver io to configuration mode by
pressing the CFG button > 2s until the multicoloured LED turns blue.
The blue LED is lit during the entire configuration process.
Configuration mode is active for 5 minutes.
Description of the dierent settings
Dimming range
All lightbulbs are dierent, as is their dimming range. You can set the
dimming range that is the most suitable for your lightbulb by choosing
the right MIN and MAX values.
Product functioning mode
This dimmer is designed to be compatible with trailing-edge dimmable
LED lightbulbs. If you use a non-dimmable or a leading-edge LED
lightbulb, please switch the dimmer to ON-OFF mode. In this case, it will
be possible to switch on or o the lightbulb, but the dimming function
will not be available.
Return after power cut
After a power cut, the light wired to the receiver may remain o or return
to its last status before the cut.
Type of control point
The controls can be single push-button(s) or double push-button
(one single type at a time). During the product set-up (or when it is
reinitialized), the receiver automatically detects if it is wired to a single
or a double push-button. This setting allows the installer to manually
correct the mode if needed.
Adjusting the dierent settings
Settings
categories
Settings Number
of short
press
on CFG
(<1s)
Number of
LED flashes
(confirma-
tion)
Value
after reset
Dimming
range
Set the MIN
dimming value
x2 x2 MIN by
default
Set the MAX
dimming value
x3 x3 MAX by
default
Product
functioning
mode
Dimming mode x4 x4 Default
value
ON/OFF mode x5 x5 -
Status after
power cut
Light OFF x6 x6 Default
value
Last status
before power
cut
x7 x7 -
Type of wall
switch
Single push
button
x8 x8 Auto-de-
tection of
the type of
wall switch
after (re)
initialization
Double push
button
x9 x9
→ Set the dimming range once in configuration mode :
1. Press and hold the wired push-button to dim your light, then release
when you reach the brightness you want to set as the MIN value of the
dimming range.
2. Save this MIN value by pressing the CFG button 2 times in a row.
3. Repeat the step 1. to find the brightness you want to set as the MAX
value of the dimming range.
4. Save this MAX value by pressing the CFG button 3 times in a row.
Exit configuration mode
Press the CFG button > 2s until the blue LED switches o,
The receiver automatically exits configuration mode after 5 min.
Resetting the dimming range
When changing the lightbulb, there are several ways to reset the MIN and
MAX values of the dimming range:
With access to the product:
- Via the CFG button of the receiver and the wired push-button: see “Set
the dimming range once in configuration mode” section above.
Without access to the product:
- Via the TaHoma app
- Via a setting tool dedicated to our PRO customers
- Via a 3-button io remote control:
1
>
> 5 sec 2 sec
Reset the MIN value Reset the MAX value
2
>
2
>
< 0,5 sec -1% MIN < 0,5 sec +1% MAX
> >
> 0,5 sec MIN > 0,5 sec MAX
3
>
3
>
> 2 sec 2 sec MIN > 2 sec 2 sec MAX
Reset the MIN value:
1] Enter the reconfiguration mode
2] Find the most convenient MIN value for the lightbulb
3] Save this MIN value
Reset the MAX value:
1] Enter the reconfiguration mode
2] Find the most convenient MAX value for the lightbulb
3] Save this MAX value
ASSOCIATION
1. Switch the receiver to association mode
A) If the receiver has not been associated yet
B) From the receiver
C) From the wall switch
D) From an already associated transmitter
2. Complete the association with the other
product
3. Exit association mode
A) Automatically
B) From the receiver
C) From the wall switch
Associate to
TaHoma,
Connexoon io or
Nina
Associate to an io
1-way transmitter
Confirma-
tion
1. A)
Switch OFF then ON
the mains power sup-
ply via the electrical
cabinet.
Switch OFF then ON
the mains power sup-
ply via the electrical
cabinet. Then press
the PROG button of
the new remote for 2
seconds.
The lamp
switches ON
for 2 seconds
before turn-
ing OFF.
+
The LED
turns green
until the first
association
is complete
or for 10
minutes.
B)
Press the receiver’s PROG button for
2 seconds.
C)
Switch OFF then ON the mains power supply
via the electrical cabinet. Then press 5 times in
a row quickly on the push-button in the next
10 minutes.
D)
Press the PROG button of the transmitter
which is already paired to the receiver for 2
seconds to switch the receiver to association
mode.
2. Start the procedure to
add a new equipment
from the TaHoma,
Connexoon io or Nina
interface. Then follow
the instructions on
screen.
Press the PROG but-
ton of the transmitter
to add for <0,5 second
to complete the
adding procedure.
The lamp
switches ON
for 2 seconds
before turn-
ing OFF.
+
The LED
flashes green
before turn-
ing OFF.
3. A)
Automatically: when an association is complete
or after 10 minutes
-
B)
Press <0,5 second on the receiver’s PROG
button.
C)
Press the push-button.
Deleting the receiver from TaHoma, Connexoon
io or Nina
1. Select the equipment to delete via the TaHoma, Connexoon io or Nina
interface.
2. Start the procedure for deleting an equipment.
3. Follow the instructions on screen.
Deleting the receiver from an io 1-way
transmitter
1. Switch the receiver to association mode.
2. Press the PROG button of the transmitter to be deleted for
<0,5 second to complete the deleting procedure.
3. The light switches ON for 2 seconds before turning OFF, and the LED
flashes green before turning OFF.
REINITIALIZATION
Reinitializing the IZYMO™ LED
dimmer receiver io
There are 2 types of reinitialization for this receiver.
Delete the radio associations only: Press the PROG button of the
receiver for 7 seconds (or the PROG button of an associated transmitter)
until the light switches ON and OFF 2 times or until the LED flashes green
before turning OFF. The receiver is no longer associated to any radio
transmitter.
And/or
Reset the parameters to default values only: Press the CFG button of
the receiver for 7 seconds until the LED flashes blue before turning OFF.
The receiver parameters come back to their default values, and the auto-
detection of the type of wall switch restarts.
FAQ
To consult the Frequently Asked Questions and their answers, go to our
dedicated webpage:
United
Kingdom
https://www.somfy.co.uk/support
Lebanon
https://www.somfy.com.lb/en-lb/assistance/faq
For any other country, please contact Somfy customer service.
TECHNICAL DATA
Power supply
220-240V , 50Hz
Output
220-240V , 50Hz, 0.65A max
Pollution
Cat II
Power supply cable
section
Mini : 0.75 mm
Maxi : 1.5 mm
Degree of protection
IP 20
Protection class
Double insulation with no earth
Dimensions
43 x 43 x 13 mm
Protocole radio
Io-homecontrol 2-way
Frequency range and
eective radiated power
868.000MHz - 868.600MHz p.a.r. < 25 mW
868.700MHz - 869.200MHz p.a.r. < 25 mW
869.700MHz - 870.000MHz p.a.r. < 25 mW
Radio range in open
space
250 m (« HOME » radio range)
Radio range between 2
concrete walls
20 m
Number of io-home-
control control points
1-way: 10 remote control devices
2-way: unlimited
Operating temperature
0°C à + 55°C
Humidity
85 % HR à 25°C
Altitude
< 2000m
TR
IZYMO™ o LED Dmmer alıcısı
GİRİŞ
IZYMO™ o LED Dmmer alıcısı, LED aydınlatmalarının ışık şddetn
kontrol etmey ve değşmn sağlayan ve radyo frekanslarını kullanan br
mkro modüldür. Devre kescsnn arkasındak br dağıtım kutusuna veya
ışık şddetnn ayarlanması sevyesnde ankastre br kutuya monte edlr.
Br o-homecontrol, TaHoma vercs ve/veya duvardak tekl veya çftl
basmalı tuş aracılığıyla kontrol edleblr.
Bu mkro modül, LED ampuller ve rezstf güç çeken
chazlar çn uyarlanmıştır
UYUMLULUK
Yükler
Bu mkro modül ışık ayarlanablr LED ampuller çn
uyarlanmıştır.
Akım yükü tp Güç sevyes alanı
Işık şddet ayarlanablr LED ampuller
220-240V 50Hz
0-100W
12/24V LED spotları veya tralng-edge uyumlu
ışık şddet ayarlanablr elektronk transformatörlü
halojen ampuller
0-100W
Tralng-edge uyumlu, ışık şddet ayarlanablr
sürücülü LED aydınlatma şertler
0-100W
Işık şddet ayarlanmayan LED ampuller 220-240V
50Hz
0-100W, sadece ON/
OFF (AÇ/KAPA)
modunda
Rezstf güç çekenler (Ak-kor ve halojen ampuller) 0-150W
12/24V LED spotları veya ferro-manyetk trans-
formatörlü ışığı ayarlanablr halojen ampuller
Uyumlu değl
Işığı ayarlanablr Fluo-compact ampuller Uyumlu değl
Daha y br kullanıcı deneym çn tavsyeler:
Ɣ Sadece aynı türden güç çeken ve aynı markanın ve hatta aynı teknk
özellklere sahp ampuller kullanınız
Ɣ Terchen uyumluluk lstemzde yer alan ampuller kullanınız.
→ Aşağıdak QR kodu taratarak uyumluluk lstesn temn
edeblrsnz:
Chaza bağlantılı
(anahtar tpler)
Ɣ Her türden basmalı tuşlar
Ɣ Her türden basmalı çftl tuşlar
Ɣ Chaza bağlantısız. Bu durumda kontrol sadece br veya brkaç o vercs
üzernden gerçekleşr.
Gösterge ışıklı basmalı tuşlarla, yaylı anahtarlarla, döner tuşlu
varyatörlerle ve entegre varyatörlü açma kapama chazlarıyla uyumlu değldr.
o-homecontrol vercler
Ɣ IZYMO™ o vercs
Ɣ Smoove Lghtng o (mod 2 konumunda)
Ɣ TaHoma
Ɣ Connexoon o
Ɣ Energeasy connect (Rexel) chazı
Ɣ Nna
Ɣ Io-homecontrol uzaktan kumandalar (Stuo Varaton dahl)
TANIM
PROG
CFG
A B C D E
F
G H
Tanım Kablo İşaret
+ grş (IN+) Mor A
- grş (IN-) Turuncu B
Çıkış (OUT) Syah C
Besleme Nötr N Mav D
Besleme Faz L Kahvereng E
Çok renkl LED - F
PROG tuşu (eşleştrme) - G
CFG tuşu (konfgürasyon) - H
Eğer alıcının kablosunu tekl br basmalı tuşa bağlayacaksanız IN+ grşn
VEYA IN- grşn kullanınız.
Eğer alıcının kablosunu çftl br basmalı tuşa bağlayacaksanız IN+
grşn VE IN- grşn kullanınız. Bu durumda IN+ grşne bağlanmış
olan basmalı tuş ışık şddetnn MAX yönünde değştrlmesn ve IN-
grşne bağlanmış olan dğer basmalı tuş da ışık şddetnn MIN yönünde
değştrlmesn sağlar.
MONTAJ
Montaj öncesnde şebeke beslemesn elektrk panosundan kesnz.
Ürünün bağlantısı yapılırken montajın yapılacağı ülkede geçerl olan
elektrk tessat normlarına ve yönetmelklerne mutlaka uyulmalıdır.
IN+ ve IN- grş kabloları şebekeden zole edlmemştr.
IZYMO™ o LED Dmmer alıcısının şebeke besleme gerlm 220-240V AC,
50Hz, Faz ve Nötr şeklnde olmalıdır.
Aşağıdaklerden brnn çne monte edleblr:
A) Duvara monte anahtarın arkasına konumlandırılmış ankastre kutuya
(en az 50 mm dernlk veya mkro modül yuvası le brlkte), eğer faz ve
nötr kabloları mevcut se:
B) Tavandak aydınlatmanın daresel kapağının altına:
C) Br dağıtım kutusu:
KABLO TESİSATI VE KULLANIM
A) Paralel bağlanmış br veya brkaç tane basmalı tuşun kablo tessatı