* Except for Nollh American nlodd
IN----
N---
N--
k
- 7
---N
---N
--N
--[]
[]
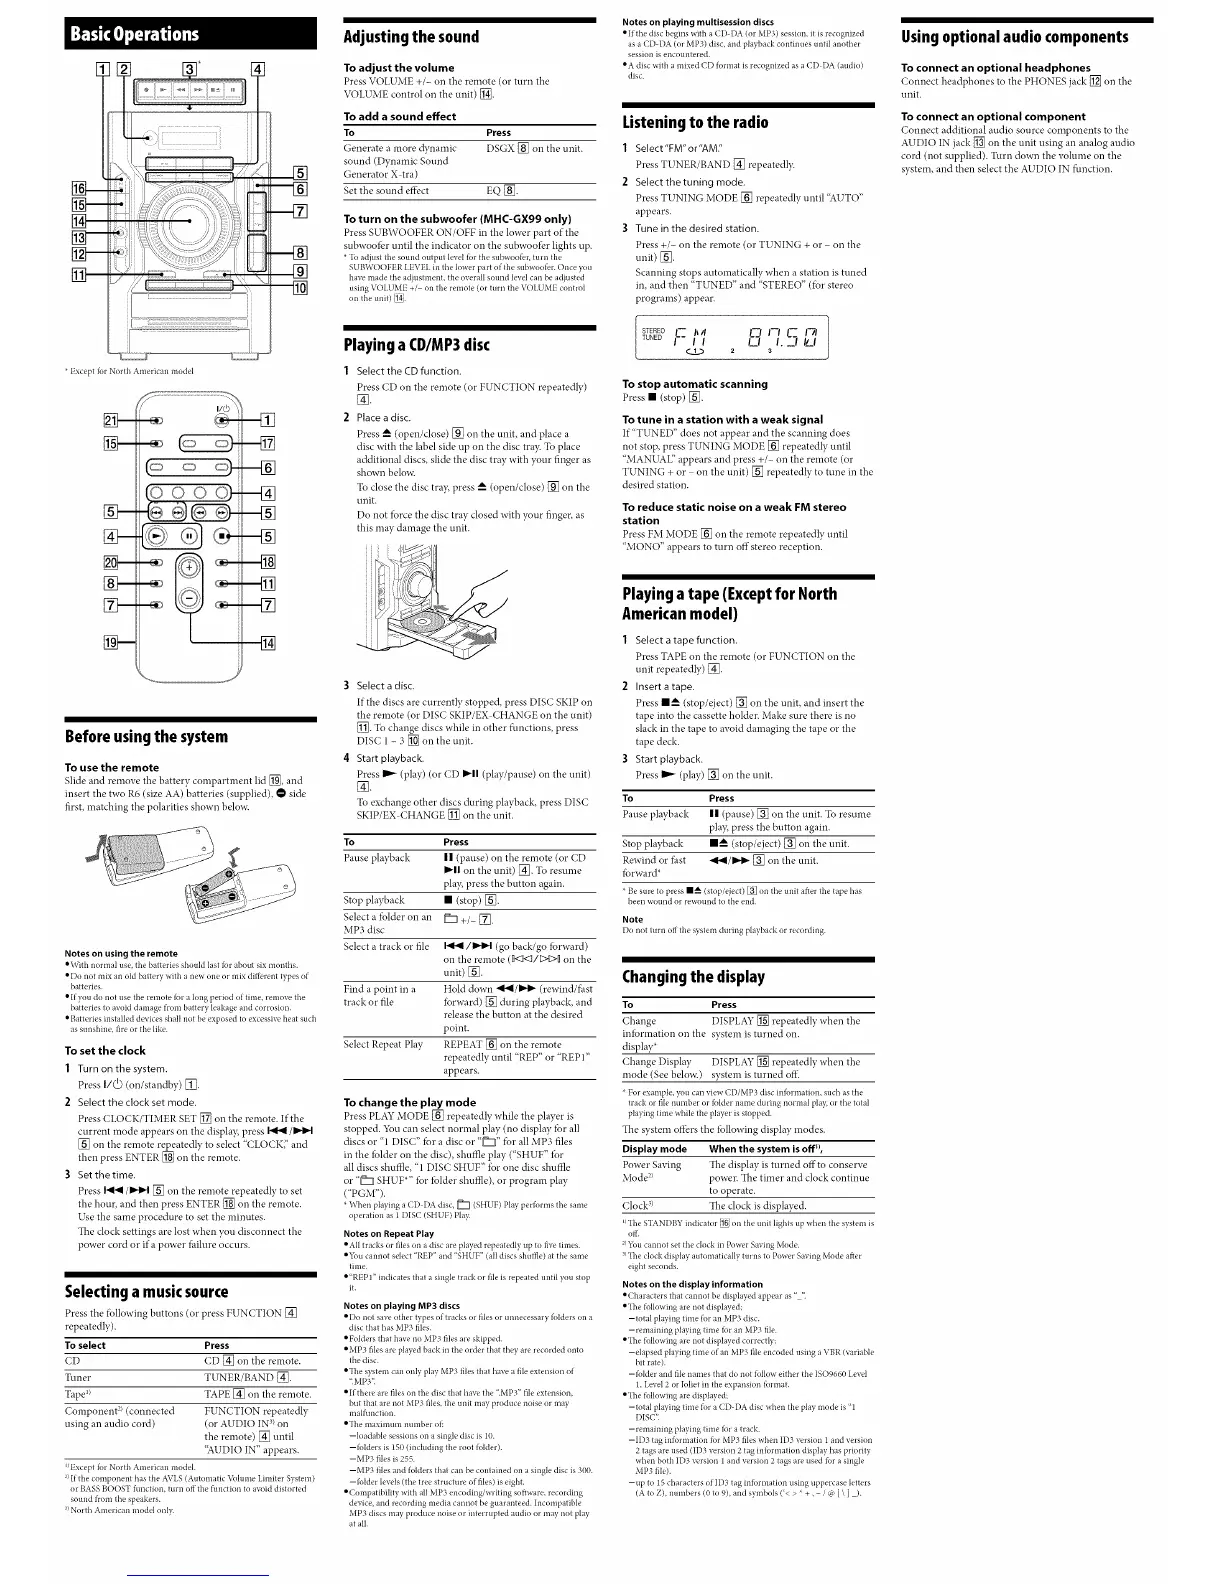
Before using the system
To use the remote
Slide and remove the battery compartment lid _, and
insert the two R6 (size AA) batteries (supplied), • side
first, matching the polarities shown below.
Notes on using the remote
eWiih nornlal use, the batteries should last for about six months.
• Do not mix an oht batlerv with a new one or mix diflerenl types of
batteries.
• If you do not use the remote for a king period of time, remove the
baneries to avoid damage from banery leakage and corrosion.
• Batteries installed devices shall not be exposed to excessh_, heal such
as smlshine, fire or the like.
To set the clock
1 Turn on the system.
Press1/_) (on/standby) [_.
2 Select the clock set mode,
Press CLOCK/TIMER SET [_ on the remote. If the
current mode appears on the display, press _/I_M
[] on the remote repeatedh/to select "CLOCK;' and
then press ENTER [_ on the remote.
3 Set thetime.
Press I_</IHM [] on the remote repeatedly to set
the hour, and then press ENTER [] on the remote.
Use the same procedure to set the minutes.
The clock settings are lost when you disconnect the
power cord or if a power failure occurs.
Selecting a music source
Press the _llowing buttons (or press FUNCTION []
repeatedly).
Toselect Press
CD CD [] on the remote.
Tuner TUNER/BAND [].
Tape_t TAPE [] on the remote.
Component 2)(connected FUNCTION repeatedly
using an audio cord) (or AUDIO IN3/on
the remote) [] until
"AUDIOIN" appears.
_)Except forNorthAmericanmodel.
2) If the component has the AVLS (Automatic Volume I.imiter System)
or BASS BOOST function, turn off the function to axx)id distorted
sound from the speakers.
_) North American modal onl):
Adjusting the sound
To adjust the volume
Press VOLUME +/- on the remote (or turn the
VOLUME control on the unit) [].
To add a sound effect
To Press
Generate a more _narnic DSGX [] on the unit.
sound (Dynamic Sound
Generator X tra)
Set the sound effect EQ [].
To turn on the subwoofer (MHC-GX99 only)
Press SUBWOOFER ON/OFF in the lower part of the
subwoof_r until the indicator on the subwoofer lights up.
* "Ib adjust the sound output level for the subwoofei; turn the
SUBWOOFERLEVELin the lowerpart of the subwoofer.Onceyou
havemadetile adjustment, the overallsound levelcan beadjusted
usingVOI.UME+/ on the remote (orturn fl_eVOI.UMEconhol
oil the unit) _.
Playinga CD/MP3disc
1 Select the CD function.
Press ('D on the remote (or FUN('TION repeatedly)
[].
2 Placea disc.
Press A (opeu/close) _ ou the uuit, aud place a
disc with the label side up on the disc tra?c To place
additional discs, slide the disc tray with your finger as
shown below.
To close the disc tra); press A (open/close) [] on the
unit.
Do not force the disc tray closed with your finger, as
this may damage the unit.
3 Select a disc.
If the discs are currently stopped, press DISC SKIP on
the remote (or DISC SKIP/EX CHANGE on the unit)
[_. To change discs while in other flmctions, press
DISC 1 - 3 [] on the unit.
4 Start playback.
Press _ (play) (or CD I_11 (play/pause) on the unit)
[].
To exchange other discs during playback, press DISC
SKIP/EX CHANGE [] on the unit.
To Press
Pause playback II (pause) on the remote (or (21-)
I_11 on the unit) []. To resume
play, press the button again.
Stop playback • (stop) [].
Select a fblder on an if2? +/ [Z].
MP3 disc
Select a track or file _/1_,4 (go back/go lbrward)
on the remote (I]<1<t/_>C>Don the
unit) [].
Find a poiut iu a Hold down <41/1_- (rewind/filst
track or file forward) [] during playback, and
release the button at the desired
point.
Select Repeat Play REPEAT [] on the remote
repeatedly until "REP" or "REP 1"
appears.
To change the play mode
Press PLAY MODE [] repeatedly while the player is
stopped. 52}u can select normal play (no display lbr all
discs or "1 DISC" fbr a disc or "_" fbr all MP3 files
in the lblder on the disc), shuffle play ("SHUF" lbr
all discs shuffle, "1 DISC SHUF" lbr one disc slmffle
or "D SHUF*" fbr lblder shuffle), or program play
("PGM").
*Whenplayinga CD DA disc,_ (SHUF)Playperformsfilesame
operation as 1DISC(SHUF) Pla}=
Notes on Repeat Play
• All h'acks or files oil a disc are played repeatedly up to fix_.times.
• You cannot sdecl "REP" and "SHUF" (all discs shuffle) at the same
time.
• "REPI" indicates that a single track or fileis iepeaied until you stop
it.
Notes on playing MP3 discs
• I)o nut sa_. other types of tracks or files or unnecessary fohiers on a
disc fl_at has MP3 files.
• Folders fl_athave no MP3 files are skipped.
• MP3 files are played back in it_e order that they are recorded onto
the disc.
• "Ihe s}vatemcan only play MP3 files fl_at have a file extension of
2MP3".
• If there are files on the disc that have the ".MP3" file extension,
but tt_at are not MP3 files, it_eunit may produce noise or may
malfunction.
• "Ihe maximum number of:
--loadable sessions on a single disc is 10.
--tiMers is 150 (including lt_etool folder).
--MP3 files is255.
--MP3 files and folders fl_at can be contained on a single disc is 300.
--folder levels (the tree structm'e of files) is eight.
• Compatibility with all MP3 encoding/writing software, recording
device, and recording media cannot be guaranteed. Incompatible
MP3 discs may produce noise or interrupted audk) or may not play
at all.
Notes on playing multisession discs
• If the disc begins with a CD DA (or MP3) session, it is recognized
as a CD DA (or MP3) disc. and playback continues until another
session is encountered.
• A disc wilh a mixed CD format is recognized as a CD DA (audio)
disc.
Listening to the radio
I Select"FM" or"AM5
Press TUNER/BAND [] repeatedly.
2 Selectthetunin 9 mode.
Press TUNING MODE [] repeatedly until "AUTO"
appears.
3 Tune in the desired station.
Press +/ or] the remote (or TUNING + or on the
unit) [].
Scanning stops automatically when a station is tuned
in, and then "TUNED" and "STEREO" (fbr stereo
programs) appear.
STEREO]--2 h/I I_-£1I--I I..'_ 1-71]
TUNED-- I I I__l a I. _l ILl
J
2
To stop automatic scanning
Press • (stop) [].
To tune in a station with a weak signal
If"TUNED" does not appear and the scanning does
not stop, press TUNING MODE [] repeatedh/until
"MANUAL" appears and press +/- on the remote (or
TUNING + or on the unit) [] repeatedly to tune in the
desired station.
To reduce static noise on a weak FM stereo
station
Press FM MODE [] on the remote repeatedly until
"MONO" appears to turn off stereo reception.
Playinga tape (Exceptfor North
Americanmodel)
I Select a tape function.
Press TAPE on the remote (or FUNCTION on the
unit repeatedly) [].
2 Insert a tape.
Press I_ (stop/eject) [] on the unit, and insert the
tape into the cassette holder. Make sure there is no
slack in the tape to avoid damaging the tape or the
tape deck.
3 Start playback.
Press D_ (play) [] on the unit.
To Press
Pause playback II (pause) [] on the unit. To resume
pla?; press the button again.
Stop playback •_-- (stop/eject) [] on the unit.
Rewind or fhst _l_l/b't_ [] on the unit.
fbrward*
* Be sure lo press I_ (stop/ejed) _ on lt_e unit after the tape has
been wound or rewotlnd lo the end.
Note
Do not turn offti_esystemduringplaybackorrecording.
Changing the display
To Press
Change DISPLAY [] repeatedly when the
inlbrmation on the system is turned on.
display*
Change Display DISPLAY [] repeatedly when the
mode (See below.) system is turned oK
* For example, you can view CD/MP3 disc infornlatkm, such as the
track or filenumber or kdder nameduring normal play.or the total
playingthne while lt_eplayerisstopped.
The system offers the lbllowing display modes.
Display mode When the system is off _1,
Power Saving The display is turned off to conserve
Mode 2) power. The timer and clock continue
to operate.
Clock )) The clock is displayed.
_)'{he S]2a_NI)BYindicator 36! oil the unit lights up when the system is
2)You cannot set lhe clock in Power Saving Mode.
3)-[he clock display automatically hnns 1o Power Saving Mode after
eight seconds.
Notes on the display information
• Characters that cannot be displayed appear as" ".
• "[he following ae nol displayed;
-tolal playing lime for an MP3 disc.
-remaining playing lime for an MP3 file.
• "[he following are not displayed correctly;
-elapsed playing lime of an MP3 file encoded using a VBR (variable
bfl rare).
-folder and file names that do not follow either lt_e ISO9660 I.ex_,l
1, Level 2 or Joliet in the expansion formal
• "lhe fullowing are displayed;
-total plwing time R)r a CD DA disc when the play mode is "1
DISC".
-remaining playing lime for a track.
-ID3 tag information for MP3 files when ID3 x_,rsion 1 and version
2 lags are used (ID3 version 2 lag information display has priorfly
when both ID3 x_,rsion 1 and x_,rsion 2 lags are used for a single
MP3 file).
-up 1o 15 characters oflD3 tag information using uppercase leners
(A to Z), nmnbers (0 to 9), and symhols ('< > * +, / @ [ \ ] ).
Usingoptional audio components
To connect an optional headphones
Connect headphones to the PHONES jack [] on the
uuit.
To connect an optional component
Connect additional audio source components to the
AUDIO IN jack [] on the unit using an analog audio
cord (not supplied). Turn down the volume on the
system, and then select the AUDIO IN fimction.
 Loading...