SONY.
4-742-991-01(1)
';,I
:::1-7-(
";//j'/j'
1)
'Y
7'
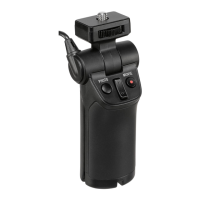
Shooting Grip
Poignee de prise de vue
CbeM04Hbllil
3a)KI!IM
Py4Ka
A1151
3VlOMKI!I
=ll!ll~ffitJl¥@3
INt.&~EIJ:I~/Ope
rating
instructions/
Mode
d'emploi!Manual de instrucciones/
Bedienung
sa
nleitung/Gebruiksaanwijzing/
Bruksanvisning/lstruzioni per
l'uso/
ln
st
ruc;Oe
s de
opera~ao/06•Wl£<;
AE
LToupvlac;/
lnstrukcja obsfugi/Nilvod
na
obsluhu/
Kezeh~si
Utmutat6/lnstructiuni de utilizare/
Betjeningsvejled
ning/Nil
vod k
pouiiti/
Kaytt6ohjeet/li1HCTPYKU.Ir151
no
3KcnnyaraU.H
ir1/
lHCTPYK~ii
'
3
eKCnnyara~iil{iei!J~IIJl
i!!
/
1l!F!li~B!l'!'l!At~Hj~;,j;~l
c.L.,J.;
©
2018
Sony Corporation
Printed in China
https:/
/www
.s
ony
.
net/
,•
'
'··
..
:····
..
,
11111111111111111111111111111
4742991010
5
• :;t
Hl
l
j:'./=-t!t-T>I9J
l-.ATJ
L.
:b
;I5Q)
-
f!B
O)tli~
I
;::W~OJHl':t.i:;.,.::t
-
7-1'
/J:fl:f
iJ
•)!-:/
"
"·
*W
i
;::~t'fP.TiitfJ"f.J;;I71;::-:>\,\L
I;t
,J;I,."f0)1t
..(1---C<:Ur~<t.:~\..'
•
https:l
/www.sony.netldics/sgr1/
•
lj\l
j
~W:-~itl;;{_~.t_,Q"IJ
•v
'/'
1J
iii!J;fl
f,:~JI"6:fJi
L
t;:.
~J"t
~t:;-t-tttJI;;;(;
~"t.
•
1!1
,,_
1!1.
..
•
~TIL::J-~~tUt"t~~l<t,-09!:CII!TO)rPJ~'i:RUlL
-cb,S.
::J-
1-=,Z;:i;
-:;9¢1L:El
L<
ti";!l..l
.
$:J!I;:ta:~:e:l-!t~t.~T:?Ji
O)fj:jiO)@~
IL
f;J.~J;t:"t
.
•
:J-
f-:tJ\~1..\!i~l;:t
,
:::1
-
1-.:"?
"5
/J
'\-
(a)!L
I<t
;!ful
·(
ti
-;!1..1,
•
"/
1
)
·v
7'0)
ftl~,Z~fl""t~t.
;:.
l;:ttg§U
J!I~#-9Y~B'~ILt£!1li6
1v
L"ti
'S
fTI..
'.
iJI!i'H
ittfto!M~If£#9
YtJI~>J:;:.
-:;t;:_Z:.
t.~
Ol~L
LfJlf,ffJfll
L(
t0:;!1..1.
~IJl
}Jl~
~#-9/
tJ\~f,
f~\..'~il"IJ:,flJIJf.
.a-~m!~LL(tO:;!\..
\
•
Jjl)
y
::;fO)~§r'ILJ:-:~"'(I;:t
l)t
::J
/Jff!:tJil:'~f~\..
l
ijj\iftJi;;;()
;j:
"t
.
i-0)~"8-l<l:!fiJ
'Y
-;hDfilJt1t:!ij~1JlfelTt:>ifl..l(
t0:;!\..l
,
•
=JII.liO)IftjNJ~;pJ:tf?"
1
J•!!7'0)1'IJ
J¥fll!iHii'K.
tli
'i:l;:t;!;t:
t,:
\..'J:?
t:).t1ll
-r<t2;!
\..l.
•
=JII.lltlLffffl"fl>C~I:t
.
-JI!P~;;'C:i:
I
L/1>
1
1-c.*-.;p:t~IIPJTL"<:"ff
ffl<t
i.";!
~\
.
~O)f.J"}.-5
i:J"O)fll/Jr"t><:"ftfflO)"jJ
"}.
5
1L
J:
-:;LI;I.:./(5 /
AfJ\JN:h.
"f
=)JI.lJtJ
I
::>f9:::'EILt.il>JiB'tJ
l
;t5>J3;"V"
,
1'Y:Ai::t~
:j;l\~l:'
l
;!.ifJfllf~I..'""C
·(
tC.;!I..l
.
-
'iJ"}.51
L7?'t
i:t
1
J-
~-:J
i
t
-c.:::·
fffflO)i;i51;t
,
J(
"5/
A1t:~/H.
iil~l
T<
t2;!1..
l,
7'/1::-+f
i)-I
LJ::::>LI;t
,j'f,ffl"('-
~
t~~~
.ilift,
S(J309.
- .!i ·
f.i!liJJt.i:
~l."E;@J
O)t:;.Z.:h.O)S.@±;ffi
l:'
O)<::~J
lH
ii!il
t
L
<
tC.
;!
\..1
,
•
7J"J.7
i;
:Hi;;t:l;:l!J(>Jf;t
l
tT<tC.;!~\
1J"J.?tJl'fE't:,l>f~C.
L
T.~i!N-t>l
t
tJ
i
O)~[z:;ltt~~
Z:
.!:::tJ\~>J;i:"t
.
•
7J"J.7~&
~M~
k;t:*.Mts~~4l.'~<~;!l.'.
• ;J;'t
lf;:_
'
)
.)W'(;ttJ
i
tJ11:JI:;.f;:_~J
l.,f~\..IJ:
3 1L
l\..l.t;).\..I
[L
jb
bT(
t;3,
;!l..l,
•
i§:Ji8J\':O)~/.:::l>t<:3-t>lli.i/161i~O)i'lifJ~i!ffi/.lO)iCJ\..I.!:::L3.
).IJ1.9(11)%-\,I.t_<:31L
I;t8'1Jifjl,.l('(f<3_;!\..l,
•
<::
'
if'Jflt1i:
l
;t:b"J.
7
tJ
'f,
l
;t
9l31/i.ilO)
;f,
- T I
L1IliJA
l -rii-t'fL
T<
1 PHOTOif-9/
$1'!1
l L
T~/
t--~
SbtL1'1<¥!1li2,1u
t>Jil;: L
;t"t,
2 ;:(-.L..;ti-$'/
#9
/~¥lilt;:~.!::.~~
ILI!fl
Ll.6,
t;
tiJI:<
;:(-b."t
l><:..
t:tJl
T:
~
3;1",
;(
-
b,O)Jill/.t
J
;:t:f.J"}."5
1
LJ:()~fJ>J;i:"t
.
t:>til!:l'O).IJifili
J;::
J;:-:~
Tl;t. A -
b.;tf-9
/lj:~lf!C·~
;t:trlv
.
3
MOV
IE;ff
-9:;
4 A
f-.'5
•!!:1'1\
~ T
WJ'll:O)t.:<Y.l.J\:,_;
~A
f-.7'Y:1~1lJUJM
it,=f'i:ilil
T<::"~Jfl
< ti";!'ll,
5 fllf!l!'!l!il:ti
-9/
:£t.i:i±~
Man~7~~uaaa~e
..
,
1
kg
.l;AT(
ii!H!J
i'l1)11l!a-tl
IJ:e~:.-•c:
PHOTO
#?'/.
MOV
IE;ti-9:;.
;(
- b.;f,'-$'/ (
WIT)
.I'Filllf'
0-40"(
t~JUviiiii/Ji~'llff;!HI'll
'
lN~l*!r\1
36.1
mmx108.3
mmx34.6
mm
.=m.t:A:®
105
.7
mmx82
.5
mmX92.2
mm
•J:e-1--~-t=O>A-;tlatJ):
240m
m
!!AII'll'
93g
IIIIIWJ'
:'l':J.
-T-1
:_,lj'Jjl) '!I
::1(1).;\/
~'A
l--
"5·!1
:1(1). :::1-
f-:Q-5/J(
-
(1
),
7!f-T(
1
l .
f.!JJt'I
J
~ -
A
1
±~<15J:tf7H!l
l
<t.~&<T.lf;:_<Y.J-fr~tJ
<
lr:~
~.Q
L
.!:::.f.l\~1-J
;t:
-
~f.l\,
<:"77f.<ti:.~ll,
f¥iiil.!::
77
-$>-if-
I::'
.A
iliiEtl
•
Z..O)~~I<:I;ti'f;&[@ttJ
\
~ft";!:hT~';t9<T.lT:.<I5~\..1..t.
l
fO)~.}.;
~
lt
l&
~
J<t<3.;!\..l
,
•
ffi>E!IHl'l:<T.l!CA<I:>J:lf:C~tP:rg~;t:;liltJ'6tJ0)5;;{_,*t})
l
<::f*
t'!l
L
<
t<3.;!1..\
•
f*MilJ:J
fllll;t
.t::iJi
l..'..tlf8J:IJ
1
£FrB,-c'~.
.
Tbl!ll'l:~l1*l"7-I'Y?~
<:
O'JINt&r.tt~W~
.:t:.
3
-
IJr.::'J{f;:tJ-:;Tt:;i;l,!lx<
t.:-;!
1..
1,
-ttl't:'t.
A-8
0>Bl'l:~l3:
'J
.::
-
O)ffi
!'J!.
:¥-DI
;:
<::·1€1~<
t
<3.
;!\..
l,
ftliJUIIIII~O>K~13:
ii-
g
iEaJJ~m;pgg(;:,M-:5\..'T1illll;!1:!T\..
l
1::::t.:~:t9
.
tf.L<I<t:f*
!it-B~<="n<tC.;!\..1,
illiiJUIIIIIUii~lfll!l>
glJ.
IL
J:
:JT~:IlHftJ
I
M:Ml'~.@Ji~
I;:
L
.:::
·
~~
I
;:J:
'Jl'it'l~!l";!ttl
\..ltc.fC.~3;9
.
fii!Ji,(l)iJ:ij'JUJr.QI;:?~'l':
~ti~l;t:<$;t:IIO)Mt!Jfl111f:S[l,§f,(t1.i.O)tflftl?:~*li:~"t.Qt
;:_
f/.JIL~~tJ
Bl!df!
)
%
.
!l!<I&Htsv.J~JU::~1lt5fFFJH~il~L
l:"l.
l;t:"t.
to:.tc.
L.
i!Ni!aO)
l*iRi'<T.l-ft!!O)~
t
i'ii<:J: ~J
.
~IJ.
I;:
~x_
l~~:SC~:.a:"t
~~iltJi®
lJ
;t:
"fO)
l';:"
7iJ(
fC.;!\..
\o
1*:J!JtiiFo,:f.Jilffj!il_.,f;:_it;.t_:(,,;!&~li!lffl
i
LJ:-:l
Tl;l:iiJ~iiJ/!t(l)i.gi;'tJ\3!)
') 3:90'Jl".
t:>:!"tl
\_tlfr.5tJ\ 'J .:: -
O);ffi!'l!,
~D
IL<::'
ffi'~<ti.
;!
l.\
,
o:-mlll!l;:t~.gc~l;t:;~(l);::
c~l.>JDS-tt<
ti
~\,\0
•
~~
VCT
-
SGR
1
• i'&IIOmtt®:
l"~.Qti.
lt
rtl
<
•
.E'Wll..t
lf:$-FJB
J:<®.Qnr,,~_.,-8-bi!.)i<
D
§l:ft~rB,,J~Ii
it
-
b./'o';--:;l~;::'ji5FJ:l(t0:";!ll
.
https
://w
ww
.
sony
.
jp/support/
71)
?f-{-\7)[.,
·.
. .
0120·333·020
ll!mlll!li
·PHS·
-[llOli
P'il!ii!
·
050·3754-9577
FAX·
.
.. ..
0120-333·389
!CfH-liJ--"I~f,!Cut
!fll-~JlCT:l:b-1?
/Af.l
;ff.:h.Tl
-3!Mll
'4
01
J+ #
i:lf!ll
LG
...
~
..
\
iPW:
tB~~n/'\.t>JtJ..otl
;f;"if
mnm;w
• Th
is
unit
is
Shooting Grip onto which some
modejs
of
the Sony digital still camera
can
be mounted.
For
the camera models available f
or
mounting onto the
Lln
it, visit the website at
https:l/www
.so
ny.net/dics/sgr1/
• If the weight
of
the mounted camera exceeds
the upper weight limit
of
this unit, the unit may fall over,
resulting in damage.
• Before you connect the cable to the terminal, be sure to check
the orientation
of
the terminal. Then, insert the cable straight
Do not insert or remove the cable forcefully. This may cause the
termin
al
part to break.
•
If
the remote control cable
is
excessively long for usage, fold
the cable and secure it with the cable clamper(a).
•
To
adjust the grip angle, press the angle adjusting bunon all
the way down. When you
are
finished with angle adjustment,
make sure that the button pops completely back out before
you use
th
is unit.
If
not,
fi
fle-tune the grip angle until the
button
pops out.
• Depending on the grip angle, remote
con
tr
ol
of the mounted
camera may fai
l.
In
such a
case,
adjust the grip angle once
agalfl.
• When opening/closing the legs
of
this unit or adjusting the
grip angle, keep your finger{s) out
of
the way
to
avoid the risk
of
being caught.
• When using
th
is unit
as
a tripod:
- Spread its legs to full extent and place the unit on a flat
surface. Depending
on
the angle
of
the camera seat or the
mounted camera, the unit may lose its balance and wobble
Do
not use the unit
if
it
wobbles.
- Check
if
the
unit
stays balanced once again after you have
attached an accessory to the mounted camera. Depending
on
th
e anached accessory, the camera may not fit for use
wit
h the unit.
-
Do
not place
th
is unit in a place subject to blowing wind or
vibrati
on
to
avoid the risk
of
falling over.
• Make sure
th
at your camera
is
securely mounted
on
this unit
to
avoid the risk
of
dropping
off
and causing an accident
or
injury.
• Do not carry around this unit while your camera is mounted
• Handle this unit with care to avoid the
ris
k of dropping it
or
lettiflg
it
exposed
to
liquid.
• Do n
ot
leave this unit
in
a place subject
to
direct sunlight,
high temperatures (for example, near a heat sour
ce),
or
high
humidi
ty.
• When you
are
finished with using this unit, dismount the
came
ra
and
st
o
re
the unit
in
the supplied pouch.
Identifying
the
parts
1
PHOTO
button
Press
the button halfway
down
to focus, and then press
it
all
the way
down
to shoot a
st
ill image.
2 Zoom button
Press
the button to zoom in.
To
incre
ase
the zooming speed,
press it further. The zooming speed depends on the zooming
capability
of
the mounted camera. Depending on the mounted
camera, the Zoom button may not work
3
MOVIE
button
4 S
tr
ap hole
Attach the hand strap and place your hand through the loop
to
prevent damage caused by dropping the product.
5 Angle adjusting button
Specifications
Total
weight
of
the
mounted
camera
and
its accessories:
Maximum!
kg(3S.3oz)
(Including batteries and other accessories)
Remote
commander
functions:
PHOTO
button,
MOVIE
button, Zoom button (WIT)
Operating
temperature
:
o
to
40
·c
(32
to
104
QF)
Dimensions
(W/H/0)
(Appro
x.):
Legs
folded:
36.1
mm
x
10B.3
mm
x 34.6
mm
(17/16
in.
x 4
3/B
in
. x 1
3/8
in
.)
Legs spread:
10S
.7
mm
x 82.5
mm
x 92.2
mm
(4114 i
n.x31/4
in.x33/4in.)
length
of
th
e remote control cable
(Approx
.
):
240mm(9112in.)
Mass {Approx.):
93g{3.3oz)
Included
item
s:
Shooting Grip
(1),
Hand Strap
(1).
Cable Clamper
(1),
Pouch (
1),
Set
of
printed documentation
Design and specificatio
ns
are subject
to
change
wi
thout notice.
1
#FJ.B411
•
Cet
appareil est une poign€e de prise de
vuesurlaquellepeuventet
re installi!s
certains
modE!Ies
d'appareils pho
to
num€riquesSony.
Po
ur savoir les
modE!
I
es
d'appareils photo
compatibles, visitez
le
site internet a
l'adresse:
https:l/www.sony.net/d
ics/sgr1/
•
1!1
,,_
1!1
.
..
• Si le poids de l'appareil photo qui
es
t install€ d€passe
Ia
lim
ite
de poids autorisee pour cet apparei
l,
l'appare
il
risque de
tomber et de s'endommager.
• Avant de brancher
le
cable au connecteur, assurez-vous de
verifier
I'
orientation du
co
nnecteur. Branchez ensuite
le
c.'ib
le
tout
droit.
Ne
forcez pas tors du branchement
ou
du retrait du
c.'ible.
To
ute force excessive risque de briser le connecteur
•
Si
le
cSb
le de
Ia
telecommande
es
t trop
lo
ng, pliez-le puis fixez-
le correctement a
I'
aide du serre-dible
(a)
•
Pou
r regler l'angle
de
prise, appuyez a fond sur
le
bouton de
ri!glage d'angl
e.
Une
fois
le
reglage de
I'
angle de prise termin€,
assurez-
voUs
que le bouton revient en position initiale avant
d'ut
iliser
ce
t appareil.
Dans
le
cas
contraire, affinez
I'
angle de
prise jusqu'a
ce
que
le
bouton ressorte completement.
• Selon
I'
angle de prise,
Ia
teiE>commande
de l'appareil photo
qui e
st
inst
al
l€ peut ne pas fonctionner.
Dans
ce
cas,
r€gl
ez
de
nouveau l'angl
ede
prise
•
lors
de l'ouverture ou
Ia
fermeture des pieds de cet appa
re
il
ou
le
reglage de ('angle de prise,
€1oignez
vos doigts pour evi
le
r
tout pincement.
•
Lo
rsque cet appareil est utilise comme
trepied:
- Sortez compiE!tement l
es
pieds et placez l'appareil sur une
surface plane.
Se
t
on
I'
angle du socle de l'appareil
pho
to
ou l'appareil photo lui-meme, l'appareil risque de perdre
l'i!quilibre et de bouger. N'utilisez pas l'appareil
s'
il bouge.
- verifiez de nouveau
si
l'appareil est equilibre a pres avoir
install€ un accessoire sur J'appareil photo. Selon l'accessoi
re
install€, ('utilisation de l'appareil photo risque de ne plus etre
possibleaveccetappareiL
-
Ne
placez pas eel appareil dans un endroit expose a des
rafales
de
vent ou des vib
rati.o
ns afin d'eviter tout risque de
chute
• Assurez-vous que l'appareil photo
es
t correctement install€
sur
cet appareil pour i!viter
tout
ris
que
de
ch
ute et de provoquer
una
cc
ident oudesblessures
•
Ne
transportez pas cet appareil sur lequel est install€ vot
re
appa
re
il photo
• Manipulez cet appareil avec precaution pour eviter
tout
risque
de chute ou exposition a un liquide
• Ne laissez pas
ce
t appareil dans un endroit expose a
Ia
lumiE!re
directe du solei
!,
a des temperatur
es
E>levees
(pres d'une sour
ce
de chaleur par exempl
e),
ou
a un taux
€1eve
d'humidite
• Lorsque vous avez termine d'utiliser cet appareil, ret
ir
ez
l'appareil photo puis rangez cet appareil dans
Ia
pochette
fournie
Description des
elements
1 Touche
PHOTO
Appuyez
ami
-course sur Ia touche pour
Ia
mise au point puis
appuyez
a fond pour prendre une photo.
2 Touche
de zoom
Appuyez
sur
Ia
touche pour faire un zoom avant. Pour
augmenter
Ia
vitesse de zoom, appuyez un peu plus sur cette
touche.
La
vitesse de zoom varie selon Ia capaciti! de zoom de
l'appareil photo install€. Selon l'appareil photo,
Ia
touche de
zoom peut
ne
pas
fonctionner.
3 Touche
MOVIE
4
Tro
u
desangle
Fixez
Ia
sangle puis passez une main dans
Ia
boucle afin
d"eviter de
fa
ire
tomb
er
le
produit et de l'endommager
S Bouton de reglage d'angle
Specifications
Poids
total
de
l'apparell
photo
install€
et
de
ses accessolres:
Ma~imum
1
kg
(3S,3
oz)
(Avec les batteries/piles et d'autres accessoires)
Fonctions
de
Ia
tetecommande:
Touche
PHOTO,
Touche
MOVIE,
Touche de zoom (WfT)
Temperature
de
fonctlonnement
:
de
o a 40
·c
(32 a 104 'F)
Dimensions (LJHJ
P)
(environ):
Pieds plies:
36,1
mm
x 108.3
mm
x 34,6
mm
(1
7/16 po. x 4 3/B po.
"1
3/8
po.)
Pieds sortis:
10S,7
mm
x
B2,S
mm x 92.2
mm
(41/
4 po. x
3114
po. x 3
3/
4 po.)
Longueur
de
cab
le
de
Ia t€1€commande
(environ):
240
mm
(91/2
po.)
Poids
(environ):
93g(3,3oz)
Articles
indus:
Poignee de prise de vue
(1),
Sangle (1
),
Serre-c.)ble
(1),
Pochette
(1)
, leu de documents imprim€s
La
conception et les specifications peuvent etre modifil!es sans
preav1s
U-6"'"'
•
Esta
unidad
es
una
Em
pufiadura de disparo
en
Ia
que
se
pueden montar algunos
modelos de ciimara fotogratica digital de
Sony
Para
los modelos de cilmara disponibles
para montar ell
Ia
unidad, visite el sitio web:
https://www.sony.netldics/sgr1/
•
1!1
,,_
1!1
.
..
•
Si
el peso de
Ia
ciimara montada e
xc
ede
el
limi
te
superior de
peso de
es
ta
unidad, esta puede caer y dai\arse.
• Antes de conectar
el
cable
al
terminal, asegUrese de comprobar
Ia
orientaci6n del terminal. Despu€s. inserte
el
cable recto.
No
inserte ni extraiga
el
ca
bl
e a
Ia
fuerza.
Esto
podria hacer que
se
rompieseel terminaL
• Si
el
cable de control
re
mote resulta demasiado largo para
utilizarse. doble y fijelo
con
Ia
abrazadera
pa
ra cable (a)
•
Para
ajustar
el
ilngulo de Ia empur'iadura, presione a fondo
el
bot6n de ajuste del tmgulo. Cuando haya terminado
con
el
ajuste d
el
iingulo, asegUrese de que
el
bot6n satga
completamente antes de utilizar esta unidad. Sino
es
asi,
ajuste
con
precisiOn el angulo
de
Ia
empufiadura hasta que el
bot6
nses
alga
• Dependiendo del tmgulo
de
Ia
empui'ladura, el control remoto
de Ia camara montada puede
fa
liar.
En
tal caso, vuelva a ajustar
el
angulo de
Ia
empur'iadura
• Cuando abra/cierre
la
s patas de esta unidad o ajuste el iiogulo
de
Ia
empufiadura, mantenga los dedos alejados para evitar
el
riesgo de pill.!irselos
• Cuando utilice esta unidad como tripode:
-
Ext
ienda
sus
patas al maximo y coloque
Ia
unidad
sa
bre una
superficie plana. Dependiendo del iingulo de asiento de
Ia
camara o de
Ia
camara montada,
Ia
unidad puede perder el
equilibria y tambalearse.
No
utilice
Ia
unidad
si
se
tambal
ea.
- Vuelva a comprobar
si
Ia
unidad permanece equilibrada
despues de haber conectado un accesorio a
Ia
cilmara
montada. Dependiendo del accesorio conectad
o,
es
posible
que Ia ciimara
no
sea
apta para utilizarse con
Ia
un
id
ad
-
No
coloque esta unidad en un Iugar
ex
pu
es
to
al
viento o a
vibraciones para
ev
itar el riesgo de caidas.
• AsegUrese de que
su
cama
ra
est€ bien montada en esta
unidad para
ev
itar
el
riesgo de cafdas y de provocar accidentes
olesiones.
•
No
lleve esta unidad consigo mientras
su
ciimara est€
mon
ta
da.
• Manipule
esta
unidad
con
cu
idado para evitar el
ri
esgo de que
secaigaoseexpongaallq
uidos.
•
No
deje
es
ta unidad en un Iugar expuesto a Ia Juz directa del
sol, altas temperaturas (por ejem
pl
o,
cerca
de una fuente de
cal
or) o humedad elevada
• Cuando haya terminado de utilizar esta unidad, desmonte
Ia
cilmara y guarde
Ia
unidad en Ia balsa suministrada.
ldentificaci6n
de
las partes
1 Bot6n P
HOTO
Pulse
el
bot6n hasta Ia mitad para enfocar, v despues pUiselo a
fonda para tamar una fotografia
2 Bot6n de zoom
Presione el bot6n para acercar/alejar.
Para
aumentar
Ia
velocidad de acercamiento/alejamiento, presi6nelo mils.
La
velocidad de acercamiento/alejamie
nto
depende de Ia
capacidad de acercamiento/alejamiento de
Ia
cama
ra
montada
Dependiendo de
Ia
cilmara montada,
el
bot6n de zoom puede
nofuncionar
3 Bot6n
MOVIE
4 Orificio para correa
Fij
e
Ia
correa para Ia mano y coloque
su
mane a trav
es
dellazo
para
ev
itar dafios causados
porIa
caida del producto.
S Bot6n de ajuste del iingulo
Especificaciones
P
es
o
total
de
Ia c.lmara v sus accesorlos:
1
kg
como milximo (lncluyendo bater/as y otros accesorios)
Funciones
del
controlador
remoto
:
Bot6n
PHOTO
, Bot6n
MOVIE.
Bot6n de zoom
{WI
T)
Temperatura
de
funclonamlento:
Oa40"C
Oimensiones
(an/al!prf}
(aprox.):
Pa
tas plegadas:
36,1
mm
x 108,3
mm
x 34,6
mm
Patas desplegadas:
105,
7
mm
x
B2,5
mm x g2,2 mm
Longitud
del
cable
de
control
remote
(aprox.):
240mm
Peso (aprox.):
93g
Elementos lncluldos:
Empufiadura de dispa
ro
(
1),
Correa para
Ia
mane
(1),
Abrazadera
para
ca
ble
(1),
Balsa
(1),
Juego de documentaci6n impresa
El
disefio y las especificaciones estiln sujetos a cambia sin previa